Do you have a question about the Sony DCR-TRV50 - Digital Handycam Camcorder and is the answer not in the manual?
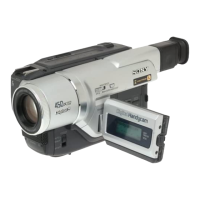
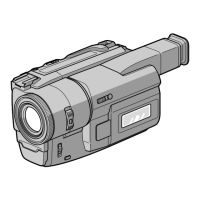
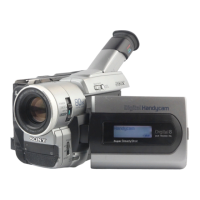
| Optical Zoom | 20x |
|---|---|
| Viewfinder | Color |
| Focus | Auto/Manual |
| Exposure Control | Auto/Manual |
| White Balance | Auto/Manual |
| Shutter Speed | 1/4 - 1/4000 sec |
| Microphone | Built-in stereo |
| Speaker | Built-in |
| Battery Type | Lithium-ion |
| Type | Camcorder |
| Image Sensor | 1/4-inch CCD |
| LCD Screen Size | 2.5 inches |
| Input/Output | S-Video |
| Battery Life | Approx. 3 hours |
Section to record model and serial numbers for future reference and dealer inquiries.
Covers recording/playing video and still images on tape and Memory Stick.
Details on transferring images from camcorder to computer via USB.
Instructions for DCR-TRV50 model to access the Internet using Bluetooth.
Details on exposure, image impact, natural appearance, and post-recording functions.
Explains the use of cassettes with memory and related functions.
Guidelines for cleaning and protecting the lens, LCD screen, and viewfinder.
Instructions for inserting and removing the battery pack, including large capacity models.
Detailed steps for charging the InfoLITHIUM battery pack.
Provides data on battery charging duration and recording/playback times.
Details on playing time with LCD closed and on LCD screen for various battery packs.
Explanation of the InfoLITHIUM battery pack technology.
Instructions for powering the camcorder via AC adapter and wall outlet.
Important precautions regarding the AC power adapter and its connection.
Notes on DST, summertime display, and consequences of not setting date/time.
Table listing time differences for various areas globally for clock setting.
Procedure for ejecting a cassette from the camcorder.
Instructions on how to slide the write-protect tab to prevent accidental erasure.
Important notes on using the touch panel, including cleaning and operation.
Notes on recording modes (SP/LP), LOCK switch, and smooth transitions.
Guidance on opening, closing, and adjusting the angle of the LCD screen.
Steps to adjust the brightness of the LCD screen using the touch panel.
Information on changing the LCD backlight brightness.
Instructions on adjusting the viewfinder lens for clear focus.
Information on changing the viewfinder backlight brightness.
Guidance on attaching the lens hood for better picture quality under strong light.
Instructions on using the power zoom lever and digital zoom.
How to use mirror mode to view oneself on the LCD screen.
Explanation of various indicators shown on the screen during recording.
How to use the backlight function for backlit subjects or backgrounds.
Using NightShot, Super NightShot, and Color Slow Shutter.
Details on using Super NightShot for brighter images in dark conditions.
How to use Color Slow Shutter for recording color images in dark places.
Notes on limitations and proper usage of these low-light functions.
Information on the NightShot Light's function and limitations.
Step-by-step guide to using the self-timer for recording.
How to locate the end of a recorded section after recording.
How to search for the next recording start point.
How to check the last recorded section of the tape.
Notes on end search functionality with and without cassette memory.
Notes on monitoring with the LCD screen and opening/closing the panel.
How to toggle screen indicators on/off using camcorder or remote.
Explanation of how date/time and settings are recorded and displayed.
Details on how to display and not display various settings during playback.
Overview of different playback modes like pause, slow speed, and frame-by-frame.
Notes on sound muting, mosaic images, and slow playback.
Guidance for connecting to TVs with VCR, monaural, or S-video jacks.
How to display camcorder indicators on the TV screen.
Notes on image stability, and functions unavailable during recording.
Details on image size, quality settings, and recording continuity.
Instructions on changing flash modes (auto, red-eye, forced) and flash level.
Guide to using the self-timer for still image recording on Memory Stick.
Details on flash usage for tape photo recording.
Instructions for setting up self-timer for tape photo recording.
Notes on limitations during tape photo recording, like mode changes and shaking.
Steps to revert white balance settings to automatic mode.
Guidance for using white balance in specific lighting conditions like studios or indoors.
Instructions to turn off the wide mode setting in the menu.
Lists functions unavailable when wide mode is active.
How wide mode pictures appear on TV via ID-1/ID-2 or S-video.
Describes the monotone effect for fading between black/white and color.
Lists functions incompatible with fader usage.
Notes on Bounce mode limitations and when the indicator does not appear.
Steps to turn off the picture effect setting in the menu.
Lists functions that do not work during picture effect.
Details on STILL, FLASH, LUMI, TRAIL, SLOW SHUTTER, and OLD MOVIE effects.
Steps to cancel the digital effect setting.
Notes on function compatibility and slow shutter/old movie modes.
Explanation of Spotlight, Soft Portrait, Sports Lesson, Beach & Ski, Sunset & Moon, Landscape modes.
Instructions to cancel the PROGRAM AE setting.
Notes on focus limitations, function incompatibilities, and color issues.
Steps to revert exposure settings to automatic.
Lists functions that do not work when exposure is adjusted manually.
How to return to automatic exposure from flexible spot meter.
Lists functions unavailable during flexible spot meter usage.
Steps to switch focus setting back to autofocus.
Using INFINITY focus setting for distant subjects.
How focal distance information aids focusing in difficult conditions.
How to switch focus back to autofocus.
Lists functions unavailable during spot focus.
Steps to cancel the interval recording function.
How to perform normal recording during the waiting interval.
Instructions to cancel the frame recording feature.
Steps to turn off the picture effect setting.
Notes on processing external input scenes and recording processed images.
Steps to cancel the digital effect setting.
Notes on compatibility and recording processed images.
Instructions to exit the PB ZOOM feature.
Notes on PB ZOOM limitations and when it is automatically canceled.
Notes regarding zero set memory cancellation and time discrepancies.
Instructions to stop the title search function.
Notes on using title search with or without cassette memory.
Instructions to stop the date search function.
Notes on date search accuracy and limitations with blank tape portions.
Procedure to search dates when cassette memory is not used.
Instructions to stop the photo search function.
Instructions to stop the photo search function.
Instructions to stop the photo scanning function.
Instructions for connecting camcorder to VCR using A/V cable for dubbing.
Action to take when tape dubbing is completed.
Lists VCR systems compatible with editing.
Instructions for connecting camcorder to VCR using i.LINK cable for dubbing.
Steps for connecting the VCR for digital program editing.
Steps to set up VCR for operation using A/V cable via infrared signals.
List of IR SETUP codes for various VCR brands.
Steps to set modes to cancel recording pause on the VCR.
Steps to confirm VCR operation and check for correct settings.
Steps to set up VCR for operation using i.LINK cable.
Procedure to adjust synchronization between camcorder and VCR.
Notes on synchronization adjustment recording and i.LINK connection.
Steps to select and mark scenes for editing onto a tape.
How to erase individual programs or all programs.
Steps to dub the program onto a tape after making it.
Conditions under which recording on VCR or Memory Stick is not possible.
Instructions for recording TV programs or from VCR using A/V cable.
Guidance for monaural or S-video connections.
Notes on commander modes and potential remote control conflicts.
Instructions for recording TV programs or from VCR using i.LINK cable.
Notes on display color unevenness and rough recorded pictures.
Ensuring the DV IN indicator is visible before recording.
How to change the insert end point after initial setup.
Using the remote commander for insert editing steps.
Notes on picture/sound distortion and inserting scenes from other camcorders.
Instructions for connecting an external microphone via the MIC jack.
Instructions for connecting a microphone via the intelligent accessory shoe.
Instructions for connecting audio equipment via A/V cable.
Notes on dubbing audio using the built-in microphone.
Step-by-step guide to adding new audio to a recorded tape.
Using ZERO SET MEMORY for precise audio recording start/stop points.
How to play back and adjust the balance of new and original audio.
Notes on audio dubbing limitations and quality.
Describes title display timing and setting procedures.
Details on title color, size changes, and character limits.
Notes on write-protect tabs, blank portions, and index signals.
Steps to erase a superimposed title.
How to change a stored title, including deleting characters.
How to erase a made label and all data in cassette memory.
Details on JPEG for still images and MPEG for moving pictures.
General notes on Memory Stick handling, formatting, and data protection.
Notes on compatibility with computer-formatted Memory Sticks and JEITA standards.
Instructions for inserting and ejecting a Memory Stick.
Notes on handling the Memory Stick when the access lamp is lit or flashing.
Guide to operating Memory Stick functions via the LCD touch panel.
Notes on returning to FN, executing/canceling settings, and touch panel usage.
How to select image quality for still images (SUPER FINE, FINE, STANDARD).
Details on image quality settings and their corresponding memory capacities.
Explanation of how image quality affects memory capacity for different image sizes.
How to select image size for still and moving pictures (e.g., 1360x1020, 640x480).
Table showing image sizes, meanings, and indicators.
Table showing approximate number of still images based on capacity and quality.
Table showing approximate recording times for moving pictures.
Steps to prepare for memory photo recording, including inserting Memory Stick.
Functions unavailable when POWER switch is set to MEMORY/NETWORK.
Information on how recording data is stored on Memory Stick.
How to record images continuously in NORMAL, HIGH SPEED, EXP BRKTG, MULTI SCRN modes.
How to select burst settings for continuous shooting.
Message displayed when Memory Stick capacity is full.
Notes on continuous shooting, HIGH SPEED mode, and exposure bracketing effect.
Instructions on changing flash modes and flash level.
Notes on flash shooting distance, lens hood, and flash limitations.
How to use HOLOGRAM AF for focusing in dark places.
Explanation of HOLOGRAM AF technology and safety standards.
Lists conditions under which HOLOGRAM AF does not emit.
Guide to using self-timer for still image recording on Memory Stick.
Steps to prepare for capturing still images from tape.
Information on the automatically set image size for still images.
Notes on handling Memory Stick when access lamp is lit or flashing.
Information on recording date/time on Memory Stick.
Steps to capture still images from external sources using A/V cable.
Instructions for capturing images using i.LINK cable.
Details on M. CHROM, M. LUMI, C. CHROM, and M. OVERLAP effects.
Steps to record superimposed images onto a tape.
How to change the still image used for superimposition.
Steps to cancel the MEMORY MIX function.
How to change the still image to be superimposed.
Steps to cancel the MEMORY MIX function.
Information on the image size for still pictures.
Steps to record superimposed images onto a Memory Stick.
Information on the image size for still pictures.
Notes on playing back images modified on computers.
Steps to prepare for MPEG movie recording.
Instructions to stop the MPEG movie recording process.
Notes on sound, functions unavailable, external flash, and recording data.
Guide to using the self-timer for MPEG movie recording.
Steps to prepare for recording moving pictures from tape.
Instructions to stop the moving picture recording.
Notes on sound conversion, handling Memory Stick, and titles.
Explanation of the AUDIO ERROR message.
Steps to record moving pictures from external sources using A/V cable.
Instructions for recording moving pictures using i.LINK cable.
Steps to create a program for editing onto a Memory Stick.
How to erase individual or all programs from Memory Stick.
Steps to dub the program onto a Memory Stick.
Conditions for NOT READY, LOW MEMORY, and other errors.
Steps to prepare for copying still images from tape to Memory Stick.
Instructions to stop the copying process.
Information on the automatically set image size for still images.
Notes on handling Memory Stick during copying, and error messages.
Steps to prepare for Memory Photo playback.
Instructions to stop the Memory Photo playback.
Reasons for not being able to play back images, and notes on file names.
Explanation of screen indicators during still image playback.
How to view six images simultaneously using the index screen.
Instructions to stop the MPEG movie playback.
Reasons for not being able to play back images, and TV playback guidance.
How to select and play back specific parts of a moving picture.
Explanation of indicators shown during moving picture playback.
How to view recording date/time for moving pictures.
Steps to prepare for copying images from Memory Stick to tape.
Instructions to stop the copying process midway.
Lists functions unavailable during copying and notes on index screen.
Notes on copying modified images and movies.
Steps to prepare for Memory PB ZOOM, including connecting to PC.
Instructions to exit the PB ZOOM feature.
Lists operations that cancel PB ZOOM and notes on moving pictures.
How to record PB ZOOM processed images onto Memory Stick or tape.
Steps to prepare for slide show playback.
Instructions to stop or pause the slide show.
How to select a specific image to start the slide show.
Guidance on connecting camcorder to TV for viewing recorded images.
Steps to prepare for protecting images from accidental erasure.
How to cancel image protection for selected images.
Notes on formatting Memory Stick and write-protect tab.
Steps to delete selected images from Memory Stick.
Notes on deleting protected images and restoring deleted images.
Steps to delete selected images using the index screen.
Steps to delete all unprotected images from Memory Stick.
How to cancel the deletion of all images.
Steps to prepare for writing print marks on still images.
How to cancel writing print marks.
How to set DATE/TIME for printing using the menu.
How to print 9 stickers using the touch panel and 9PIC PRINT.
Note that moving pictures cannot be printed.
Ways to connect camcorder to computer to view tape images.
Instructions for connecting via USB jack for tape image viewing.
Requirements for connecting via DV jack for video signal capture.
Methods for connecting to view Memory Stick images via USB or without USB.
Notes on Memory Stick formatting, software, and computer communication.
Importance of installing USB driver before connecting camcorder.
Steps for connecting camcorder to computer via USB for viewing.
System requirements for Windows users connecting via USB.
System requirements for Windows users viewing Memory Stick images via USB.
Notes on USB connection operations and compatibility.
Step-by-step guide to installing the USB driver from the CD-ROM.
Alternative method for XP users to copy images without USB driver installation.
Steps to ensure the computer recognizes the camcorder after software installation.
Instructions for viewing tape images on computer using PIXELA ImageMixer.
Steps to view Memory Stick images on computer via USB connection.
Troubleshooting steps if USB driver cannot be installed.
Procedure to correctly install USB driver if registration was incorrect.
Steps to uninstall incorrect USB driver and view tape images.
Instructions for capturing images using PIXELA ImageMixer software.
Steps to view recorded tape images on computer using PIXELA.
How to view live video feed from camcorder on computer preview.
Steps to capture still images from the preview window.
Steps to capture moving pictures from preview window.
Notes on potential issues like image shaking and color system mismatches.
Troubleshooting steps if image data cannot be transferred via USB connection.
How to access the on-line help for PIXELA ImageMixer software.
Steps to view Memory Stick images on computer.
Prerequisites for viewing Memory Stick images on computer.
Instructions on selecting and opening image files from folders.
Details on folder structure and file naming conventions.
Procedure to safely disconnect USB cable and eject Memory Stick.
Instructions for connecting camcorder to Mac via USB.
System requirements for Macintosh users connecting via USB.
Notes on USB equipment, QuickTime, and trademarks for Mac users.
Steps to install USB driver for older Mac OS versions.
Steps to view Memory Stick images on Mac OS.
Procedure to safely disconnect USB cable and eject Memory Stick on Mac.
Steps to prepare for capturing images from analog video units.
Steps to stop capturing after the process is complete.
Notes on software, signal states, copyright protection, and USB connector.
Instructions for accessing the Internet using a Bluetooth device on DCR-TRV50.
Guidance on how to hold the camcorder when operating in NETWORK mode.
Instructions for using and storing the stylus correctly.
Notes on standby mode, optional printer usage, and trademarks.
General steps to change mode settings in the menu.
Instructions to close the menu display.
Explanation of how to select mode settings and default settings.
Note on adjusting flash level and external flash compatibility.
Notes on SteadyShot function, including limitations and cancellation.
Notes on adjusting LCD brightness, color, and viewfinder brightness.
Details on still image recording modes like BURST, QUALITY, IMAGESIZE.
Details on PHOTO SAVE, FILE NO., DELETE ALL, and FORMAT functions.
Important notes regarding formatting Memory Sticks.
Options for printing date/time on print paper.
Options for TITLE, TITLE ERASE, TITLE DISPLAY, CM SEARCH, TAPE TITLE, ERASE ALL.
Settings for REC MODE (SP/LP) and AUDIO MODE (12BIT/16BIT).
Notes on recording and playing back tapes in LP mode.
Details on CLOCK SET, USB STREAM, USBCONNECT, LTR SIZE, LANGUAGE, DEMO MODE.
Notes on selecting and canceling DEMO MODE.
Details on DATA CODE, AREA SET, DST SET, BEEP, COMMANDER settings.
Details on DISPLAY, REC LAMP, and VIDEO EDIT settings.
Common recording problems and their corrective actions.
Solutions for picture-related problems like no image or incorrect colors.
Solutions for playback problems like tape movement, sound, and title search.
Solutions for power, battery, and end search related problems.
Solutions for "Memory Stick" malfunctions, deletion, and protection issues.
Solutions for title recording, digital editing, remote commander, and TV output problems.
Solutions for melody/beep sounds, charging, touch panel, and USB connection issues.
Explanation of self-diagnosis codes and corrective actions.
Explanation of various warning indicators for files, battery, and Memory Stick.
Explanation of warning messages related to settings, tape, Memory Stick, and errors.
Information on mini DV cassette types, including cassette memory.
Notes on playing back and recording tapes with copyright control signals.
Explanation of 12-bit and 16-bit audio modes and dual sound track playback.
Notes on affixing labels, storing cassettes, and cassette memory issues.
Instructions for cleaning the cassette's gold-plated connector.
Explanation of InfoLITHIUM battery pack features and functions.
Recommendations for charging the battery pack under various conditions.
Tips for maximizing battery pack performance and lifespan.
Explanation of the battery time indicator and potential inaccuracies.
Procedure for storing the battery pack to maintain function.
Information on battery lifespan and factors affecting it.
Explanation of the i.LINK digital serial interface and its applications.
Information on i.LINK maximum baud rates and specifications.
Details on connecting the unit to other i.LINK compatible equipment.
Specifies the type of i.LINK cable needed for DV dubbing.
Information on network function restrictions and AC power usage abroad.
List of TV color systems used overseas (NTSC, PAL, SECAM).
Procedure to follow if moisture condensation occurs inside the camcorder.
Notes on when and where moisture condensation may occur.
Method to prevent moisture condensation by using a plastic bag.
Instructions for cleaning video heads using a cleaning cassette.
Instructions for cleaning the LCD screen with supplied cloth or kit.
Steps to recalibrate the touch panel if buttons do not work correctly.
How to charge the camcorder's internal rechargeable battery.
Precautions for operating the camcorder, handling tapes, and avoiding damage.
General care instructions for the camcorder, lens, and AC power adapter.
Precautions for using and caring for the AC power adapter.
Instructions for cleaning and storing the camcorder lens.
Notes on using the battery pack, including handling dry batteries and leaks.
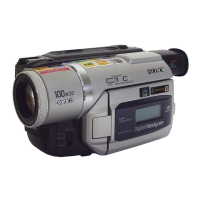
Detailed technical specifications for the video camera recorder.
General specifications including power, temperature, dimensions, and mass.
Technical specifications for the AC power adapter.
Specifications for the battery pack and Memory Stick.
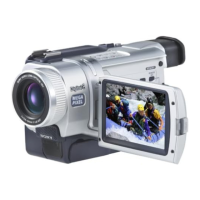
Diagram and list identifying key parts of the camcorder.
Information about the Carl Zeiss lens quality and MTF measurement.
List and description of video control buttons on the camcorder.
Notes on using accessories with the intelligent accessory shoe.
Instructions on how to properly fasten the grip strap.
Diagram and list of buttons on the remote commander.
Instructions for inserting batteries into the remote commander.
Notes on remote sensor placement and commander mode usage.
Explanation of indicators shown on the LCD screen and viewfinder.
Explanation of indicators shown in the display window.