2-7
DSC-W100_L2
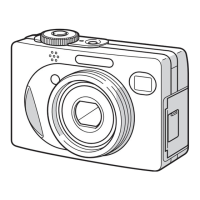
2-2-2. REMOVE OLD BARRIER ASSY
1 Remove two screws.
* Discard the removed screws.
2 Remove the Barrier Assy.
* Discard the removed Barrier Assy.
* After removing the Barrier Assy, if the “G1 Dust-Proof Ring” was removed, it must be returned to the home position.
In returning the ring, adjust the location of a projection to the lens direction.
This is an important part to prevent the dust and light from coming in.
* After removing the Barrier Assy, take extreme care not to drop dust or foreign substances in the lens barrel.
2-2-3. INSTALL NEW BARRIER ASSY
1 Install new Barrier Assy by paying attention to the projection of the Barrier Assy in relation to the position shown in the under figure.
2 Tighten two screws.
* Tightening torque = 0.5 kgf
1
1
2
Projection
2
2
1