EasyManua.ls Logo

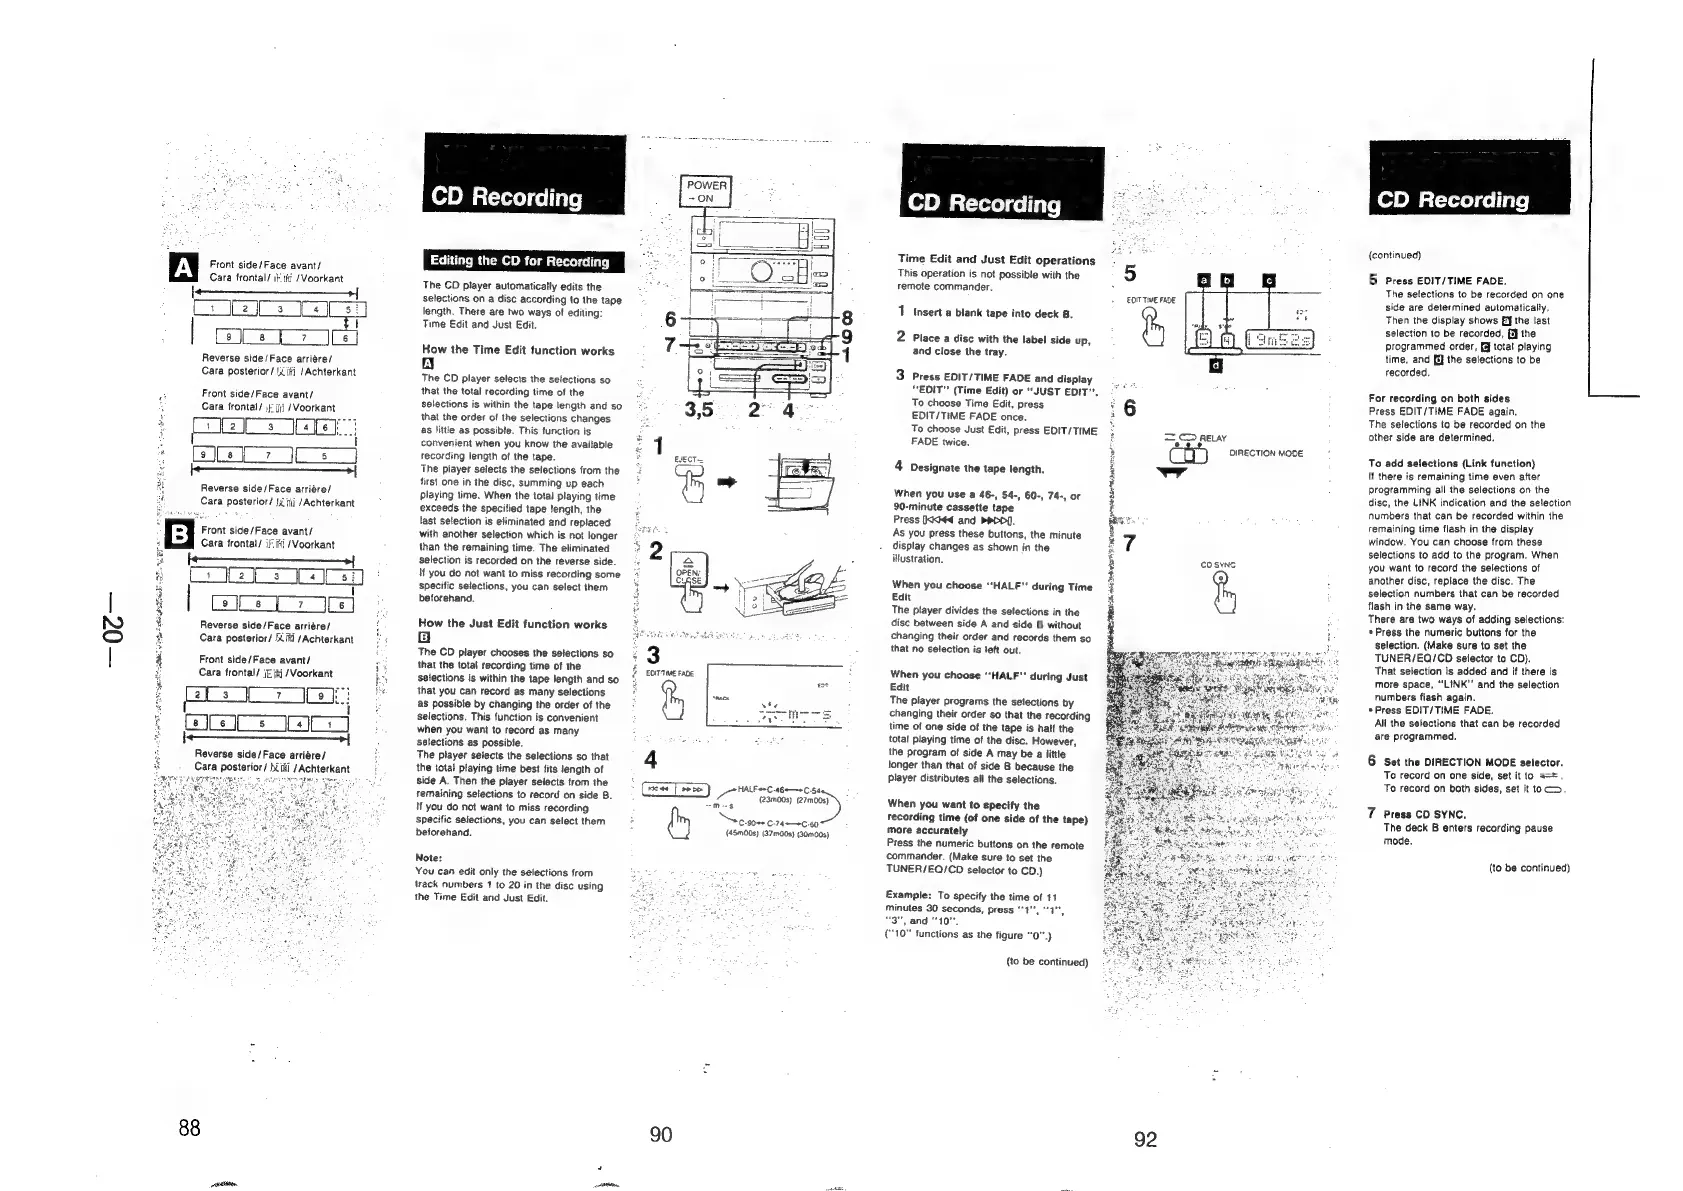
Sony HCD-H700 - CD Recording; Editing the CD for Recording; How the Time Edit function works; How the Just Edit function works

Sony HCD-H700
91 pages
Print Icon
To Next Page IconTo Next Page
To Previous Page IconTo Previous Page
Loading...
BE
a
LP
e
ati
PG!
3
Front
side/Face
avant/
Cara
frontal/
ik
tii
/Voorkant
—————_——
>
(2
es
re}
Reverse
side/Face
arriére/
Cara
posterior/!iifi
/Achterkant
Front
side/Face
avant/
Cara
frontal/
}
jjj
/Voorkant
Reverse
side/Face
arriére/
Cara
posterior/
{x
ij
/Achterkant
Front
side/Face
avant/
:
Cara
frontal/
iF.
ifi
/Voorkant
——————_———>
Cy
2s]
(ee
eee
eres
Reverse
side/Face
arrigre/
Cara
posterior/
iii
/Achterkant
Front
side/Face
avant/
Cara
frontal/
iE
jij
/Voorkant
88
moos
CD
Recording
Editing
the
CD
for
Recording
The
CD
player
automatically
edits
the
selections
on
a
disc
according
to
the
tape
length.
There
are
two
ways
of
editing:
Time
Edit
and
Just
Edit.
How
the
Time
Edit
function
works
1A]
The
CD
player
selects
the
selections
so
that
the
total
recording
time
of
the
selections
is
within
the
tape
length
and
so
that
the
order
of
the
selections
changes
as
fittle
as
possible.
This
function
is
convenient
when
you
know
the
available
recording
length
of
the
tape.
The
player
selects
the
selections
from
the
first
one
in
the
disc,
summing
up
each
playing
time,
When
the
total
playing
time
exceeds
the
specified
tape
length,
the
last
setection
is
eliminated
and
replaced
with
another
selection
which
is
not
longer
than
the
remaining
time.
The
eliminated
selection
is
recorded
on
the
reverse
side.
If
you
do
not
want
to
miss
recording
some
specific
selections,
you
can
select
them
beforehand.
How
the
Just
Edit
function
works
1B}
The
CD
player
chooses
the
selections
so
that
the
total
recording
time
of
the
selections
is
within
the
tape
length
and
so
that
you
can
record
as
many
selections
as
possible
by
changing
the
order
of
the
selections.
This
function
is
convenient
when
you
want
to
record
as
many
selections
as
possible.
The
player
selects
the
selections
so
that
the
total
playing
time best
fits
length
of
side
A.
Then
the
player
selects
from
the
remaining
selections
to
record
on
side
8.
If
you
do
not
want
to
miss
recording
specific
selections,
you
can
select
them
beforehand.
Note:
You
can
edit
only
the
selections
from
track
numbers
1
to
20
in
the
disc
using
the
Time
Edit
and
Just
Edit.
90
m
cs0e
C-74-—*C-60
(45m00s) (37m00s}
(30m00s)
Lentenill
Maelo
cd
HALFe*C.46e—*C.54.
(ees
[orme)
aa
(23m00s)
=)
CD
Recording
Time
Edit
and
Just
Edit
operations
This
operation
is
not
possible
with
the
remote
commander.
1
Insert
a
blank
tape
into
deck
8.
2
Place
a
disc
with
the
label
side
up,
and
close
the
tray.
3
Press
EDIT/TIME
FADE
and
display
“EDIT”
(Time
Edit)
or
"JUST
EDIT”,
To
choose
Time
Edit,
press
EDIT/TIME
FADE
once.
To
choose
Just
Edit,
press
EDIT/TIME
FADE
twice.
4
Designate
the
tape
length.
When
you
use
a
46-,
54-, 60-,
74-,
or
90-minute
cassette
tape
Press
Ikki
and
PPDD].
As
you
press
these
buttons,
the
minute
display
changes
as
shown
in
the
iHustration.
When
you
choose
“HALF”
during
Time
Edit
The
player
divides
the
selections
in
the
disc
between
side
A
and
side
B
without
changing
their
order
and
records
them
so
that
no
selection
is
Jeft
out.
When
you
choose
“HALF”
during
Just
Edit
The
player
programs
the
selections
by
changing
their
order
so
that
the
recording
time
of
one
side
of
the
tape
is
half
the
total
playing
time
of
the
disc.
However,
the
program
of
side
A
may
be
a
little
longer
than
that
of
side
B
because
the
player
distributes
all
the
selections.
When
you
want
to
specify
the
recording
time
(of
one
side
of
the
tape)
more
accurately
Press
the
numeric
buttons
on
the
remote
commander.
(Make
sure
to
set
the
TUNER/EQ/CD
selector
to
CD.)
Example:
To
specify
the
time
of
11
minutes
30
seconds,
press
‘‘1"",
“3",
and
“10”.
"10"
functions
as
the
figure
“0".)
(to
be
continued)
5
EDIT TIME
FADE
ie
Bperch
dermis
ect
e
NJ
REALE
ED
AON
TE
92
DIRECTION
MODE
CD
Recording
(continued)
5
Press
EDIT/TIME
FADE.
The
selections
to
be
recorded
on
one
side
are
determined
automatically.
Then
the
display
shows
EY
the
last
selection
to
be
recorded,
[iJ
the
programmed
order,
ff
total
playing
time,
and
[J
the
selections
to
be
recorded.
For
recording
on
both
sides
Press
EDIT/TIME
FADE
again.
The
selections
to
be
recorded
on
the
other
side
are
determined.
To
add
selections
(Link
tunction)
Mf
there
ts
remaining
time
even
after
programming
all
the
selections
on
the
disc,
the
LINK
indication
and
the
selection
numbers
that
can
be
recorded
within
the
remaining
time
flash
in
the
display
window.
You
can
choose
from
these
selections
to
add
to
the
program.
When
you
want
to
record
the
selections
of
another
disc,
replace
the
disc.
The
selection
numbers
that
can
be
recorded
flash
in
the
same
way.
There
are
two
ways
of
adding
selections:
«Press
the
numeric
buttons
for
the
selection.
(Make
sure
to
set
the
TUNER/EQ/CD
selector
to
CD).
That
selection
is
added
and
if
there
is
more
space,
‘LINK’
and
the
selection
numbers
flash
again.
*Press
EDIT/TIME
FADE.
All
the
selections
that
can
be
recorded
are
programmed.
6
Set
the
DIRECTION
MODE
selector.
To
record
on
one
side,
set
it
to
===,
To
record
on
both
sides,
set
it
toc.
7
Press
CD
SYNC.
The
deck
B
enters
recording
pause
mode.
(to
be
continued)