Do you have a question about the Sony MSW-M2000P and is the answer not in the manual?
Key capabilities including heads, signal processing, audio, editing, and Tele-File.
Illustrates basic and network system connection diagrams.
Licensing terms for MPEG-4 Visual technology.
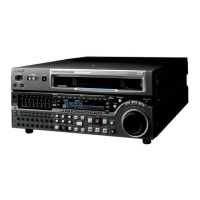
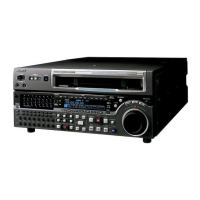
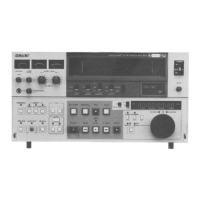
Details the components and functions of the upper control panel.
Describes the components and functions of the lower control panel.
Covers memory card slot, eject button, control panel connectors, and switches.
Details analog audio input/output connectors and level switches.
Describes analog video input/output connectors and termination switches.
Explains AES/EBU digital audio input/output connectors.
Details the Ethernet connector for network connectivity.
Covers SDI and SDTI-CP input/output connectors.
Lists connectors for remote control and external devices.
Explains TIME CODE IN and OUT connectors.
Details connectors for monitoring audio output signals.
How to connect digital VTRs for serial digital signal input.
How to connect analog VTRs for analog audio/video signals.
Examples of SDTI-CP interface connections for dubbing.
Network connection example for file transmission via Ethernet.
How the internal generator synchronizes to external video or input signals.
How the VTR selects reference signals for the servo system.
Shows connections for recording from switchers, generators, or VTRs.
Illustrates reference signal connections for playback operations.
Lists compatible MPEG IMX and other playback-only tape types.
Step-by-step guide for inserting and ejecting cassettes.
How to use the record inhibit plug to prevent accidental erasure.
Important information regarding Memory Stick usage, types, and handling.
Essential switch and menu settings before starting recording.
Guidance on setting audio recording levels for optimal results.
Explains methods for recording time code and user bit values.
Procedure to synchronize the internal time code generator to external signals.
Step-by-step instructions for performing a recording operation.
Essential switch and menu settings required before playback.
How to control playback speed using the search dial in jog mode.
How to control playback speed using the search dial in shuttle mode.
How to finely control playback speed in variable speed mode.
How to adjust playback speed temporarily for phase synchronization.
Describes various playback types like normal, jog, shuttle, and DMC.
Explains how to vary playback speed for sections and store it in memory.
Instructions for performing playback in feed mode.
Function for feed mode playback of a segment between specified IN and OUT points.
Essential switch and menu settings for initiating file transmission.
Step-by-step guide for sending video, audio, and metadata files.
Introduction to automatic editing modes like assemble and insert editing.
Essential switch and menu settings for editing operations.
How to select between assemble and insert editing modes.
Guidance on setting video and audio IN/OUT points for editing.
How to set audio and video edit points independently for split editing.
Instructions for modifying or deleting previously set edit points.
How to cue up to edit points or preroll before an edit.
How to preview the editing results before committing to the edit.
Describes the process of executing an automatic editing operation.
Conditions and tape movement during DMC editing.
Step-by-step process for setting edit points and player speed for DMC editing.
Method to save editing time by setting points and executing edits simultaneously.
How to perform sequential automatic editing operations.
Editing using an external device as a player without remote control.
Step-by-step procedure for performing manual editing.
Using preread heads to read recorded signals in advance for editing.
How to cue up to specific shot marks or adjacent ones.
How to read and display shooting data captured with shot marks.
How to sort shot marks by cassette and arrange them by time code.
Instructions on reading shot marks from a loaded cassette.
How to enable writing recording start marks automatically.
Selecting the type of shot mark to write during operations.
How to display, select, and delete shot marks from a list.
Instructions for cueing up to shot marks using the list or index function.
How to read and display shooting information recorded with shot data.
How to sort shot marks by cassette and arrange them in time code sequence.
How to read and interpret the clip data displayed on the screen.
Instructions on selecting clips using the MULTI CONTROL knob.
How to select specific data within a clip using function buttons.
How to use clip data for prerolling and cueing to specific points.
Procedures for modifying clip data like cue points and attributes.
Instructions for adding new clips or deleting existing ones.
How to set or change cue point, IN point, and OUT point data.
How to set write protect, mark, and recording start point attributes.
Instructions for entering and editing comment data for clips.
How to use undo and resume functions to manage data modifications.
How to display and modify attributes like title, ID, and model name.
How to select between Basic or Extended UMID recording.
How to choose between copying input UMID or generating a new one.
Methods for generating the Instance Number when inheriting UMID data.
Specifies the SDI signal VANC line for UMID insertion.
How to set Stored Ownership data within the UMID Source Pack.
How to set the unit's calendar clock and time zone for correct UMID generation.
Options for selecting UMID output type and whether to output UMIDs.
How UMID data appears on the control panel and video monitor.
How to record essence marks from SDI signals or generated by the unit.
How to output essence marks when playing back a tape.
Selecting whether to convert and output AED detected events as essence marks.
How to write detected cut event time codes to a Tele-File label.
Explains the structure and pages of the function menu.
Instructions on changing menu item settings and navigating menu pages.
Lists function items available on the HOME page of the function menu.
Lists function items available on Page 1 of the function menu.
Lists function items available on Page 2 of the function menu.
Lists function items available on Page 3 of the function menu.
Lists function items available on Page 4 of the function menu.
Lists function items available on Page 5 of the function menu.
How to access and display the setup menus.
How to view setup menus on an external monitor.
How to hide unused items to customize the setup menu display.
How to navigate and select specific menu items.
How to select sub-items within a menu item.
Procedures for changing settings for menu items and sub-items.
How to reset all settings to the factory default values.
How to switch between NTSC (525-line) and PAL (625-line) modes.
How to save and recall menu settings using menu banks.
Details downloading, uploading, and formatting memory sticks.
Step-by-step guide for downloading files from a memory stick.
Step-by-step guide for uploading files to a memory stick.
Instructions for formatting a memory stick.
Explains how to display and interpret the unit's operational hours.
Provides a guide for checking and replacing components based on usage hours.
Comprehensive technical specifications of the unit's hardware and formats.
Covers general specs like power, mass, dimensions, and operating conditions.
Details tape speeds, playback times, and search speeds for various formats.
Specifications for sampling frequency, quantization, and compression.
Technical details for analog component video output signals.
Specifications for analog component signal conversion.
Technical details for analog composite video signal conversion.
Specifications for digital audio signal format and output.
Details network interface specifications for specific models.
Technical playback specifications for Digital Betacam format.
Technical playback specifications for Betacam SX format.
Technical playback specifications for Analog Betacam format.
Audio specifications for different tape types and playback modes.
Technical audio playback specifications for specific models.
Lists adjustable parameters for video and chroma processing.
Details all input connector types, formats, and specifications.
Details all output connector types, formats, and specifications.
Specifics for Ethernet connectors on certain models.
Lists remote control interface connectors and types.
Information about the PC card slot for memory cards.
Information about the memory stick slot for storage.
Lists items included with the product.
Lists optional accessories available for purchase.
Advises on minimizing interference from portable devices.
| Audio Frequency Response | 20 Hz to 20 kHz |
|---|---|
| Power Requirements | AC 100-240V, 50/60 Hz |
| Audio Channels | 2 |
| Weight | 21 kg |
| Video Signal System | NTSC/PAL |
| Input Voltage | 100-240V AC |
| Audio Dynamic Range | 90 dB |
| Input/Output Connectors | Composite video (BNC), XLR audio, timecode (BNC) |
| Dimensions | 426 x 149 x 496 mm |
| Video Recording System | Rotary head |