EasyManua.ls Logo

Sony PS-X500 - Page 6

Sony PS-X500
32 pages
Print Icon
To Next Page IconTo Next Page
To Previous Page IconTo Previous Page
Loading...
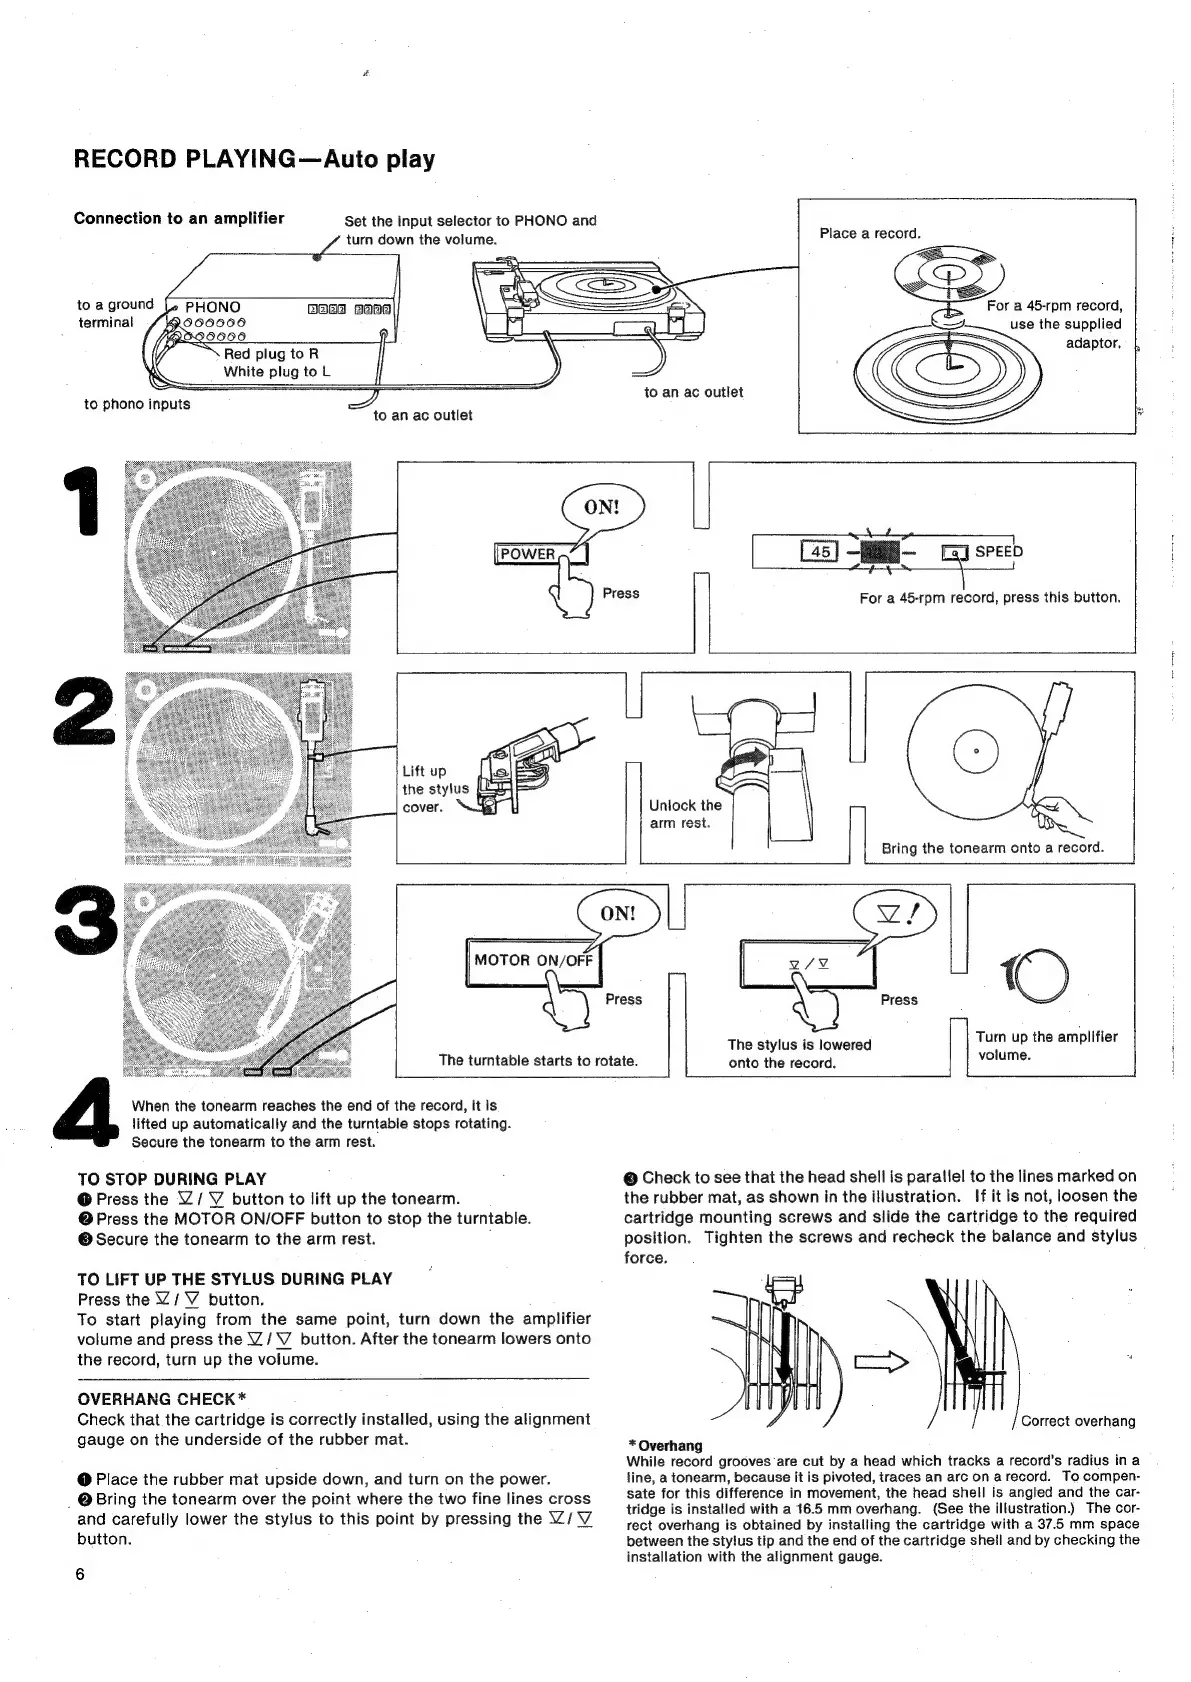
RECORD
PLAYING—<Auto
play
Connection
to
an
amplifier
Set
the
input
selector
to
PHONO
and
turn
down
the
volume.
Place
a
record.
to
a
ground
Hee
aaa
For
a
45-rpm
record,
terminal
Red
plug
to
R
White
plug
to
L
to
an ac
outlet
use
the
supplied
adaptor.
|
to
an
ac
outlet
|
Press
|
—as-
st
SPEED
For
a
45-rpm
record,
press
this
button.
Lift
up
'
sie
|
=
the
stylus
JE)
cover.
MOTOR
ON/OFF
The
turntable
starts
to
rotate.
Unlock
the
arm
rest.
Bring
the
tonearm
onto
a
record.
(
Turn
up
the
amplifier
The
stylus
is
lowered
volume.
onto
the
record.
When
the
tonearm
reaches
the
end
of
the
record,
it
is
lifted
up
automatically
and
the
turntable
stops
rotating.
Secure
the
tonearm
to
the
arm
rest.
&
@
N
TO
STOP
DURING
PLAY
@
Press
the
Y/
VY
button
to
lift
up
the
tonearm.
@
Press
the
MOTOR
ON/OFF
button
to
stop
the
turntable.
©
Secure
the
tonearm
to
the
arm
rest.
:
TO
LIFT
UP
THE
STYLUS
DURING
PLAY
Press
the
Z/
V
button.
To
start
playing
from
the
same
point,
turn
down
the
amplifier
volume
and
press
the
W/V
button.
After
the
tonearm
lowers
onto
the
record,
turn
up
the
volume.
OVERHANG
CHECK*
Check
that.the
cartridge
is
correctly
installed,
using
the
alignment
gauge
on
the
underside
of
the
rubber
mat.
@
Place
the
rubber
mat
upside
down,
and
turn
on
the
power.
_
@
Bring
the
tonearm
over
the
point
where
the
two
fine
lines
cross
and
carefully
lower
the
stylus
to
this
point
by
pressing
the
W/V
button.
6
©
Check
to
see
that
the
head
shell
is
parallel
to
the
lines
marked
on
the
rubber
mat,
as
shown
in
the
illustration.
If
itis
not,
loosen
the
cartridge
mounting
screws
and
slide
the
cartridge
to
the
required
position.
Tighten
the
screws
and
recheck
the
balance
and
stylus
force.
>|
|
Correct
overhang
*
Overhang
While
record
grooves
are
cut
by
a
head
which
tracks
a
record’s
radius
in
a
line,
a
ionearm,
because
it
is
pivoted,
traces
an
arc
on
arecord.
To
compen-
sate
for
this
difference
in
movement,
the
head
shell
is
angled
and
the
car-
tridge
is
installed
with
a
16.5
mm
overhang.
(See
the
illustration.)
The
cor-
rect
overhang
is
obtained
by
installing
the
cartridge
with
a
37.5
mm
space
between
the
stylus
tip
and
the
end
of
the
cartridge
shell
and
by
checking
the
installation
with
the
alignment
gauge.