5
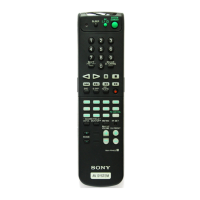
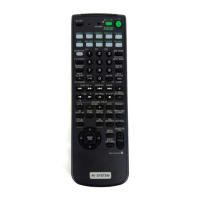
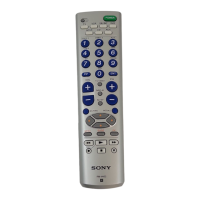
Location of Parts and Basic Remote Operations
1 SLEEP button
Press repeatedly to activate the sleep function and the
duration which the receiver turns off automatically.
2 SYSTEM STANDBY switch
Press to turn off the receiver and other Sony audio/
video components at the same time.
3 AV 1/u switch
Press to turn the audio and video components on or
off.
4 Function buttons
Press one of the buttons to select the component you
want to use. When you press a button, the receiver
turns on.
To select Press
VCR VIDEO1 (VCR mode 3), VIDEO2
(VCR mode 1) , or VIDEO3 (VCR
mode 2)
a)
Note that the function buttons are factory-set as
described in the table above. If you want to change
the factory setting of the buttons to match your
particular components, do the procedure “Changing
the Factory Settings of a Function Button” on page 12.
Notes
• Before you turn on the receiver, make sure that you have
turned the MASTER VOLUME control on the receiver to
the leftmost position to avoid damaging your speakers.
• After you have selected VCR or DVD player, turn on the
TV and set the TV’s video input to match the component
you selected.
5 MASTER VOLUME +/– buttons
Press to adjust the volume level of all speakers at the
same time.
If you have pressed the TV CONTROL button:
Press to adjust the volume level of the TV speakers.
6 MUTING button
Press to mute the sound. The MUTING indicator on
the receiver lights up when the sound is muted.
If you have pressed the TV CONTROL button:
Press to mute the sound from the TV.
DVD
DVD
TV TV
Tape deck TAPE
MD deck MD
CD player CD
Built-in tuner TUNER
Turntable PHONO
the component connected
to the 5.1CH INPUT jacks
on the receiver
5.1CH
a) Sony VCRs become operable when you press the VIDEO1, 2, or
3 button. These buttons correspond to VHS, Beta, and 8mm,
respectively.
To select an LD player or satellite tuner (etc.) press the
button for the function to which you connected the
component.
See the table on page 10 for information on the buttons
you can use to control each component.