M
marvin97Aug 28, 2025
What to do if a tape cannot be inserted into my Sony SLV-X9N ShowView?
- TTony DyerAug 28, 2025
Check that there isn't already a tape inside the tape compartment.
What to do if a tape cannot be inserted into my Sony SLV-X9N ShowView?
Check that there isn't already a tape inside the tape compartment.
What to do if the timer does not operate on my Sony SLV-X9N ShowView?
Check that the clock is set, a tape has been inserted, and the safety tab has not been removed. Ensure the tape is not at its end, a program has been set for timer recording, and your timer settings are past the current time. Check that the decoder and satellite tuner are turned on. Reset the clock and timer if the VCR was disconnected from the mains for more than one hour. As a last resort, turn the power off and unplug the mains lead.
Why does my Sony VCR have poor TV reception?
Check that the aerial cable is securely connected. Adjust the TV aerial. Ensure the TV system is correctly set for your TV. Verify that SYSTEM (B/G or D/K) in the TUNER menu matches the system in your local area.
What to do if the remote commander does not function with my Sony SLV-X9N ShowView?
Ensure you are pointing the remote commander directly at the remote sensor on the VCR. If the remote is still not working, try replacing all the batteries with new ones. Also, verify that the [TV] / [VIDEO] remote control switch is set correctly.
How to fix a Sony VCR when the picture is not clear?
If your TV is connected to the VCR with both Scart and aerial cables, make sure the RF channel is set to OFF. Reset the RF channel output of your VCR, as existing broadcasts may interfere. Adjust the tracking using the PROGRAM +/– buttons on the VCR. Clean the video heads using the Sony T-25CLD, E-25CLDR, or T-25CLW video head cleaning cassette. If unavailable, have the heads cleaned at a Sony service facility. Do not use non-Sony liquid cleaning cassettes, as they may cause damage. If the problem persists, the video heads may need replacement.
Covers warnings to prevent fire, electric shock, and proper handling of the unit.
Information on VCR compatibility with PAL and MESECAM colour systems.
Details on power consumption during standby and phase-out of halogenated flame retardant.
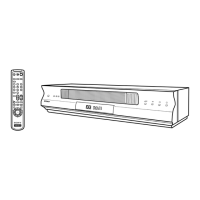
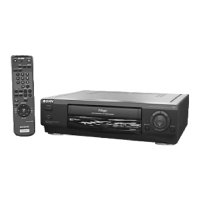
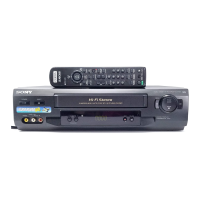
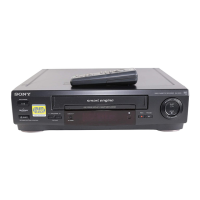
Identifies and describes the VCR's front panel, display window, rear panel, and remote commander.
Guide to unpacking the VCR and checking included accessories.
Instructions for inserting batteries and using the remote commander with VCR and TV.
Detailed steps for connecting the VCR to a TV using aerial or Scart cables.
Procedure for tuning the TV to receive VCR signals, including RF channel setup.
Automated setup for language, channels, and clock using the Auto Set Up function.
Manual procedure to set the VCR's date and time for timer functions.
Instructions on how to change the VCR's on-screen display language.
Guide to manually preset channels not found by Auto Set Up.
How to change channel order and disable unwanted programme positions.
Instructions for connecting and setting up a Canal Plus decoder for viewing/recording.
Instructions for inserting a tape and starting playback, including playback controls.
Steps for recording TV programmes, selecting speed, and starting/stopping recording.
Guide to setting timer recordings using the Dial Timer function.
Instructions for timer recording using the ShowView system and programme guides.
Details on fast-forward, rewind, slow motion, and frame-by-frame playback using the shuttle ring.
How to set the VCR to stop recording automatically after a specified duration.
Setting up the VCR to automatically record from connected equipment with timer functions.
Procedure for managing existing timer recording settings.
Instructions for recording stereo and bilingual sound from ZWEITON or NICAM systems.
Using Smart Search to find recorded programmes and start playback directly.
Guide to adjusting tracking and using the Reality Regenerator and OPC functions.
Steps to turn off display indicators in standby mode to conserve power.
Configuration of VCR settings through the OPTIONS-1 and OPTIONS-2 menus.
Diagrams and instructions for connecting another VCR or a stereo system for recording.
Procedure for basic editing, including cutting unwanted scenes during recording.
Feature to record new audio over the normal audio track of a tape.
Solutions for common VCR problems related to power, clock, playback, recording, and other functions.
Technical details on VCR system compatibility, channel coverage, and tape speeds.
Information on power requirements, consumption, operating temperature, dimensions, and mass.