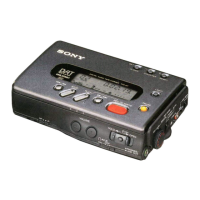
Do you have a question about the Sony Walkman TCD-D7 and is the answer not in the manual?
Superb recording/playback with excellent frequency response and low noise. High speed access.
Allows up to four-hour continuous recording using AA batteries, ideal for meetings.
Recording level can be adjusted manually or automatically for any situation.
Automatically registers date/time of recording, displayable during playback.
Window indicates current operational mode and battery status.
Compact mechanism and design for portability.
Records from digital audio equipment like CD, MiniDisc, or tuners.
Handle liquid spills, unplugging power, and foreign objects in jacks.
Use recommended AC adaptor or car battery cord; disconnect power when not in use.
Avoid heat sources, direct sunlight, dust, vibration, and placing objects on top.
Prevent damage from condensation by removing tape when moving between temperature zones.
Controls for playback, stop, pause, fast-forward, rewind, and record/ID write.
Selects between standard play and long play recording/playback modes.
Adjusts the audio output volume for headphones or line out.
Selects output for headphones (with AVLS) or line out.
Locks buttons to prevent accidental operation or opens the cassette compartment.
Adjusts microphone sensitivity for optimal recording levels.
Input jack for connecting an external microphone.
Input jack for analog audio sources.
Selects recording mode (Manual, Music, Speech) for automatic level adjustment.
Manually adjusts the recording input level.
Output jack for headphones or line-level audio connection.
Illuminates the display window for use in the dark.
Resets counters or adjusts settings in certain modes.
Controls the tape counter display and adjusts settings.
Sets and displays the clock time and date.
Digital input/output and remote control connection port.
Access point for installing or replacing batteries.
Power input jack for connecting an AC power adapter or car battery cord.
Indicates when the unit is in long play recording or playback mode.
Shows program number, day of the week, and AM/PM.
Indicates when a start ID signal is detected or being written.
Displays tape position, time, or operational messages.
Shows when the unit is actively recording.
Shows when the unit is actively playing back a tape.
Indicates when the unit is in pause mode during recording or playback.
Displays the current battery level.
Shows when the automatic start ID function is active.
Alerts the user to potential moisture condensation inside the unit.
Shows the audio input level during recording.
Instructions for inserting and managing AA alkaline batteries.
How the display indicates battery level and replacement needs.
Unit automatically enters low-power mode after inactivity to save battery.
Unit has no power switch; display is always on when batteries are inserted.
Proper battery insertion, recharging, mixing, and handling leaks.
Connecting the AC power adaptor for mains operation.
Connecting the unit to a car battery using a specific cord.
Step-by-step guide to setting year, month, date, day, hour, and minute.
How to stop the clock setting process.
Method to switch between 12-hour and 24-hour clock formats.
Restrictions due to HOLD switch and battery removal affecting clock settings.
Steps to open the compartment, insert cassette, and close.
Precautions on disconnecting power and cassette orientation.
How to remove a cassette from the unit.
How to use the shutter to prevent accidental recording.
Connecting and using a microphone for recording.
Connecting analog audio sources for recording.
Connecting digital audio sources via optical or coaxial cables.
Using the adaptor kit for digital connections and remote control.
Requirement for AC power adapter when using the RM-D3K.
Using SP/LP switch, MIC SENS switch, and REC MODE switch.
Chart showing recording times based on cassette type (DT-120, DT-90, DT-60).
Limitations on LP mode with digital input and playback compatibility.
Settings for microphone sensitivity (H for normal, L for loud sound).
Selecting MANUAL, MUSIC, or SPEECH modes for recording.
How to check the selected input source (MIC, LINE, DIGITAL).
Steps to enter pause mode, adjust level, and start recording.
How to stop and pause the recording process.
Connecting headphones or speakers to listen during recording.
Precautions regarding recording start, output level, and disconnecting plugs.
Avoiding unrecorded parts on tape for proper absolute time writing.
Behavior when recording reaches the end of the tape (auto-rewind).
Using the HOLD switch to prevent accidental button presses.
Tips for achieving successful recordings.
Setting the recording level manually using the REC LEVEL knob.
Recommendations for microphones for high-quality recording.
Connecting headphones for playback audio.
Connecting analog audio equipment for playback output.
Connecting digital audio sources for playback.
Steps to start playback, detect mode, and adjust volume.
How to stop and pause the playback process.
How to fast-forward and rewind the tape.
Using cue/review functions for fast scan.
Using the Automatic Music Sensor to find tracks.
Understanding tape transport direction and remaining tape indicators.
Using the Automatic Volume Limiter System for comfortable headphone listening.
Automatically starting playback after rewinding.
Displaying the current sampling frequency.
Using the HOLD switch to prevent accidental button presses.
Indicates the beginning of a recorded program (track) for automatic cueing.
Methods for writing start IDs automatically or manually during recording.
Signals used to identify program (track) numbers during recording.
Writing start IDs in desired positions without erasing recording.
Erasing start IDs without affecting the recorded tape content.
Renumbering program numbers if they are missing or duplicated.
Explains which sources allow digital dubbing and which do not.
Additional information about SCMS rules and analog dubbing.
How the tape counter and absolute time are displayed.
How the clock, recorded time, and current date/time are displayed.
Procedure to reset the tape counter to zero.
How the remaining tape time is displayed.
Explains common messages like ERROR, HOLI, NO TAPE, etc.
Messages related to recording like TAPE PROTECT, NO INPUT, COPY PROHIBIT.
Messages indicating the input source (MIC, LINE, DIGITAL).
How to clean the exterior of the unit.
Recommendation and procedure for cleaning the tape head.
Step-by-step guide for using the cleaning cassette.
Precautions and usage limits for the cleaning cassette.
Details on tape type, recording time, sampling frequency, and frequency response.
Specifications for signal-to-noise ratio, dynamic range, THD, and wow/flutter.
Details on input/output jacks, impedance, and levels.
Information on power sources and battery operating times.
Dimensions and weight of the unit.
List of items included with the unit.
List of optional accessories available for purchase.
Solutions for when buttons are unresponsive.
Troubleshooting steps for a completely non-operational unit.
Solutions for tape transport issues.
Diagnosing and fixing lack of audio output.
Troubleshooting issues preventing recording.
Solutions when audio is not captured on the tape.
Troubleshooting volume control issues.
Solutions for issues with writing start IDs or PGM numbers.
How to operate buttons when start ID writing is in progress.
Solutions when absolute time is not recorded on the tape.
Addressing distortion when using a microphone.
Troubleshooting noise during the recording process.
Solutions for unexpected tape stoppage during playback.
Addressing sound quality issues like noise or distortion.
Solutions for a compartment door that won't close.
| Brand | Sony |
|---|---|
| Model | Walkman TCD-D7 |
| Category | Microcassette Recorder |
| Language | English |