Operating Manual
OPERATING MANUAL
GENERAL INFORMATION AND WARNING
• Electronic automatic battery charger with microprocessor suitable for any battery type;
• Fully automatic charging cycle with electronic setting; protected against overload, short – circuit at clamps and
reversed polarity;
• Never disconnect the battery while charging: this could cause sparks;
• Never use the equipment in the rain, in areas used for washing or in damp areas;
• Before starting to charge, make sure the voltage of the equipment suits the voltage of the battery, that the
charging current suits the capacity of the battery and that the selected charging curve (for lead – acid batteries
or airtight gel batteries) is correct for the type of battery to be charged. In addition, make sure the rated input
voltage of the charger suits the available supply voltage and the system is equipped with grounding;
• If necessary, replace the fuse with another of the same type and the value as indicated on the rating plate;
• Use the battery chargers only in well ventilated areas;
• Pay attention to any remarks of the battery manufacturer;
For lead – acid batteries with liquid electrolyte:
• Control the water level after each charging process;
• Refill with distilled water only;
• Caution! The gases generated during charging are explosive. Do not smoke in the vicinity of the batteries. When
working with cables and electrical equipment, avoid open flames and sparks.
• Attention: Use protective glasses and gloves during battery maintenance. Battery acid cause injuries. In case of
contact with battery acid, wash the affected parts with a lot of fresh water and consult a doctor if necessary.
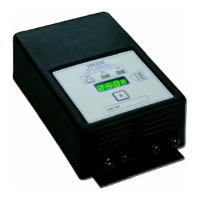
CONTROLS (see figure behind the cover)
1. Main switch (1): when in the “OFF” position, the device is disconnected from the supply mains by two poles;
when in the “ON” position, the device is connected;
2. Three digit display + symbol (2), to view A = the charging current, U = the battery voltage, h = the charging time,
C = the charging ampere – hours [Ah], E = the energy used [KWh];
3. Button for the selection of the display mode (3): A, U, h, C, E. After about 10 seconds the display returns to the
visualization of the charging current;
4. Red control indicator (4): when it is on, the charging cycle has started;
5. Yellow control indicator (5): when it is on, the final phase of the charging cycle has started;
6. Green control indicator (6): when it is on, the charging cycle has finished.
OPERATION
• Put the main switch (1) in the “OFF” position and connect the plug of the feeding cable to a supply plug;
• Connect the battery, checking the polarity;
• Bring the switch (1) to “ON”, thus starting the automatic charging cycle. Now, the battery charger's display will
show a sequence of details on the charger's internal programming: after the name “SPE”, it will show the
software release installed in the equipment, then, in sequence, the following parameters: battery voltage,
charging current, charging curve number and, finally, the words “GEL” or “Acd” depending on the set up
charging curve being suitable for airtight gel batteries ore lead – acid batteries. Make sure the type of batteries
to be charged (gel ore lead . Acid batteries) matches the displayed details (“GEL” or “Acd”,
respectively). If it doesn't, contact our dealer. Now, a test is run on the battery voltage to decide if the
charging process should be started or not. If the battery is not connected to the battery charger, the display will
shown the word “bat”. The word will stay on, even if the test is failed (for instance, reversed polarities or
incorrect battery connection). If the test is passed, the display the display will show the battery for approximately
5 seconds and the battery will begin to be charged. The charging cycle progress will be shown by red (4), yellow
(5) and green (6) LED indicators.
• At the end of charge, when the green indicator is on, put the main switch (1) in the “OFF” position and
disconnect the battery.
PROBLEMS SOLUTIONS AND CHECKS
The battery charge does not switch on Check that the plug is connected to the supply mains
and that the fuse is efficient
The charging cycle does not start and the message
“bat” is displayed
Check the connection to the battery and the polarity
The yellow indicator (5) will not light up even 15 hours
from the starting of the charging cycle, and the display
Check the battery for possible faulty components
D00613-00 7
 Loading...