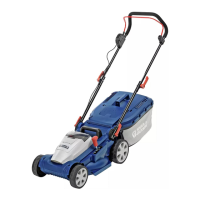
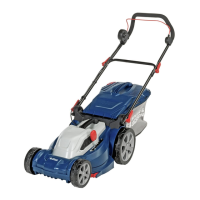
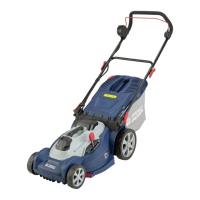
This document serves as an original instruction manual for a 36V Cordless Lawnmower, model SCR3637A, manufactured by Spear & Jackson. It provides comprehensive guidance for assembly, operation, and maintenance, emphasizing safety precautions throughout.
Function Description
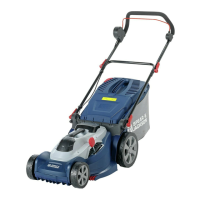
The Spear & Jackson 36V Cordless Lawnmower is designed for domestic use, specifically for mowing lawns in home and hobby gardens. Its cordless nature offers freedom of movement without the restriction of power cables. The mower is intended for cutting grass and is equipped with a grass collection bag to gather clippings, or it can be used with a mulching plug to return finely cut grass to the lawn. The device operates on a 36V battery system, providing power for the cutting blade. It features adjustable cutting heights to suit various lawn conditions and desired grass lengths. The mower is not designed for commercial use, nor is it suitable for mowing wet or unusually high grass.
Usage Features
The manual outlines several key usage features to ensure safe and effective operation:
- Assembly: The initial setup involves unpacking all parts, fixing the lower and upper handles, and assembling the grass bag. The handle assembly includes a cable guide to prevent damage when folding the handle. The upper handle has two possible height positions for operator comfort. The grass bag assembly involves inserting the handle into the upper cover and securing the metal frame inside the bag with clips.
- Battery and Charging: The mower uses a Lithium-ion battery pack. Before operation, users must check the battery capacity using a charge-level indicator panel with four LEDs. A fully charged battery shows four lights, while one light indicates that recharging is required. The intelligent charger measures the battery's charge level, temperature, and voltage to optimize battery life. It provides visual cues (LED indicators) for various charging statuses, including charging in progress, charging paused due to temperature, and fully charged. The charger is for indoor use only.
- Starting and Stopping: To switch on the mower, the user must first press a safety button and then pull the switch bar towards the handle. Releasing the switch bar will turn off the mower. There is a short delay in the motor starting after engaging the On/Off switch, which is normal; the user should hold the switch for 1-3 seconds.
- Cutting Height Adjustment: The mower offers multiple cutting height positions, ranging from 22mm to 62mm. Users can select the appropriate height based on the grass length and desired outcome. The manual advises against cutting more than one-third of the total grass length for a healthy lawn and recommends gradually reducing the height for very high grass.
- Grass Collection and Mulching: The mower can be used with a grass collection bag, which has a "full indicator" that opens when empty or not full and closes when full. Alternatively, a mulching plug can be installed to finely chop and return grass clippings to the lawn. The mulching plug must be removed if the collection bag is used, and vice versa.
- Motor Power Output Levels: The mower features different motor power output levels, which can be cycled through using a press button. These levels include "AUTO" (automatically adjusts to fit the lawn), "1" (for light mowing), "2" (for taller and thicker grass), and "3" (maximum power for stubborn grass).
- Mowing Tips: The manual provides practical advice for mowing, such as inspecting the lawn for objects that could damage the mower, reducing walking speed for thick grass, and avoiding cutting wet grass, which tends to stick to the underbody.
- Safety Precautions: Extensive safety information is provided, covering work area safety (removing objects, keeping bystanders away), electrical safety (charger plug matching outlet, avoiding wet conditions), machine use and care (not forcing the mower, disconnecting power before adjustments), personal safety (wearing protective equipment, staying alert), and battery/charger safety (avoiding shorting terminals, proper handling of liquid ejection). Users are warned about the sharp blade and moving parts, emphasizing the need to disconnect power and wait for parts to stop before touching.
Maintenance Features
Regular maintenance is crucial for the longevity and safe operation of the lawnmower:
- Cleaning: The underbody and cutting blade should be kept clean and free of debris. Clippings must be removed from the discharge chute.
- Blade Maintenance: The cutting blade should be checked periodically for tightness. After prolonged use, especially in sandy soil, the blade may become worn or lose its original shape, reducing cutting efficiency. The manual instructs users on how to replace the cutting blade, emphasizing correct alignment and tightening the bolt to a specified torque (16 Nm min, 20 Nm max). It recommends replacing the blade after 50 hours of mowing or 2 years, whichever comes sooner. The cutting blade should also be lubricated with light machine oil after each use.
- General Checks: All nuts, bolts, and screws should be kept tight. The grass collector should be checked frequently for wear or deterioration.
- Storage: Before storing, the product should be switched off, the battery removed, and the mower cleaned. For compact storage, the upper handle can be folded down by loosening the wing knobs.
- Transportation: When transporting, the product should be switched off, the battery removed, and protected from heavy impact or strong vibrations. It should be secured to prevent slipping or falling.
- Recycling and Disposal: The manual highlights the "Crossed out Wheelie Bin Symbol," indicating that the product and battery should not be disposed of with general household waste due to potentially harmful chemicals. Users are advised to recycle electrical products and Lithium-ion batteries through separate collection schemes in accordance with local legal requirements.
- Troubleshooting: A dedicated troubleshooting section helps users diagnose and resolve common issues, such as the mower failing to operate, motor starting/stopping intermittently, poor cutting, or charging problems. Solutions range from checking for blockages, charging the battery, ensuring correct insertion of parts, to allowing components to cool or warm.
The manual strongly advises that any inspection, maintenance, or repair work beyond the described steps should be performed by a qualified specialist to ensure safety and prevent further damage. It also emphasizes wearing appropriate protective clothing, including gardening gloves, when performing maintenance.