3.
If you are using either a SPECTRONIClI20 or 20D,
refer to Table 2-2 for information on filters and
phototubes that must be installed for accurate
results.
Sample Measurements
Once your instrument has been set up properly and has
warmed up for at least 15 minutes. you can begin
taking measurements.
Table 2-2 Phototube options (SPECTRONICII 20 and
20D only)
Phototube
Cat. No.
332971**
332972
332989
Filter
Cat. No.
None required
332918*
332992*
Range
340 to 600 nm
600 to 950 nm
400 to 700 nm
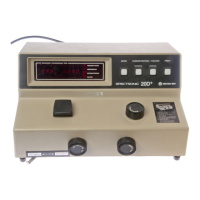
SPECTRONICe 20 and 20+
Notes:
.To read the meter properly, align the needle with its
reflection in the mirror.
.It is important to insert the blank and reset the meter
to lOO%T every time the wavelength is changed.
*Or use appropriate filter from Accessory Filter Kit
(Cat. No. 333128)
* * Included with instrument
Tip:
The basic steps for taking measurements are
highlighted in bold text in the following
instructions.
4. Plug the power cord into a grounded outlet with the
appropriate voltage.
5. Turn the Power SwitchlZero Control clockwise and
allow the instrument to warm up for at least 15
minutes.
Technique
I. Turn on the SPECTRONIC" 20+ by turning the
Power Switch/Zero Control (knob on the left side of
instrument) clockwise. Allow the spectrophotometer
to WanD up for at least 15 minutes to stabilize.
2. After the wannup period, set the desired
wavelength with the Wavelength Control Knob.
3. Set the fflter lever to the appropriate position for
the selected wavelength (not required for
SPECTRONIC" 20).4.
Adjust the meter to O%T with the Power
S witch/Zero Control (knob on the front left side of
instrument). Make sure the sample compartment is
empty and the cover is closed.
5. Fill a clean cell with water (or blank solution) and
wipe the cell with a tissue to remove liquid droplets,
dust and fingerprints.6.
Place the cell in the sample compartment and
align the guide mark on the cell with the guide mark
at the front of the sample compartment. Press the
cell &!:mly into the sample compartment and close
the lid.7.
Adjust the meter to lOO%T with the
Transmittance! Absorbance Control (knob on the
front right side of instrument).
8. Remove the cell from the sample compartment and
empty the water.9.
Rinse the cell twice with small volumes of the
solution to be measured and fill it with the solution.
Successful use of your spectrophotometer depends on
the consistent use of correct laboratory procedures and
analytical techniques. To minimize problems, follow
these simple rules:
.Keep all solutions free of bubbles.
.Make sure that all sample holders are at least half
full.
.Use the same cuvette for both sample and blank
measurements.
.Use square cuvettes (Cat. No. 331709) with Holder
(Cat. No. 333176) for greater accuracy.
.Make sure that the mark (fiducial line) on the test
tube aligns with the mark on the adapter toward the
front of the instrument.
.During extended operation at a fixed wavelength,
check from time to time for IOO%T drift. Possible
causes of drift are listed in Table 3-1 in the
Maintenance section.
.Use clean test tubes and do not touch the test tubes
below the fiducial line.
 Loading...