Installation & Operating Procedures
SPECTRONIC 2ar series
.Change in wavelength
It is important to insert the blank and reset the
display to 100% T or O.OA every time the
wavelength is changed.
Tip:
The basic steps for taking measurements are
highlighted in bold text in the following
instructions.
10.
Wipe the cell with a tissue and insert the cell into
the sample compartment. Align the guide marks
and close the lid.
II. Read the appropriate value (%T or A) from the
meter.12.
Remove the cell from the sample compartment and
repeat steps 9 through II for any remaining
sample solutions.13.
When all measurements are completed, turn off the
spectrophotometer by turning the Power
SwitchlZero Control counterclockwise until it
clicks.
Transmittance and Absorbance
SPECTRONIC~ 200 and 200+
Notes:
.Flashing display
A flashing display indicates that the reading is out of
range and the I OO%T/OA control must be adjusted.
This adjustment controls an optical occluder which
regulates the amount of light passing through the
sample.
In %T mode:
A reading greater than 200%T will cause the display
to flash.
-If the flashing reading is -1999, turn the
100%T/OA control clockwise until the display
operates normally.
-If the flashing reading is + 1999. turn the
lOO%T/OA control counterclockwise until the
display operates normally.
In absorbance mode:
A reading greater than 2A will cause the display to
flash.
-If the flashing reading is -1999, turn the
100%T/OA control counterclockwise until the
display operates normally.
-If the flashing reading is + 1999. turn the
100%T/OA control clockwise until the display
operates normally.
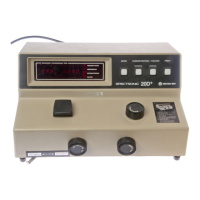
1. Turn on the insn-ument by turning the Power Switch
(knob on the left side of insn-ument) clockwise.
Allow the spectrophotometer to warm up for at least
15 minutes to stabilize.
2. After the warmup period, set the desired
wavelength with the Wavelength Control Knob.
3. Set the ffiter lever to the appropriate position for
the selected wavelength (not required for
SPECTRONICCB> 20D).4.
Adjust the display to O%T with the Zero Control
(knob on the front left side of the insn-ument). Make
sure that the sample compartment is empty and the
cover is closed.
5. Set the display mooe to TRANSMI1TANCE or
ABSORBANCE by pressing the MODE control key
until the appropriate lED is lit.
6. Fill a clean cell with water (or another blank
solution) and wipe the cell with a tissue to remove
liquid droplets, dust and fingerprints.
7. Place the cell in the sample compartment and
align the guide mark on the cell with the guide mark
at the front of the sample compartment. Press the
cell firmly into the sample compartment and close
the lid.
8. Adjust the display to lOO%T or O.OA with the
Transmittance/Absorbance Control (knob on the
right side of insn-ument).
9. Remove the cell from the sample compartment and
empty the water.
10. Rinse the cell twice with small volumes of the
solution to be measured and fill it with the
solution.
It may require several complete turns of the
lOOo/fiT control to return to the proper range.
 Loading...