7
1.6 Design components
Case: The instrument is enclosed in a solid
PC (polycarbonate) case with TPE (rubber)
overmold.
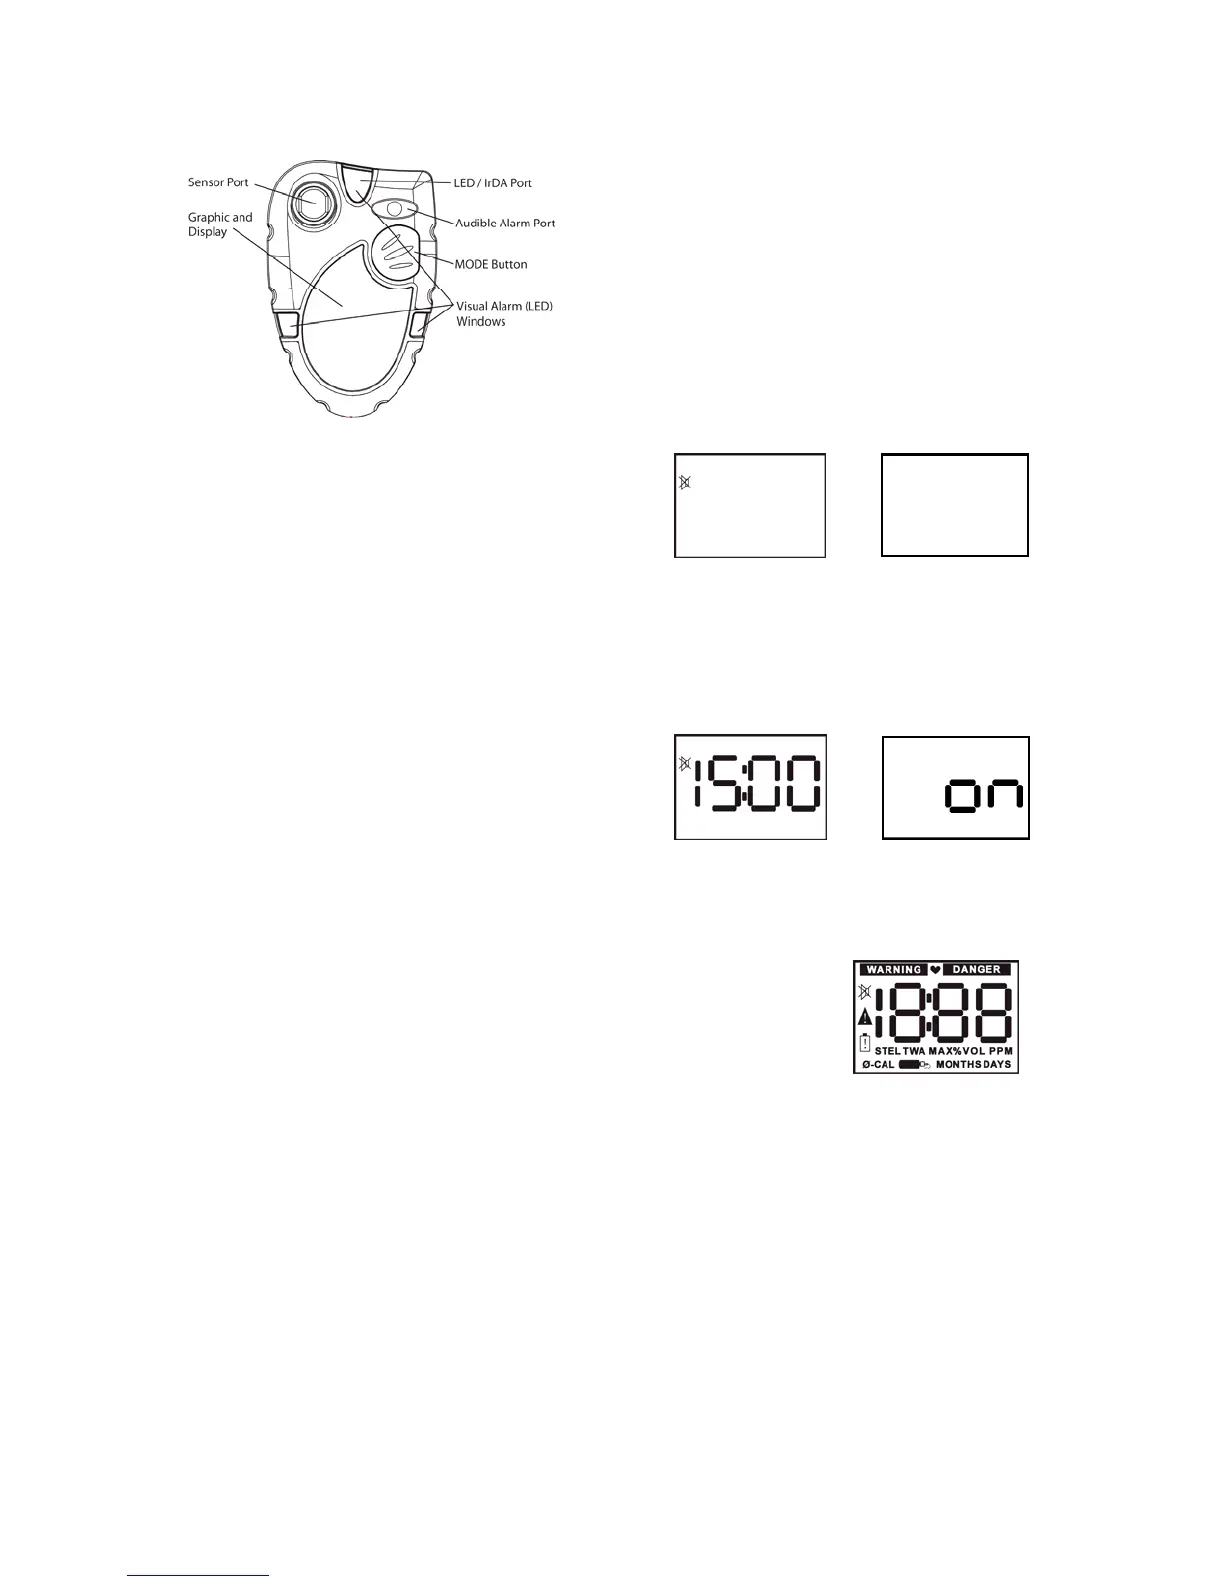
Figure 1: Exterior front view.
Front face: The front face of the instrument
houses the LCD display, MODE button,
sensor port, LED alarm and audible alarm
port.
LCD display: The liquid crystal display (LCD)
shows gas readings, messages and other
information. A built-in, manually-activated
backlight allows the display to be read even in
low light conditions.
LED / IrDA port: The LED also functions as
the IrDA port.
MODE button: The large push-button on the
front of the instrument is called the MODE
button. The MODE button is used to turn the
ToxiPro on and off, to turn on the backlight, to
view the MAX, STEL (if enabled) and TWA (if
enabled) screens and to initiate the automatic
calibration sequences.
Sensor port: The sensor port is located at
the upper left corner of the instrument. A filter
prevents unwanted contaminants from
entering the sensor.
Audible alarm port: A cylindrical resonating
chamber contains the loud audible alarm.
Visual alarm (LED) Windows: A bright LED
(Light-Emitting Diode) alarm light provides a
visual indication of the alarm state.
Belt Clip: The belt clip attaches to the bottom
surface of the instrument.
1.7 Standard accessories
Standard accessories with every ToxiPro
include installed sensor and lithium battery,
reference manual and calibration/sample
draw adapter.
Optional accessories include manual sample
draw kit (hand-aspirated), vibrating alarm,
Datalogger Upgrade and BioTrak software kit.
1.8 Value pack kits
ToxiPro value packs include all standard
accessories, plus calibration fittings, 34-liter
cylinder of calibration gas, and fixed flow rate
regulator in a foam-lined, hard-shell carrying
case.
2. Field Operation
Field operation of the ToxiPro is controlled
entirely through the MODE button, which is
located on the front of the instrument.
The MODE button is used to turn the ToxiPro
on and off, to turn on the backlight, to access
MAX, STEL (if enabled) and TWA (if enabled)
gas readings for the current session and to
initiate calibration.
2.1 Turning the ToxiPro on
The ToxiPro is effectively disabled when it
leaves the Honeywell Analytics factory. Upon
arrival, the ToxiPro’s display will be blank.
The ToxiPro O
2
will show the negated horn
icon.
or
To initialize the instrument, press the MODE
button for 5 seconds. ToxiPro O
2
models will
proceed with a 15-minute countdown while
the oxygen sensor stabilizes.
Note: The 15-minute sensor warm-up
period is only necessary for the initial
start-up of ToxiPro O
2
models.
→
When the ToxiPro O
2
warm-up period
concludes, the screen will be completely
blank. ToxiPro models equipped with a toxic
gas sensor do not require an initial warm up
period.
With the blank screen shown, press and hold
the MODE button for 5 seconds to initiate the
start-up sequence.
At start-up, the ToxiPro will automatically go
through a basic electronic self-test sequence
that will take approximately thirty seconds.
During the self-test sequence, all sections of
the display will be lit, the display backlight will
momentarily turn on and the audible alarm will
“chirp”.
If the instrument fails to detect the sensor
during startup, “F 1” will be displayed with the
caution symbol following the display test
screen. If “F 1” is shown, the instrument will
automatically shut down in approximately 5
seconds. See Section 4.2 of this manual for
instructions on accessing the sensor
compartment.
 Loading...