EasyManua.ls Logo

Spyder Auto PRO-YD-CS03-AM Series User Manual

Spyder Auto PRO-YD-CS03-AM Series
3 pages
To Next Page IconTo Next Page
Page #1 background imageLoading...
Page #1 background image
*Please Note*
If you are unfamiliar with the installation pro-
cesses, professional installation is highly rec-
ommended.
INSTALLATION GUIDE:
PRO-YD-CS03-AM-(ALL COLORS)
1) Open the hood. Remove the headlight retainer
stake by sliding it out towards the grille.
3) Remove the headlight. Squeeze the tab
indicted to loosen the lower lens assembly.
4) Unseat the lower lens assembly and disconnect the
DRL socket and turn signal socket, then remove the
lower lens and set it aside.
2) Unseat the headlight and disconnect the headlight
wiring harnesses.
Question and Answer IconNeed help?

Do you have a question about the Spyder Auto PRO-YD-CS03-AM Series and is the answer not in the manual?

Spyder Auto PRO-YD-CS03-AM Series Specifications

General IconGeneral
BrandSpyder Auto
ModelPRO-YD-CS03-AM Series
CategoryAutomobile Accessories
LanguageEnglish

Summary

Spyder Headlight Installation Guide

Tools Required for Installation

No specific tools are required for this installation process.

Step-by-Step Installation Process

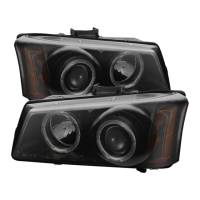
Detailed steps for removing old headlights and installing new SPYDER headlights.

Step 1: Remove Headlight Retainer Stake

Open hood, slide out headlight retainer stake towards grille.

Step 2: Disconnect Headlight Wiring

Unseat the headlight and disconnect its wiring harnesses.

Step 3: Loosen Lower Lens Assembly Tab

Remove headlight, squeeze tab to loosen lower lens assembly.

Step 4: Remove Lower Lens Assembly

Unseat lower lens, disconnect sockets, remove lower lens.

Step 5: Reinstall Sockets and Seat Lower Lens

Reinstall DRL/turn signal sockets into SPYDER lower lens assembly and seat it.

Step 6: Connect Harness to SPYDER Headlight

Reconnect OEM headlight harness to SPYDER upper lens projector headlight assembly.

Step 7: Secure Upper Headlight Lens

Reinstall headlight retainer stake to secure the upper headlight lens assembly.

Step 8: Finalize Installation

Close the hood and enjoy your new SPYDER headlights.

Additional Support and Disclaimer

Installation Video Support

Watch our installation video on YouTube for further help with installation.

Installation Disclaimer

Spyder Auto not liable for damages from improper installation; seek professional help if unsure.

Related product manuals