EasyManua.ls Logo

Spyder Auto PRO-YD-CM04 Series User Manual

Default Icon
3 pages
To Next Page IconTo Next Page
Page #1 background imageLoading...
Page #1 background image
*Please Note*
If you are unfamiliar with the installation processes,
professional installation is highly recommended.
1) Open the hood. Remove [2x] 10mm bolts securing
the headlight.
INSTALLATION GUIDE:
PRO-YD-CM04-(ALL COLORS)
3) Disconnect the wiring harness and set the
OEM headlight aside.
4) Connect the wiring harness to your Spyder
headlight.
2) Unseat the headlight.
Question and Answer IconNeed help?

Do you have a question about the Spyder Auto PRO-YD-CM04 Series and is the answer not in the manual?

Spyder Auto PRO-YD-CM04 Series Specifications

General IconGeneral
BrandSpyder Auto
SeriesPRO-YD-CM04
Housing ColorBlack
Voltage12V
Lens MaterialPolycarbonate

Summary

SPYDER INSTALLATION GUIDE PRO-YD-CM04

Tools Required

Lists the necessary tools for installation, including a 10mm socket and ratchet.

Headlight Removal and Wiring

Instructions for opening the hood, removing OEM headlight bolts, unseating, and disconnecting wiring.

Spyder Headlight Installation and Final Steps

Headlight Mounting and Completion

Steps for seating and mounting the new Spyder headlight using 10mm bolts, and closing the hood.

Further Assistance and Disclaimer

Installation Video Link

Provides a YouTube link for additional installation help and information.

Disclaimer

States Spyder Auto is not liable for damages and advises professional installation if unsure.
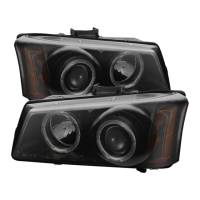
Related product manuals