Do you have a question about the Spyder Auto PRO-YD-CS99 Series and is the answer not in the manual?
Details on the tools needed for installation, noting no specific tools are required.
Steps to open the hood, release, and disconnect the original equipment manufacturer (OEM) headlight assembly.
Steps for transferring bulbs, connecting harnesses, seating, and securing the new Spyder headlight assembly.
Instructions for closing the hood and enjoying the newly installed Spyder headlights.
Provides a disclaimer on liability and recommends professional installation for those unfamiliar with the process.
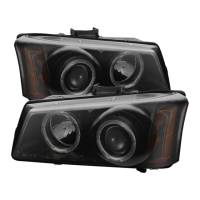
| Light Source | Halogen |
|---|---|
| Housing Color | Black |
| Lens Color | Clear |
| Installation | Plug and Play |
| Brand | Spyder Auto |
| Series | PRO-YD-CS99 |
| Category | Automobile Accessories |
| Fitment | Direct Replacement |