Setup Procedure
Note: The Enter button is used to select options while the Plus and Minus buttons are used to alter
the options or navigate the menu. If no selection is made after a period of time the unit will return
to operation automatically. While in the menu system all AC power to the outputs is turned off for
safety.
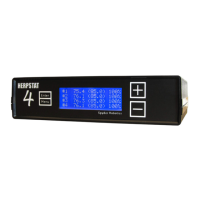
Press the Enter button to display the initial menu screen. This screen allows you to select which Output to
configure, the System settings, and the Hardware settings. Each output has its own individual settings. All
settings in the unit are stored in non-volatile eeprom memory which are retained during a power outage.
Navigate to the System option and press Enter.
System Setup
Note: Adjust the Time and Date to insure proper operation.
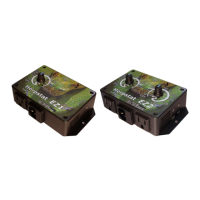
Display:
This setting adjusts whether to display temperature in Celsius or Fahrenheit.
SetTime:
This setting adjusts the system clock's time. While setting the time the Plus button increments the hour and the
Minus button increments the minute.
SetDate:
This setting adjusts the system clock's date. While setting the date use the Plus and Minus buttons to adjust the
setting and the Enter button to advanced to the next setting.
Sounds:
Enables or disabled the system beep during menu selection. Does not affect audible alerts.
M-Reset: (Master Reset)
Selecting this will reset all settings in the device to factory defaults.
LCD:
This option will adjust the LCD backlight brightness.
Output Setup for Temperature Control
From the initial menu screen select an output using the Plus and Minus button and press Enter.
Mode: (Heat (Dimming), Heat (Pulse), Cooling)
Note: When the Mode is changed all settings for selected output will be set to the defaults for that particular
mode.
Heat (Dimming) can adjust the voltage output to the heating device similar to a household dimmer. In most
cases this is the best performing mode of control.
Heat (Pulse) can provide varied lengths of pulsed power to the heating device. This method of control is best
used with metal rack systems.
The Cooling mode is a non-proportional mode that applies power when the set temperature is breached. The
Cooling mode then powers off the output when the temp drops below the Swing setting.
(Output Setup for Temperature Control continued...)
DayTemp:
The DayTemp setting is the temperature the device will try to maintain during the Day Cycle. If the Nite Cycle
is disabled then the Day Temp setting will be used for the full 24hrs.
SnsrAdj:
The SnsrAdj (Sensor Adjust) setting is used to alter the temperature read by the temperature probe to match
other equipment. Note: The sensor used in the Herpstat Probes are typically more accurate than most other
equipment. Adjustments to this setting are usually not necessary.
Swing:
This setting is available in Cooling mode. This controls the range of temperature before the output is re-enabled
after it has made it to the Day Temp or NiteTemp setting.
Basking Assist:
The Basking Assist option is for use with basking lights as a heat source. Once the target temperature has been
reached instead of turning the power off it will continue providing a reduced power up to a degree above the
target temperature.
NiteCycle Menu:
Enter this menu to adjust settings if a different temperature is required during the night.
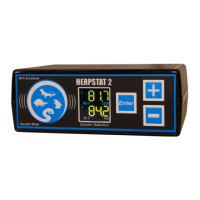
NC= (OFF / ON)
To Enable/Disable the Nite Cycle press the Enter button while the cursor has the NC= option selected.
Nite Temp:
This setting is the temperature the device will maintain during the Nite Cycle.
NC Start:
This setting adjusts what time the Nite Cycle starts.
NC End:
This setting adjusts what time the Nite Cycle ends.
Ramping:
This setting adjusts how long it will take to switch between the DayTemp and NiteTemp settings allowing a
smooth transition up to 10 hours.
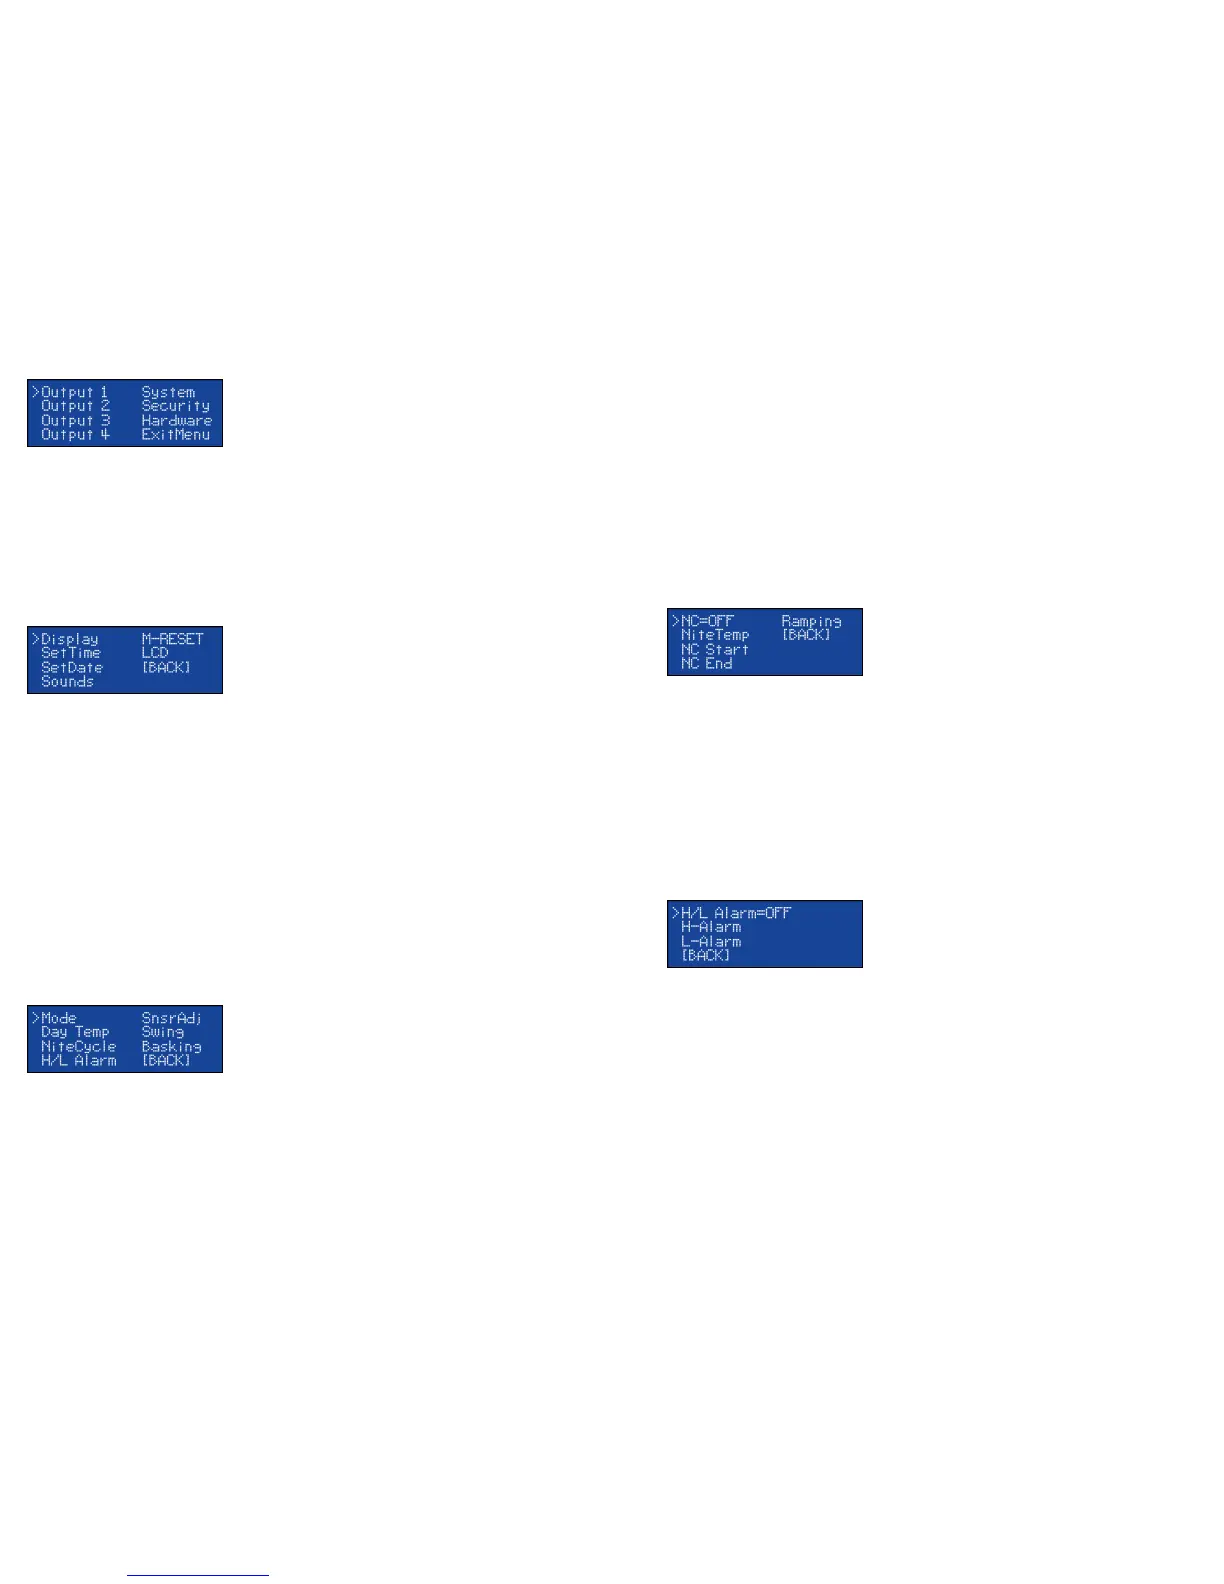
H/L Alarm Menu:
Enter this menu to set the audible High/Low Alarm feature.
H/L Alarm= (OFF / ON)
To Enable/Disable the High/Low Alarms press the Enter button while the cursor has the H/L Alarm= option
selected.
H-Alarm:
This setting is the highest temperature at which the audible alarm triggers if breached for the selected output.
L-Alarm:
This setting is the lowest temperature at which the audible alarm triggers if breached for the selected output.
L-Alarm 30m Mute: This setting is under the L-Alarm menu. By default it is enabled. This will mute the low
temperature alarm for 30 minutes when the Herpstat first powers on or returns from the menu allowing time for
the temperature to reach the target setting. If the L-Alarm is triggered you can reactivate the mute by entering
the menu or by pressing the PLUS button on the main display that shows the probe temperatures. This will
allow another 30 minutes before the L-Alarm becomes active.
 Loading...