Do you have a question about the Stack 07800 and is the answer not in the manual?
Symbols indicating possible dangers. Read associated safety notices carefully and follow them.
Icon indicating supplementary information. Read operating instructions before use.
Symbol indicating caution for hot surfaces.
Symbol indicating suitability for use with food.
Signal word indicating high risk, resulting in serious injury or death.
Signal word indicating medium risk, possibly serious injury or death.
Signal word indicating low risk, slight or moderate injury.
Signal word indicating risk of damage to material.
Prohibits using the grill as a heater or integrated device, and limits to personal use.
Use product only for specified purpose and as described in instructions.
Warranty excludes faults from incorrect handling, damage, or repairs.
Crucial warning: Do not use in enclosed spaces due to carbon monoxide poisoning risk.
Notice: Do not operate if deformed or defective. Check before every use.
Note to comply with national and local regulations, permits, and rules.
Choose a location free from combustible materials with a minimum 3m gap.
Keep children and pets away; never leave unattended when hot.
Only use firelighters according to DIN EN 1860-3; do not use methylated spirit or petrol.
Only use barbecue charcoal or briquettes tested according to DIN EN 1860-2 as fuel.
Use barbecue tongs and gloves when handling hot parts; surfaces remain hot.
Use barbecue tongs and utensils with long, heat-resistant handles for preparing food.
In case of fire, smother flames with a fireproof blanket or extinguisher.
Be careful when handling parts due to danger of injury from sharp edges.
Keep packaging material away from children and animals to prevent suffocation.
Protect the product from impacts.
Use only original accessories from the manufacturer to ensure proper function.
Operate with charcoal for 30 minutes to remove production residues. Clean after cooling.
Small amount of smoke/odour during first use is normal and not a quality defect.
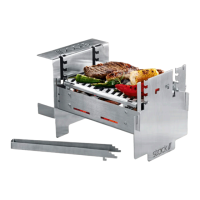
Use tongs for placing, turning, removing food, and assembling/adjusting the grill.
Ensure tongs' hooks engage in appropriate slots for assembly and adjustments.
Use container to transport fuel and firelighters; fill chambers evenly with fuel.
Container serves as chimney starter or fire base with grill rack and bottom side part.
Assemble top side part onto charcoal container and flip grill into horizontal position.
Grill rack height can be adjusted to 4 levels for distance from embers or adding fuel.
Convert grill to fire using residual embers to light wood.
Ensure grill rack is hooked, place grill upright, remove top part.
Fill charcoal container with wood and firelighters, place grill rack, set up bottom side part.
Store grill and components in carrying bag after cooling and emptying.
Grill gets very hot and may not be moved during use, except with tongs.
Only use if assembled properly according to instructions and not damaged.
Set up on a secure, stable, horizontal, flat, and fire-resistant surface.
Load fuel up to specified maximums; place items on barbecue once fuel has ash layer.
Always use supplied barbecue tongs for hot components and remove when not in use.
Do not use any force during assembly or conversion.
Never pour water or liquids onto hot components to prevent burns or scalding.
Fill charcoal container chambers with briquettes/charcoal and firelighters.
Place grill rack on charcoal container, ensuring locking lugs engage.
Set up bottom side part with logo visible.
Place charcoal container vertically on bottom side part, aligning open side and grill rack.
Slide charcoal container back on side part as far as it will go.
Light firelighters in charcoal container with a long lighter.
Place top side part on charcoal container, ensuring correct alignment.
Flip the grill carefully into horizontal position using barbecue tongs.
Place food on the barbecue once it is ready.
Adjust grill rack height by sliding it right, pulling out, and re-inserting at desired height.
Add more fuel if necessary, noting maximum permitted amounts.
Allow all parts to cool down completely before emptying or cleaning.
Do not use corrosive or abrasive cleaning agents; avoid spraying cold water on hot parts.
Components may lose some colour over time; this is normal and does not affect function.
Dispose of ash, scrape residues, wash parts with warm water and detergent, or use dishwasher.
Allow all parts to dry completely before storing them away.
Allow all parts to cool down completely before storing or transporting them.
Assemble components as shown in Picture A and store in the carrying bag.
When not in use, store in a dry place out of reach of children and animals.
Dispose of residual waste in designated containers; comply with local regulations.
Dismantle product into individual parts and recycle metals and plastics.
Dispose of packaging material in an environmentally friendly manner for recycling.