6
EN
Keep this instruction manual for future reference.
INTRODUCTION
Anyoneusing,cleaningordisposingofthisproductmustbefa-
miliar with the instructions in this manual.
These operating instructions are an integral part of the product.
PURPOSE AND USE
ThisunitisdesignedtobeusedasaFLEXIBLEHOSEREELfor
COMPRESSEDAIR,anyotheruseisconsideredimproper.The
manufacturer declines all responsibility for damage or accidents
resulting from improper use of the unit or from failure to comply
withthesafetyregulations.Anytamperingormodicationofthe
unit not previously authorized relieves the manufacturer from
damages deriving from or referable to the above-mentioned acts.
PACKAGE CONTENTS
● Reelwithxingbracket
● Quick coupling
● Connector (nipple)
● Expansionplugs(2),washers(2),nuts(2)
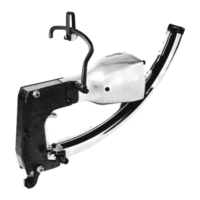
DESCRIPTION OF THE UNIT (Fig. 1)
1. Fixingbracketforwallmounting
2. Reel
3. Hose stop
4. Hose
5. Quick coupling
6. Quick coupling (nipple)
7. Connecting hose (air inlet)
SAFETY WARNINGS
● DO NEVERexceed thestatedmaximumoperatingpressures.
● ALWAYS discharge the air pressure before carrying out the
xing(onthewall),cleaningorreassemblyoftheunit.
● Thereelmustbexedtoastablewall,capableofsupporting
both weight and load.
● Take care of the hose, preventing it from becoming trapped
betweenobstaclesand/orsurroundingobjects.
● Protect the hose from oil, acids, sharp edges and high tem-
peratures.
● Attheendofeachuse,rewindthehosecompletely,puttingitin
its housing; this way the reel will be protected of unnecessary
and prolonged tension.
Warning!
In the event that the hose (4) is damaged, do not use the unit
and dispose of it in accordance with current regulations.
INSTALLATION
Afterremovingtheunitfromthepackagingandcheckingitsin-
tegrity, make sure that all the components listed in the “package
contents” are present inside the packaging.
Ensurethatitispossibletoinstallthereelsufcientlyclosetothe
compressed air source so that the connecting hose (7) can be
easily connected to the source.
● Use a pencil to mark the points where holes are to be drilled
for fastening (Fig. 2).
● Drilltwoholesinthewall(g.3)withthesamediameteras
the plugs supplied.
● Drive the anchors of the expansion plugs into the holes in
the wall (Fig. 4).
● Put the retaining bracket (1) at the threads of the dowels, then
hang the unit, taking care to thread the slots of the reel bracket
over the threads.
● Gentlylet the reel downwards, so that both threads tinto
the narrow slot.
● Mount one washer and one nut on each thread and tighten
the nuts.
Warning!
Ensure that the xing bracket (1) is securely xed to the
wall.
USE
Warning!
Ensure that the compressed air system is not under
pressure when connecting the unit.
● Connect the quick coupling (6) of the connecting hose (7) to
the outlet of the compressed air source.
● Grasp the hose retainer (3).
● Pull the hose (4) and pull it out as far as necessary, holding it
rmly.Therewindmechanismislocked(likearollingshutter),
so the hose does not return automatically unless it is pulled out
again. For each metre of hose there are 2-3 clamping points.
Do not pull the hose out beyond the safety mark stamped
on the hose.
● Attheendofuse,switchoffthecompressedairsourceand
release the pressure. Gently pull the hose (4) and let the
mechanism rewind it.
● Accompanythehose(4)duringrewinding.Ensurethatthehose
does not twist or snag while being rewound.
● The hose must not be under pressure when being rewound
or during use.
CLEANING
● Clean the reel with a well-wrung cloth or brush. Do not use ag-
gressive or abrasive cleaning agents, as these could damage
the hose (4) and the hose reel (2).
● Avoidsprayingwateronorinsidethereel.
● Keep the reel hose clean to allow proper sliding.
 Loading...