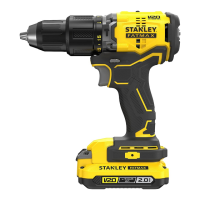
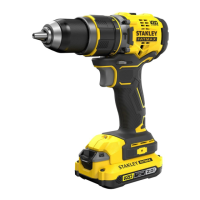
The STANLEY FATMAX SFMCD715 Hammerdrill/Screwdriver is a versatile cordless power tool designed for screwdriving applications and for drilling in wood, metal, plastics, and soft masonry. It is intended for both professional and non-professional users.
Function Description
The SFMCD715 operates on an 18V Li-Ion battery system, offering cordless convenience. It features a trigger switch (1) for variable speed control, where the speed increases with the depression of the trigger. A forward/reverse button (2) allows for changing the rotational direction and also acts as a lock-off button to prevent accidental starting. The tool includes a torque adjust collar (3) for setting the appropriate torque for different tasks, a dual range gear selector (4) for switching between low speed/high torque and high speed/low torque, and a keyless chuck (5) for easy bit changes. An integrated LED work light (7) illuminates the work area when the drill is activated.
Important Technical Specifications
- Model: SFMCD715
- Voltage: 18VDC
- No-load speed: 0-600/0-1900 min⁻¹ (dual range)
- Max. torque: 60 Nm
- Chuck capacity: 1.5-13 mm (keyless chuck)
- Max Drilling capacity:
- Steel: 13 mm
- Wood: 30 mm
- Masonry: 13 mm
- Weight: 1.2 kg (without battery)
- Battery compatibility: STANLEY FATMAX 18V Li-Ion batteries (SFMCB201, SFMCB202, SFMCB204, SFMCB206 with capacities of 1.5Ah, 2.0Ah, 4.0Ah, 6.0Ah respectively).
- Charger compatibility: STANLEY FATMAX chargers (SFMCB11, SFMCB12, SFMCB14). Input voltage 230VAC, output voltage 18VDC.
- Sound pressure (LPA): 88.5 dB(A), uncertainty (K) 3 dB(A)
- Sound power (LWA): 99.5 dB(A), uncertainty (K) 3 dB(A)
- Vibration total values (triax vector sum) according to EN60745:
- Drilling into metal (ah, D): 1.2 m/s², uncertainty (K) 1.5 m/s²
- Impact drilling into concrete (ah, ID): 12.2 m/s², uncertainty (K) 1.5 m/s²
Usage Features
- Battery Charging (Fig. A): The battery (6) should be charged before first use and whenever power diminishes. The charger (8) is plugged into an outlet, and the battery is inserted. A blinking green LED (8a) indicates charging, while a solid green LED signifies a full charge. The charger also features a Hot/Cold Pack Delay (green LED (8a) flashing, red LED (8b) solid) if the battery temperature is outside the recommended 10 °C to 40 °C range, ensuring optimal battery life.
- Battery State of Charge Indicator (Fig. B): Pressing the button (6a) on the battery allows users to quickly check the remaining charge.
- Installing/Removing Battery (Fig. C, D): To install, slide the battery pack (6) into the tool until an audible click is heard. To remove, depress the battery release button (6b) and pull the battery pack out. Always ensure the lock-off button is engaged before changing batteries.
- Keyless Chuck (Fig. G): To insert a drill bit (12) or accessory, grasp the chuck (5) and rotate it counterclockwise. Insert the bit fully, then tighten by rotating the chuck clockwise. Do not attempt to tighten or loosen bits by gripping the chuck and turning the tool on.
- Trigger Switch & Forward/Reverse Button (Fig. H): The trigger switch (1) controls the tool's ON/OFF and speed. The forward/reverse control button (2) selects rotation direction (left for forward, right for reverse) and locks the tool in the off position when centered. Always release the trigger switch before changing direction.
- Adjusting Torque Control (Fig. I): The torque adjust collar (3) allows selection of operating modes (drilling, hammer drilling) and torque settings for screwdriving. For drilling in wood, metal, or plastics, set the collar to the drilling symbol. For light masonry, set it to the hammer drilling position. For screwdriving, start with the lowest setting and increase if the clutch ratchets before the desired result is achieved.
- Dual Range Switch (Fig. J): The gear shifter button (4) allows selection of low speed/high torque (position 1, away from chuck) or high speed/low torque (position 2, toward chuck). Always turn the tool off and allow it to stop before changing gears.
- Screwdriving: Use forward rotation (button pushed left) for driving fasteners and reverse (button pushed right) for removing them.
- Drilling: Use sharp drill bits. Support and secure the workpiece. Start drilling at low speed with light pressure, applying pressure in a straight line with the bit. Hold the drill firmly with two hands. Avoid stalling the drill. Minimize stalling on breakthrough by reducing pressure. Keep the motor running while pulling the bit out of a drilled hole.
- Belt Hook (Optional extra) (Fig. E, F): The belt hook (9) can be attached to either side of the tool using the provided screw (10) to accommodate left- or right-handed users. It can be removed if not desired. Ensure the screw is securely tightened. The belt hook is for hanging the tool from a work belt and should not be used for tethering or suspending objects overhead.
Maintenance Features
The SFMCD715 is designed for long-term operation with minimal maintenance.
- General Cleaning: Regularly clean the ventilation slots in the tool and charger using a soft brush or dry cloth. Clean the motor housing with a damp cloth. Avoid abrasive or solvent-based cleaners.
- Battery Care: Never attempt to open the battery. Do not expose it to water or store it in temperatures exceeding 40 °C. Charge only within 10 °C to 40 °C using the specified STANLEY FATMAX charger. Dispose of batteries according to local provisions.
- Charger Care: The charger does not require maintenance apart from regular cleaning. Do not open or probe the charger. Replace defective cords immediately.
- Service: Have the power tool serviced by a qualified repair person using identical replacement parts to maintain safety. Battery packs should only be serviced by the manufacturer or authorized service providers.
- Safety Precautions: Always remove the battery from the tool and unplug the charger before performing any maintenance.