Note:
In the rare event that the vehicle to be started has a Positive Grounded System (positive battery terminal is connected to chassis), replace steps 4a
and 4b above with steps 5a and 5b, then proceed to step 6.
5a. Connect negative (–) black clamp to vehicle battery’s negative terminal.
5b. Connect positive (+) red clamp to vehicle chassis or a solid, non-moving, metal vehicle component or body part. Never clamp directly
to Positive battery terminal or moving part. Refer to the automobile owner’s manual.
6. When clamps are connected properly, turn the Jump-Starter Power Switch to ON.
7. Turn ON the ignition and crank the engine in 5-6 second bursts until engine starts.
8. Turn the Jump-Starter Power Switch back to the OFF position.
9. Disconnect the negative (–) engine or chassis clamp first, then disconnect the positive (+) battery clamp.
WARNING: TO REDUCE THE RISK OF INJURY OR PROPERTY DAMAGE:
•FOLLOWALLSAFETYINSTRUCTIONSFOUNDINTHE“SPECIFIC SAFETYINSTRUCTIONSFORJUMPSTARTERS”
SECTION OF THIS INSTRUCTION MANUAL.
CAUTION: TO REDUCE THE RISK OF PROPERTY DAMAGE:
attempts, discontinue jump-start procedure and look for other problems that need to be corrected.
unit will sound a beep. Disconnect clamps and reconnect to battery with correct polarity.
contact a qualified technician to investigate why the engine did not start.
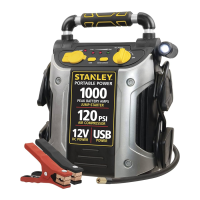
USB POWER PORT
1. Push the USB Power Button to turn the USB Port on and the USB power indicator will light.
2. Lift up the cover of the USB Charging Port.
3. Plug the USB-powered device into the USB Charging Port and operate normally.
Notes:
Make sure the USB Power Button is in the off position when the unit is being recharged or stored.
Some household USB-powered electronics will not operate with this unit.
12 VOLT DC PORTABLE POWER SUPPLY
This portable power source is also for use with all 12 volt DC accessories equipped with a male accessory outlet plug and are rated
up to 5 amps.
3. Switch on the appliance and operate as usual.
4. Periodically press the battery charge level pushbutton to check battery status.
EMERGENCY AREA LIGHT
The area light is controlled by the Area Light Power Switch on top of the light. Make sure the area light is turned off when the unit
is being recharged or stored.
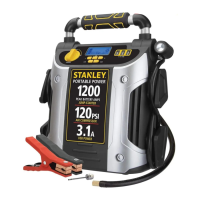
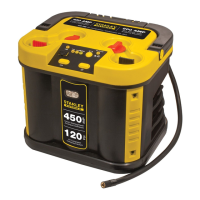
PORTABLE COMPRESSOR
The built-in 12 volt DC compressor is the ultimate compressor for all vehicle tires, trailer tires and recreational inflatables. The
the unit under the air pressure gauge. The compressor can operate long enough to fill up to 3 average sized tires before the battery
must be recharged.
The compressor may be used by removing the air hose from the storage hatch and if required, fitting an appropriate nozzle to the
air hose. Return hose to the storage compartment after use.
Inflating Tires or Products With Valve Stems
1. Lift the thumb latch on the SureFit™ nozzle (chuck) and fit it onto the valve stem.
2. Ensure SureFit™ nozzle connector is pushed on to valve stem as far as possible before closing thumb latch.
3. Make sure latch is secure.
moisture.
FIRST AID
SKIN: If battery acid contacts skin or clothing, wash immediately with soap and water for at least 10 minutes. If redness, pain, or
irritation occurs, seek immediate medical attention.
EYES: If battery acid comes in contact with eyes, flush eyes immediately, for a minimum of 15 minutes and seek immediate
medical attention.
SAVE THESE INSTRUCTIONS
INTRODUCTION
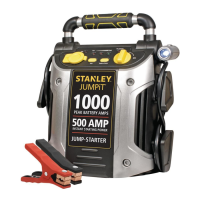
Congratulations on purchasing your new 500 Amp Jump Starter with Compressor. Read this Instruction Manual and follow the
instructions carefully before using this unit.
CHARGING/RECHARGING
Lead-acid batteries require routine maintenance to ensure a full charge and long battery life. All batteries lose energy from self-
discharge over time and more rapidly at higher temperatures. Therefore, batteries need periodic charging to replace energy lost
through self-discharge. When the unit is not in frequent use, manufacturer recommends the battery be recharged at least every
30 days.
WARNING:NeverattempttousetheACandDCchargingmethodsatthesametime.
Notes:
This unit is delivered in a partially charged state – you must fully charge it upon purchase and before using it for the first time. Initial AC charge should be
for 24 hours.
Make sure all other unit functions are turned off during recharging, as this can slow the recharging process.
Charging/Recharging Using the 120 Volt AC Charger and a Standard Household Extension Cord (not included)
cord into a standard 120-volt AC wall outlet.
Battery Status Indicators light solid.
Note:
The unit cannot be overcharged using this method.
12 Volt DC Charging Method (optional accessory)
connector at each end.
2. Insert the silver-tipped end plug into the 12 volt DC accessory outlet on the front panel of the unit.
3. Charge the unit until the green FULL indicator lights when the Battery Power Level Button is pressed (with the adapter
4. When charging is complete, remove the charging cord and store in a safe place.
Notes:
Some vehicles require that the ignition be switched to the accessory outlet position in order to power the accessory outlet.
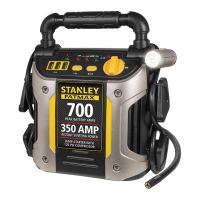
JUMPSTARTER
start the vehicle.
set the emergency brake.
2. Make sure the Jump-Starter Power Switch is turned to off.
3. Remove jumper clamps from clamp tabs. Connect the red clamp first, then the black clamp.
4. Procedureforjump-startingaNEGATIVEGROUNDEDSYSTEM(negativebatteryterminalisconnectedtochassis)
(MOSTCOMMON)
4a. Connect positive (+) red clamp to vehicle battery’s positive terminal.
4b. Connect negative (–) black clamp to chassis or a solid, non-moving, metal vehicle component or body part. Never clamp directly to
negative battery terminal or moving part. Refer to the automobile owner’s manual.
5. Procedureforjump-startingPOSITIVEGROUNDSYSTEMS
J5C09_ManualENSP_031113.indd 6-7 3/11/2013 11:27:14 AM
 Loading...