6
When using air-powered accessories, always wear safety clothes.
Keep the work area free and always maintain a stable position.
Do not allow inexpert persons to use tools without suitable supervision. Keep children and animals at a distance from the work area;
improper use of compressed air may cause serious injuries.
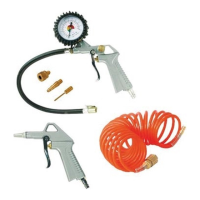
TECHNICAL DATA Max.pressure:10bar
INSTRUCTIONS FOR USE Connect the air hose to the inlet fitting (1) on the gun. To inflate the tire and check pressure, insert the fitting (2) in
the valve of the tire holding down the lever (3) on this; following insertion, release the lever (3). With the gauge facing you, read the pressure;
for inflation, press the lever (4) fully for a few seconds and then release it; repeat the operation until you have obtained the pressure required as
shown by the needle on the dial of the gauge. For deflation, release the lever (4) and press the button (5) with your thumb until all the air has been
expelled.(A – B).
Wheninflatingfootballs,rubberdinghies,certainbicycletiresandchildren’sinflatableswimming-pools,youmayhavetouseasuitableadapter.
Adapter 6 is used for footballs. Adapter 7isusedforrubberdinghies,airbedsandchildren’sswimming-pools.Adapter8 is used for certain
bicycles.
Select the suitable adapter and insert it in the inflation hose pressing tab (3) (fig. 1.1). Push the adapter in the inflation hose a shown in figure 1.1
and release tab (3). To fasten the adapter, turn it slightly in a clockwise direction.
WARNINGS Neverexceedtheinflationpressurerecommendedintheinstructionsforuseoftheobjecttobeinflated.Protectthegaugeagainst
impacts. In the case of impacts, check calibration.
TECHNICAL DATA Max.pressure:8bar
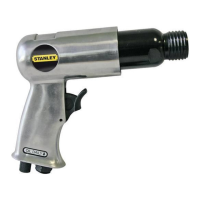
INSTRUCTIONS FOR USE Connect the air hose to the inlet fitting (1) on the gun. Direct the nozzle towards the area or object to be blown and
press the lever (2). The flow of air can be adjusted by regulating pressure on the lever (2).
TECHNICAL DATA Max.pressure:10bar
INSTRUCTIONS FOR USE OF CORD WITH FAST DISCONNECTS
Connecttheendofthecordfittedwithconnector(1)tothecompressor;connecttheotherendfittedwithconnector(2)totheair-poweredtool.To
insert the connector (2) in the tool, push until it clicks in place.
Todetachthecord,graspthetoolfirmlywithonehandandthering-nutoftheconnector(2)withtheotherandpullintheoppositedirection.Ifthis
operation is difficult, make sure that you have vented all the air from the cord. (C – D)
WARNINGS Before connecting or disconnecting a tool or the cord, make sure that you have switched off the compressor.
The cord must not be crushed or bent as it could be pierced.