Installing the VHD-V61 camera
Before you installthe camera, read the following safety information:
n Do not subject the camera to rain or moisture
n To prevent electric shock, do not remove screws or covers of the camera. There
are no self-serviceable parts. Refer to qualified service personnel for servicing
n Do not operate under unspecified temperature, humidityor power supply
n Use the soft dry cloth to clean the camera. If the camera is very dirty,clean it with
diluted neutral detergent; do not use anytype of solvent, which may damage the
surface
n The installation must be performed by qualified service personnel or system installers
in accordance withall localrules
n Do not move the camera head manually. Doing so results in the camera
malfunctioning
n Before powering the camera, check the power voltage carefully. Ensure you are
using the correct power source
n Ensure that the camera is far awayfrom areas where there might be radiation, x-
rays, or strong electric waves, or where magnetism is generated
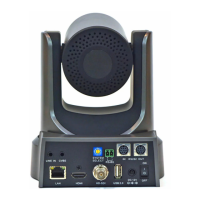
The rear view of the camera, shown below, indicates where to connect the cables:
To install the camera:
1. Connect the supplied HDMI-HDMI cable to the HDMI connector on the camera.
Connect the other end to the Camera-In connector on the StarLeaf room system.
2. Connect the supplied VISCA camera control cable to the RS-232 IN connector on
the camera. Connect the other end to the room system Camera Control
connector.
3. Connect power to the DC 12V power input connector.
Note: The selector switches on the rear of the camera have no effect on the operation
of the camera.
480-00260-02