EasyManua.ls Logo

StarTech.com HB20A7AME User Manual

StarTech.com HB20A7AME
2 pages
To Next Page IconTo Next Page
Page #1 background imageLoading...
Page #1 background image
Instruction manual
FR: Guide de l’utilisateur - fr.startech.com
DE: Bedienungsanleitung - de.startech.com
ES: Guía del usuario - es.startech.com
NL: Gebruiksaanwijzing - nl.startech.com
PT: Guia do usuário - pt.startech.com
IT: Guida per l’uso - it.startech.com
JP: 取扱説明書 - jp.startech.com
Manual Revision: 02/28/2018
For the latest information, technical specications, and support for
this product, please visit www.startech.com/HB20A7ME.
Package contents
1 x USB 2.0 hub
1 x USB-A to USB-B cable
1 x DIN rail kit
1 x instruction manual
Requirements
A USB equipped computer
Up to seven USB peripheral devices with cabling
A terminal power source (7-48 volts, 3 amps)
A Phillips type screwdriver (optional for DIN mounting)
Operating system requirements are subject to change. For the latest
requirements, visit www.startech.com/HB20A7AME.
HB20A7AME
7-Port USB 2.0 Hub - Industrial-Grade - ESD and Surge Protection
*actual product may vary from photos
Product diagram
Mounting the USB hub
1. Attach the DIN rail clips to the USB hub, using the DIN rail screws
(provided) and a Phillips type screwdriver (sold separately).
2. Slide the DIN rail clips into the DIN rail on your rack.
Front view
Back view
Power terminal
USB 2.0 host port
USB 2.0 ports
Power LED
DIN rail mounting
holes
Question and Answer IconNeed help?

Do you have a question about the StarTech.com HB20A7AME and is the answer not in the manual?

StarTech.com HB20A7AME Specifications

General IconGeneral
Bus TypeUSB 3.0
Connector Type(s)USB Type-C, USB Type-A
MAC Address TableNot Applicable
Jumbo Frame SupportNot Applicable
Switching CapacityNot Applicable
Forwarding RateNot Applicable

Summary

Product Diagram

Front View

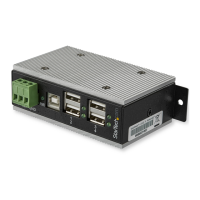
Diagram showing the front of the USB hub, illustrating the Power LED and USB 2.0 ports.

Back View

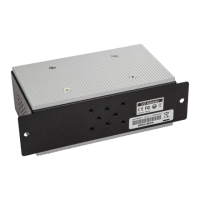
Diagram showing the back of the USB hub, highlighting the power terminal and DIN rail mounting holes.

Installation Steps

Connecting the Hub to Computer

Connect the USB 2.0 host port (PORT 0) on the hub to a USB port on your computer using the included cable.

Connecting Peripherals

Connect your peripherals to the USB 2.0 ports on the USB hub.

Connecting Power

Connect the positive and negative power pins on your power source cabling to the corresponding sockets on the power terminal.

LED Indicators

Power LED Behavior

Details the behavior and significance of the Power LED, indicating the hub's operational status.

Power Requirements

Voltage and Amperage Specs

Specifies the minimum and maximum voltage, and minimum recommended amperage for the USB hub's power source.

Regulatory and Compliance Information

FCC Compliance Statement

Details the FCC compliance for the digital device and potential interference guidelines.

Industry Canada Statement

States compliance of the digital apparatus with Canadian ICES-003.

Trademarks and Protected Names

Acknowledges third-party trademarks and protected names used for illustrative purposes.

Technical Support and Warranty

Information on lifetime technical support and the two-year product warranty.

Limitation of Liability

Details the limitations of liability for damages and losses related to product use.

Related product manuals