ENGLISH ENGLISH
20 21
20 21
This manual is consistent with the date of manufacture of
data of the machine acquired manual check for updates
of our machines on the website: www.grupostayer.com
1. Machine-specic Safety Warnings
Wear hearing protection. Exposure to noise can cause
hearing loss.
Always use the auxiliary handle supplied with the
machine. Loss of control can cause personal injury.
Use suitable detectors to determine if utility lines
are hidden in the work area or call the local utility
company for assistance. Contact with electric lines can
lead to explosion. Penetrating a water line causes property
damage or may cause an electric shock.
Hold the power tool only by the insulated gripping
surfaces when performing an operation where the
cutting tool may contact hidden wiring or its own
cord. Contact with a “live” wire will also make exposed
metal parts of the power tool “live” and shock the operator.
When working with the machine, always hold it rmly
with both hands and provide for a secure stance. The
power tool is guided more secure with both hands.
Secure the workpiece. A workpiece clamped with
clamping devices or in a vice is held more secure than
by hand.
Do not work materials containing asbestos. Asbestos
is considered carcinogenic.
Take protective measures when dust can develop
during working that is harmful to one’s health,
combustible or explosive. Example: Some dusts are
regarded as carcinogenic. Wear a dust mask and work
with dust/chip extraction when connectable.
Keep your workplace clean. Blends of materials are
particularly dangerous. Dust from light alloys can burn or
explode.
Always wait until the machine has come to a complete
stop before placing it down. The tool insert can jam and
lead to loss of control over the power tool.
Never use the machine with a damaged cable. Do not
touch the damaged cable and pull the mains plug when
the cable is damaged while working. Damaged cables
increase the risk of an electric shock.
2. Functional Description
follow the warnings and instructions may result in electric
While reading the operating instructions, unfold the
graphics page for the machine and leave it open.
2.1 Intended Use
HD3DK - HD6BK - HD6DK - HD26BK - HD27BK -
HD27CK - HD5CK- HD40BK - MH6BK - MH6CK
The machine is intended for hammer drilling in concrete,
brick and stone. It is also suitable for drilling without
impact in wood, metal, ceramic and plastic. Machines with
electronic control and right/left rotation are also suitable
for screwdriving and thread cutting.
MD4K - MD6K - MD10 - MD15K - MD15BK
The machine is intended for heavy chiselling and
demolition work as well as for driving in and compacting
with the appropriate accessories.
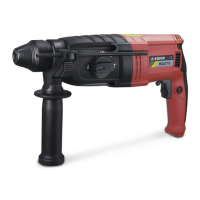
2.2 Product Features
The numbering of the product features refers to the
illustration of the machine on the graphics.
1 Chuck
2 SDS-plus/ SDS-max tool holder
3 Dust protection cap
4 Locking sleeve
5 Rotational direction switch
8 Release button for mode selector switch
9 Mode selector switch
10 Button for RPM adjustment
11 Auxiliary handle
12 Handle
13 Carrying handle
14 Knurled nut for carrying handle
15 Limit bolt
16 Tool shank
17 Tool holder
18 Chisel position selector
3. Assembly
HD3CK - HD26BK - HD27BK - HD27CK -
HD5CK - HD6BK - HD6DK - HD40BK - HD50BK -
MD4K - MD6CK - MD10K - MD15K - MD15BK - MH6BK
- MH6CK - MH26K - TD800K
Before any work on the machine itself, pull the mains
plug.
3.1 Auxiliary Handle
Operate your machine only with the auxiliary handle 11.
Rotating the Auxiliary Handle
The auxiliary handle 11 can be set to any position for a
secure and low-fatigue working posture.
Turn the bottom part of the auxiliary handle 11 in
counterclockwise direction and swivel the auxiliary handle
11 to the desired position. Then retighten the bottom part
of the auxiliary handle 11 by turning in clockwise direction.
Pay attention that the clamping band of the auxiliary handle
is positioned in the groove on the housing as intended for.
3.2 Changing the Tool
The dust protection cap 3 largely prevents the entry of
drilling dust into the tool holder during operation. When
inserting the tool, take care that the dust protection cap 3
is not damaged.
A damaged dust protection cap should be changed
immediately. We recommend having this carried out
by an after-sales service.
Inserting SDS-plus Drilling Tools
The SDS drill chuck allows for simple and convenient
changing of drilling tools without the use of additional
tools.
Clean and lightly grease the shank end of the tool. Insert
the tool in a twisting manner into the tool holder until it
latches itself.
Check the latching by pulling the tool.
As a requirement of the system, the SDS drilling tool can
move freely. This causes a certain radial run-out at no-
as the drill bit centres itself upon drilling.
Removing SDS Drilling Tools
Push back the locking sleeve 4 and remove the tool.
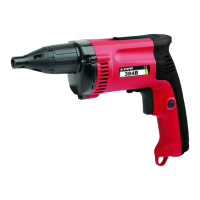
3.3 Carrying Handle (MD15K - MD15BK)
The carrying handle 13 can be turned to any position.
Loosen the knurled nut 14 , turn the carrying handle
13 around the machine axis to the desired position and
tighten the knurled nut 14 again.
The carrying handle 13can also be mounted facing to the
other side. Completely unscrew the knurled nut 14 and
handle 13 to the side and tilt the remaining clamping
element by 180°. Mount the carrying handle 13 in reverse
order.
3.4.- Changing the Tool (MD15K / MH6BK)
Before any work on th e machine itself, pull the mains
plug.
Clean the tool shank 16 and apply a light coat of grease.
Pull out the lock bolt 15 and turn it 180° in anticlockwise
direction. Allow the lock bolt 15 to latch again.
Insert the tool into the tool holder to the stop. The groove
of the tool shank 16 must face upward as shown in the
Check the latching by pulling the tool.
3.5 Changing the Tool (TD-800)
The TD-800 model allows rapid tool coupling both circular
rod. (Example: A drill HSS) and tool shank SDS-PLUS.
the tool.
the outside and then the key ring fastener.
With the SDS-PLUS tool simply insert thoroughly. Lock
4. Operation
4.1 Starting Operation
Observe correct mains voltage! The voltage of
the power source must agree with the voltage
specied on the nameplate of the machine.
Power tools marked with 230 V can also be
operated with 220 V.
Setting the Operating Mode
With the selector switch for drilling/hammer drilling 9 , the
operating mode of the machine is selected. To change the
operating mode, press the release button 8 and turn the
drilling/hammer drilling selector switch 9 to the desired
position until it can be heard to latch.
Note: Only change the mode of operation while
disconnected from the machine! Otherwise you may
damage the machine.
Position for hammer drilling in concrete or stone, HD5CK,
Position for drilling without impact in wood, metal, ceramic
and plastic as well as for screwdriving and thread cutting.
and 17).
Position for chiselling, HD3CK, HD5CK, HD6DK,MH6BK,
MH6CK
Reposition Chiseling Vario-lock (MD10K)
The chisel 12 may be positioned at angles.
Thus, the optimal working position can be set for each
application.
Insert the chisel in the tool holder
- Push the ring 18 forward and turn the chisel in
the desired position.
- Release the ring 18 to lock the position.
Reversing the Rotational Direction
The rotational direction switch 5 is used to reverse the
rotational direction of the machine. However, this is not
Right rotation: Turn the selector switch for drilling/
hammer drilling 5 on both sides to the stop in the position.
 Loading...