188
FR
ES
PT
IT
EL
PL
RU
KZ
UA
RO
EN
13
FR
ES
PT
IT
EL
PL
RU
KZ
UA
RO
EN
CAUTION ! Always wear safety glasses and gloves during
installation.
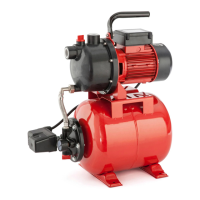
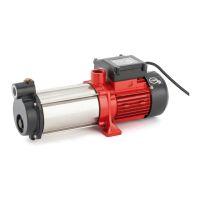
Suction hose illustration
2.3
Assemble the different elements together according to the illustration. In case screw are necessary : tight
it with appropriate tool.
• As a basic principle, we recommend using:
- A preliminary filter, in order to avoid unnecessary damage to the pump as a result of stones and solid
foreign bodies.
- A suction-hose set with suction hose and an check valve with a strainer (in order to prevent long
priming periods).
• If you cannot obtain a suction-hose set, please purchase :
- an 25 mm (1”) intake hose
- a check valve with a strainer
- 2 hose clamps 2 standard adapters (one for the suction hose, one for the discharge line) and assemble
the suction-hose set yourself using a standard adapter and a clamp.
Attach the lter to the wall. Make sure that the vibrations of the pump do not damage this
installation (exible connection is strongly recommended)
4.3 FIRST USE
WARNING ! Read the « SAFETY INSTRUCTION » section at the
beginning of this manual including all text under subheading
therein before using this product.
Pay particular attention using the machine for the first time : focus and dedicate all your attention to this
first use.
Setting up your pump
• Place the pump on flat firm surface to ensure safe operation.
• Remove the connectors caps from the connectors and store them.
Connecting the suction hose
• Screw the standard connectors onto the suction connector.
• Assemble the suction hose using a standard connector and clamp. Make sure the assembly is tight
enough as a leaking suction hose will draw in air instead of water.
• If the water is not so clear, add a filter between the suction connector and suction hose.
Risk of damage to the pump!
If without lter: unwanted particles (sand, stones, etc.) will
cause damages to the pump. Any damage caused in this way
will not be covered under our warranty
Risk of damage to the pump!
The hose adapters on the suction and discharge connectors
must only be tightened by hand to avoid damage to
connectors. If water leaking at the connector, seal the joint
• Position the suction hose so that it rises from the water withdrawal point to the pump. Avoid positioning
the suction hose higher than the pump, as this would delay the escape of air bubbles and impede the
priming process.
• The end of the check valve should be low enough in the water to ensure that if the water level falls, the
pump will not run dry.
• A leaking suction hose will draw in air instead of water. Please make sure the clamp is properly tightened.
• For suction heights exceeding 3 m we recommend securing the suction-hose (e.g. by fastening it to a
wooden post). This relieves the pump of the weight of the suction hose.
• Install the intake and discharge lines in such a way that they do not place the pump under any
mechanical strain.
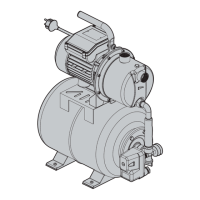
Priming the pump illustration
2.4
to
2.6
First, unscrew the filling plug to remove air from the pump during filling.
Fill the pump with clear water via discharge connector. Filling must be done slowly so that the air
contained in the pump is completely expelled. Fill to overflow and put back the filling plug. As this is
not an auto-priming pump, the suction pipe will also need to be filled. To save time when filling, you
can detach the suction pipe set and fill it directly (by submerging the suction pipe in water, for example)
before connecting the pump.
Depending on the suction height and the amount of air in the suction hose, priming can take anywhere
between 1 minute to 5 minutes. If it takes longer than this, the pump should be refilled with water.
Illust
ration
3.2
Always remove the plug from the socket before refilling !
Connecting the discharge hose illustration
2.8
A hose with a diameter of 25MM is recommended for better results.
4.4 OPERATION
Start the pump illustration
3.1
to
3.2
Make sure the pump is correctly installed and primed, refer to chapter "first use" above.
Connect the power cable to an earthed 220-240V 50Hz power supply protected by a minimum 10-amp
fuse. Once the pump
Operation safety warnings
•Operatethe product only at reasonable hours – not early in the
morningorlate at night whenpeople might be disturbed.
•Do not modify theproduct in any way oruseparts and
accessoriesthat are notrecommendedby the manufacturer.
has been primed, put the discharge hose back down.
 Loading...