52 | WWS 20 www.stiebel-eltron.com
INSTALLATION
Installation
360
410 80
D0000046845
1
2
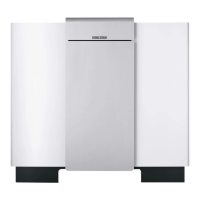
1 Anti-vibration mount
2 Support points for anti-vibration mounts
Fit the anti-vibration mounts onto the appliance support
points provided on the wall mounting bracket rails.
!
Material losses
Have a qualified contractor check the installation to en-
sure that the appliance is permanently and securely in-
stalled.
10.2 Siting the appliance
!
Material losses
The appliance must be positioned horizontally to prevent
damage.
Position the appliance on a horizontal and even sub-
strate.
When fixing to a wall mounting bracket, ensure that
the rail supports are aligned horizontally.
!
Material losses
Take note of the appliance's weight and centre of gravity.
Position the appliance in the final installation site.
When fixing to a wall mounting bracket, the depressions on
the device underside must be positioned on the anti-vibra-
tion mounts on the bracket.
Attach the fully wired junction box underneath the appliance
between the wall mounting brackets.
10.3 Water connection
!
Material losses
Carry out all water connection and installation work in
accordance with regulations.
!
Material losses
The water must be treated, as appropriate to the temper-
ature and hardness of the water. The appliance must be
descaled regularly as required.
Observe the details specified in the chapter "Installa-
tion/ Descaling the appliance".
Note
Generally, heat pumps should always have flexible
connections. Aim to avoid the transmission of struc-
ture-borne sound when installing pipes.
Note
The length of the pipework between the appliance and
the DHW cylinder should be as short as possible. If the
pipework between the appliance and the DHW cylinder
is longer, the output and efficiency data may fall.
The following material combinations are approved for metal pipe-
work installations:
Cold water inlet DHW outlet
Copper pipe Copper pipe
Steel pipe Steel pipe or copper pipe
Thoroughly flush the pipework before connecting the ap-
pliance. Foreign bodies, such as welding pearls, rust, sand
or sealant can impair the operational reliability of the
appliance.
Safety valve
The appliance has been designed to connect to a closed DHW
cylinder. Provide the appliance with a pressure relief valve.
Install a type-tested safety valve in the cold water supply
line. The response pressure of the safety valve must be below
or equal to the permissible operating pressure of the DHW
cylinder.
The safety valve protects the appliance against unacceptable ex-
cess pressure. The diameter of the cold water supply line must be
no greater than the diameter of the safety valve.
- Ensure that the expansion water escaping from the safety
valve can drip into a drain, e.g. a tank or funnel.
- Ensure the drain cannot be shut off.
- Size the drain so that water can drain off unimpeded when
the safety valve is fully opened.
- Ensure that the discharge pipe of the safety valve is open to
atmosphere.
- Fit the discharge pipe of the safety valve with a constant
downward slope and in a room free from the risk of frost.
Pressure reducing valve
The maximum pressure in the cold water supply line must be at
least 20% below the response pressure of the safety valve. If the
maximum pressure in the cold water supply line is higher, install
a pressure reducing valve.
Drain valve
Install a suitable drain valve at the lowest point in the cold
water inlet line.
 Loading...