16
5
DO NOT OPEN THE TABLE TO PLAYING
POSITION UNTIL BOTH TOPS ARE
INSTALLED! DO NOT LEAVE TABLE
STANDING UNATTENDED. IT COULD
BE KNOCKED OVER CAUSING SERIOUS
BODILY INJURY OR PROPERTY
DAMAGE.
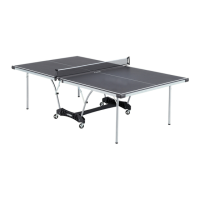
Figure 11
20. Secure U-support tube (#21) to Strut Tubes (#17) with two Screws (#5)
as shown in Figure 11. Align holes in U-support with holes in Strut
Tubes and thread screw (#5) into hole in Strut Tube (#17). Tighten
screws all the way but be careful not to over tighten as you could strip
threads on screws.
21. Attach Linkages (#16) to Leg (#19) as shown in Figure 11. Pivot Leg
(#19) out from the table top and pivot both linkages (#16) up and align
hole in Linkage with hole in Leg (#19). Attach Linkage (#16) to Leg
(#19) using Hex Head Bolt (#24), Spacer (#37) and Locknut (#34).
Spacer (#37) goes between Linkage and Leg. Attach other Linkage
to Leg the same way. Tighten nuts securely.
16
16
21
19
34
37
24
24
34
37
17
17
Spacer goes
between Linkage Arm
(#16) and Leg (#19)
5
11
19
 Loading...