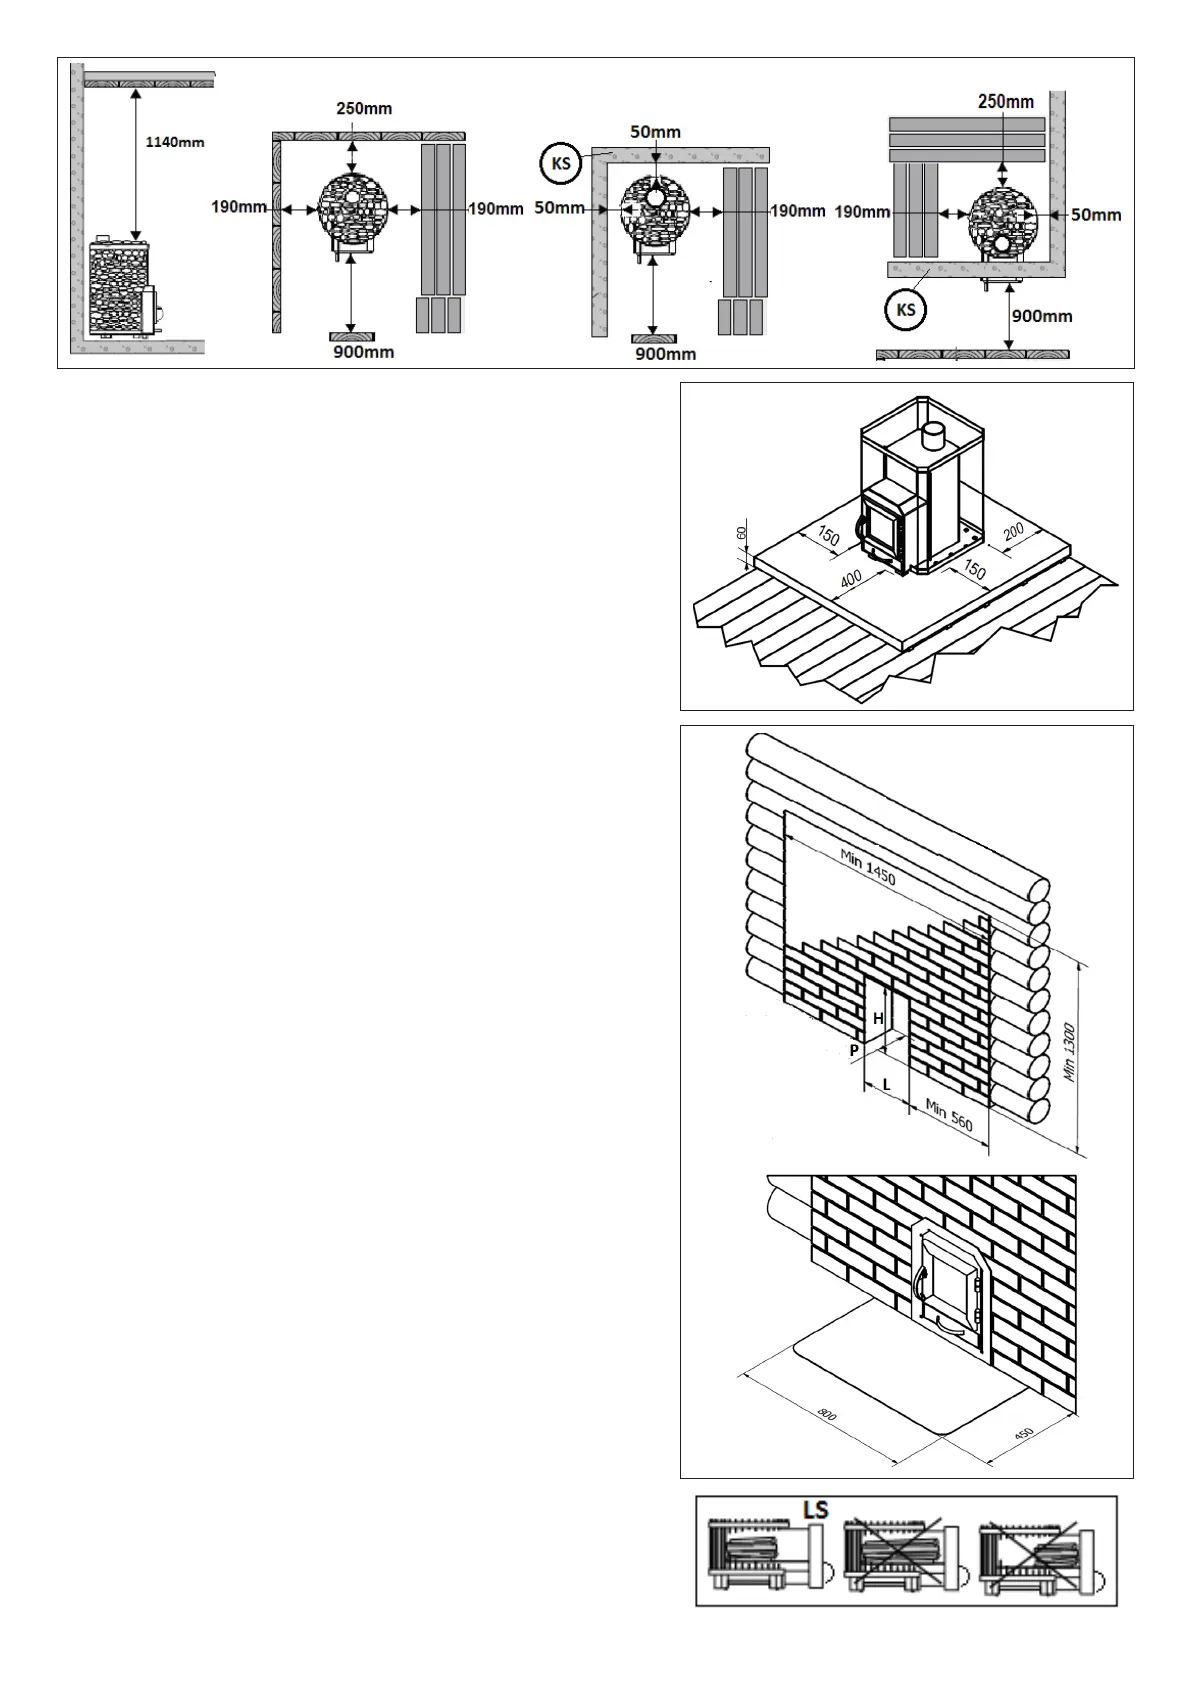
Figure 3. Safety distances
3.4. Heater stones
The most suitable are the stones with a diameter of 10–15 cm. For heater stones, use only
stones that are specically provided for this purpose. Before stacking the stones onto the
heater they must be cleaned of dust.
Stacking the heater stones:
1. Use the stones, which suite between the steel mesh and heater housing.
2. Place the stones in a uniform layer between the heater housing and the steel mesh so
that the entire housing is covered. Thermal radiation of uncovered heater housing can cause
the surrounding objects to heat up to dangerous temperatures, even beyond the safety
distances.
3. Fill the upper part of the mesh and the top of the housing with stones. Do not make a high
pile of stones on top of the heater. After you have placed all the stones, make sure that none
of them can roll off the heater.
3.5. Heating the sauna heater
Before heating the heater, make sure that in the sauna or in the safety zone of the
heater there are no objects that do not belong there.
1. Empty the ash drawer.
2. Make sure that the combustion and ventilation air supply is not obstructed.
3. Place the larger logs on the bottom of the re chamber and smaller ones on top leaving
enough space between them for the combustion air to ow. Use rewood with a diameter of
8-12 cm (at the ignition consider the amount of logs, see Table 1).
LS-heaters
Place the rewood on the rack in the back of the re chamber. Avoid burning the rewood in
the extension part of the chamber. Do not use too long rewood, even if they t into the re
chamber (see Figure 5).
4. It is recommended to pick the rst heater-load of rewood (the ignition load) from smaller
and easily-igniting pieces of wood, thus having more air and less weight than the standard
load. This is especially important in case of low draft due to poor weather conditions, in which
case the recommended initial load is 1/3 of the norm (Table 1), using 3-5 cm diameter logs.
Place the ignition material on top of the rewood. Starting the re on the top part of the wood
load produces lower emissions and combustion is of higher quality.
5. Light the ignition material and close the door. N.B. The heater is not intended for use
with the open door. The door can be opened during ignition, when adding rewood and
during combustion products removal. During any other times the door must be closed. The
ow of combustion air is regulated by changing the position of the ash drawer.
N.B. The handles heat up when the heater is heated. For opening the door and ash
drawer use the heat protection cloth included in the supply. For igniting the heater, it is
recommended to keep the ash drawer open by up to 40 mm. When the wood has started
to burn, the ash drawer must be placed so that the distance between the ash drawer’s front
and the re chamber’s wall is 3–10 mm, depending on the actual draft.
- Using too strong draft for heating will cause a risk that the unburned parts can get into the
ambient air and cause re hazard and environmental pollution, as well as that too intense
burning will cause overheating of the heater.
- When the sauna room has been heated up enough and it is time to go to the sauna, you
can close the ash drawer to reduce the intensity of the ame and save rewood.
6. If necessary, when the re starts to go out, add more rewood with a diameter of 12-15 cm
(consider the amount when adding logs, see Table 1).
N.B. Intensive heating over a long period of time increases the risk of re.
Excessive heating or overheating (such as several consecutive full loads) can cause the
heater and chimney to overheat. Overheating will shorten the heater’s service life and can
cause a re.
Please note that temperatures over 100 °C in the sauna room may damage the sauna and
pose hazard to the sauna user’s health. If necessary, let your heater, chimney and sauna
room cool down.
Figure 4.
Figure 5.
Figure 2. Floor
protection
 Loading...