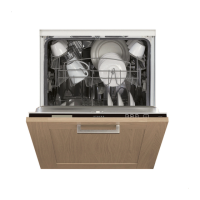
Itis recommend that yourun a washcycle with the
dishwasher e mpty an d the n r emove th e plu g fro m the
socket, t urn o ff t he wa ter supply and l eave the door of
t he app lia nce s l i ghtly open. T h i s wil l help the door
sealsto last longer and preventodours fromforming
withi nthe appliance.
If th e appliance must be move d, t ry t o keep i t in the
vertical position. If absolutely necessary, it can be
positi oned on its back.
Oneofthefactorsthatcauseodourstoforminthe
dishwasher is foo d th at re mains t rappe di n the seals .
Periodic clea ning with a d amp sponge will p reve nt t his
f r o m occurr ing.
Aft er ever y wa sh, t urn off t he w ater supply to the
applia nce and leave th e doo r sli ght ly op en so t hat
m oisture a nd odou rs a re n ot t rapped in side.
Befo re cl eaning or per fo rmi ng mainten ance, always
remove th e p lug fr om t he socket.
To clean the exterior and rubberparts ofthedishwasher,
do not use solventsor abrasive cleaning products.
O nly u se a cloth w ith w arm soapy wate r.
To r em ove s pots o r st ains f rom the sur face of the
interi or, u se a clo thda mp ened wit hwater a na little
vi nega r, o r a c lea ning pro duct mad e s peci fical ly fo r
dishwashers.
After Every Wash
Remove the Plug
No Sol vent s or Ab rasiv e Cl eanin g
Mov ing the Ap plia nce
Seals
When not in Use for a LongTime
Th e instal lation of the pipes
and elect rical e qui pments
should be d one by p rofessio nals .
Electrical Shock Hazard
Disconnect electrical power
before
installing dishwasher.
Failure to do so can result in
death or electrical shock.
T h e ins tal la t ion position of di shwashe r sh oul d be n e a r the exi s t ing inle t an d dr a in h os es and
power cord.
One side of thecabinetsinkshould be chosen tofacilitate the connectionof drain hoses of
the dishwasher.
Installation preparation
N ote: please c hec k the accompany ing install ati on a ccessor ies(hook for aesthetic panel,screw )
●