STRIKEMASTER
®
LITHIUM 40v CONTENTS
PRODUCT SPECIFICATIONS ........................................................... 01
QUICK START ........................................................................... 02-04
SAFETY INFORMATION ............................................................. 05-07
SYMBOLS .................................................................................... 08
KNOW YOUR ICE AUGER ............................................................... 09
ASSEMBLY ............................................................................... 10-11
OPERATION .................................................................................. 12
MAINTENANCE .............................................................................. 13
TROUBLESHOOTING ...................................................................... 14
PRODUCT SPECIFICATIONS
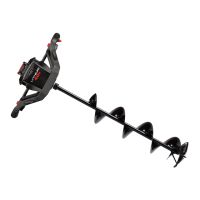
COMPONENTS
• StrikeMaster Lithium 40v Powerhead
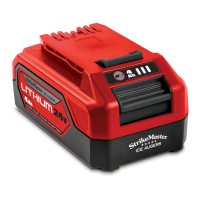
• StrikeMaster Lithium 40v Battery - 40 volt, 5 amp hour
• StrikeMaster Lithium 40v Battery Charging Base
• StrikeMaster Lithium 8” or 10” Auger Spiral, Blades and Blade Cover
BATTERY CHARGING TIME
• 2.5 hours
TOTAL WEIGHT
8” Lazer ........................................................................................................ 24 lbs./ 10.9 kg
10” Lazer .................................................................................................... 27 lbs./ 12.23 kg
01 02
STRIKEMASTER
®
LITHIUM 40v
QUICK START
ASSEMBLY
1. Remove all Lithium 40v contents from carton: Powerhead (A), Battery Charging
Base (B), Battery (C) and Auger Spiral (D), (Image 1).
2. Connect Powerhead to spiral, using collar bolt and hex wrench.
a. Collar bolt is located inside collar bolt threads at top of spiral (Image 2).
b. Two Hex wrench's are included: One is stored on the bottom of the Powerhead.
The other is taped to the mid-point of the spiral.
Remove hex wrench from spiral
before operating.
3. Slide Battery onto Battery Charging Base using the channels on both sides guide.
Press down until you hear it click in place. Leave Battery on Battery Charging Base
until fully charged (Image 3).
NOTE:
Battery is not fully charged when first removed from box.
4. When Battery Charging Base indicator shows green, your Battery is fully charged
(Image 4).
5. Once Battery is fully charged remove from Battery Charging Base. Slide battery onto
Powerhead using the channels on both sides as a guide, pressing down until you
hear it click in place (Image 5).
6. Remove blade cover from bottom of spiral and stow in a safe place (Image 6).
Your StrikeMaster Lithium 40v is ready for use.
FORWARD/ REVERSE
Your new StrikeMaster Lithium 40v has a forward and reverse capability. The Forward/
Reverse position needs to be selected when the spiral is at rest. If switched during use
the auger spiral will maintain its current direction until it comes to a complete stop.
Example: While drilling a hole in the forward position if switch is accidentally engaged into reverse
during drill cycle, the spiral will continue in forward until the power buttons are released and the
spiral comes to a complete stop.
LED WORKLIGHTS
Your New StrikeMaster Lithium 40v has two LED lights on the bottom side of the
Powerhead to illuminate the cutting area. The lights will turn on when the operating lock
lever and POWER button are engaged. The LED lights will remain on for 30 seconds
after POWER button is released.
IMAGE 2
IMAGE 3IMAGE 3
IMAGE 5
IMAGE 6
IMAGE 4
IMAGE 1
EXTREME COLD WEATHER OPERATION
The Lithium-Ion Battery can be used in temperatures down to (-4°F/ -20°C). If your Battery is not performing correctly, put
the Battery on the Powerhead, free spin auger out and above ice for 30 to 90 seconds depending on how cold the unit is (the
colder the unit, the more time to warm up). After this sequence the Battery will warm up and begin operating normally.
NOTE:
Always store Battery in a warm location.
(A)
(B) (C)
(D)
 Loading...