EasyManua.ls Logo

Stromberg Carlson Products BC-202 User Manual

Stromberg Carlson Products BC-202
6 pages
To Next Page IconTo Next Page
Page #1 background imageLoading...
Page #1 background image
StrombergCarlson.com • 231.947.8600
STEP 1 STEP 2
NOTICE
The sliding
teeth face
this direction
INS-BC202-C 10.18.2022
Two Bike
Platform Mount Carrier
Model: BC-202
Assembly Instructions
Two Bike Platform Mount Carrier BC-202
Assemble the primary frame by connecting the
Support Base Assembly (part #1) and (2) Horizontal
Tubes (part #2) using (2) 5/16” knobs, (4) 5/16” flat
washers, (2) 5/16” spring washers, (2) 5/16” hexagon
bolts, (2) M10 Carriage bolts and (2) M10 Locknuts
(parts #3, #4, #5, #6, #23 and #24). (See Figure 1)
n Fits 2” receiver
n Tilts down for access to vehicle
n Wheel mounts adjust to any size frame
n Tire cradle ts up to 2-1/2” wide tire
(BC-2FT Fat Tire Adaptor available)
n Weight capacity 80 lb
Tools Needed
(1) 17mm Open Wrench
(1) 24mm Open Wrench
14-1/4"
6"
10"
2-1/2"
10"
Fits 2"x2" receiver
BC-202
1-3/8" square tubing
51-1/2" long
32"
FIGURE 1 FIGURE 2
Place Vertical Tube (part #7) into the Support Base Assembly by
using M10 Carriage Bolt and M10 Locknut (parts #23 and #24). With
the Vertical Tube in a vertical position, insert the 5/16” hexagon bolt
(part #6), through the 5/16” flat washer (part #4), the 5/16” spring
washer (part #5) and the 5/16” flat washer (part #4), tighten with
5/16” knob (part #3). (See Figure 2)
NOT TESTED ON OR APPROVED
FOR E-BIKES
Question and Answer IconNeed help?

Do you have a question about the Stromberg Carlson Products BC-202 and is the answer not in the manual?

Stromberg Carlson Products BC-202 Specifications

General IconGeneral
BrandStromberg Carlson Products
ModelBC-202
CategoryAutomobile Accessories
LanguageEnglish

Summary

Assembly Instructions

Step 1: Assemble Primary Frame

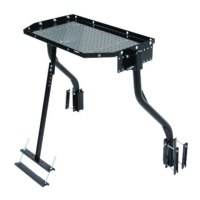
Assemble primary frame by connecting Support Base Assembly and Horizontal Tubes with hardware.

Step 2: Attach Vertical Tube

Place Vertical Tube into Support Base Assembly and secure with bolt and knob.

Step 3: Attach Folding Shank

Attach Folding Shank to Support Base Assembly tube using M16 Bolt, Locknut, pin and clip.

Step 4: Install Cradle Assemblies

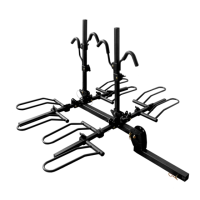
Slide Cradle Assemblies onto Horizontal Tubes and tighten knobs securely.

Step 5: Install J-Hook Assemblies

Install J-Hook Assemblies onto Vertical Tube and tighten Eyebolt.

Step 6: Secure Folding Shank

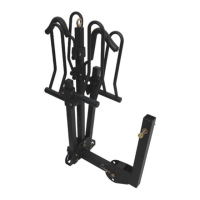
Insert Folding Shank into receiver and secure with Stabilizing Pin, washers, and clip.

Mounting Bikes

Step 7: Prepare for Bike Loading

Loosen knob, expose bolt, and rotate vertical tube down before loading bikes.

Step 8: Load and Secure First Bike

Load bicycle into cradles, adjust position, and tighten cradles to prevent movement.

Step 9: Secure Vertical Tube and J-Hooks

Rotate vertical tube upright, lock knob, lower J-Hooks over frame, and tighten.

Step 10: Secure Wheel Cradle Straps

Loop Wheel Cradle Straps over each wheel and secure to prevent bike falling.

Step 11: Mount Second Bike

Mount second bicycle in reverse direction to avoid handlebar interference.

Product Features

Tilt Down Feature

Explanation of the tilt down feature and safety precautions during operation.

Storage Feature

Instructions for adjusting the rack to a vertical position for storage.

Folded When Not in Use

Guidance on folding the rack to a compact position for storage.

Reference Materials

Hardware Kit

List and quantities of all hardware components included with the product.

Assembly Diagram

Visual representation of the product assembly with part callouts.

Related product manuals