phone: 231-947-8600
www.strombergcarlson.com
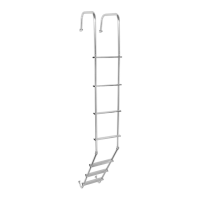
UNIVERSAL EXTERIOR RV LADDER
MODEL # LA-401 & LA-401BA
INS-LA401 & INS-LA401BA
03.12.2018
Thank you for purchasing the Stromberg Carlson Products, Inc. LA-401/LA-401BA Universal Exterior RV Ladder.
Please read all directions thoroughly prior to assembly. When assembled and used properly, this product will
provide many years of trouble free service. This kit contains components and hardware for one complete universal
ladder. Complete the following easy steps and you will be ready to use your new universal ladder.
Tools Needed for Installation:
Assembly Instructions:
1. Determine backing/framing locations in the back wall and rear roof of
your RV; mark accordingly (using masking tape or a pencil). This will
help you in determining standoff placement later in the installation. If
you are unable to determine backing/framing locations with a stud
finder or other method, you will need to call your RV manufacturer for
a blue print or contact an RV service center for assistance.
2. Insert the (2) Top U-Shaped Ladder Sections (part #1) into the Middle
Straight Ladder Section (part #2). Bolt them together using (2) #10-24
x 30 mm Bolts (part #7).
3. Keeping the Middle Straight Ladder Section parallel with the back wall
of your RV, place the upright tubes of the Top U-Shaped Ladder
Sections on the roof of your RV. Be sure to maintain 5” spacing
between the vertical tube and back wall of your RV for installation of
the standoffs in later steps.
4. Trim the roof mount ends of the Top U-Shaped Ladder Section vertical tubes so the ladder will mount flush to
the roof (trimming may not be necessary if you do not have a sloped roof). See FIG. 1
5. Using a
3
/
16
” drill bit, drill a hole ½” up from the bottom of the newly cut tube. Attach (2) Roof Mount Brackets
(part #6) to the upright tubes of the Top U-Shaped Ladder Sections, using (2) #10-24 x 37 mm Bolts (part #7).
6. Attach the Roof Mount Brackets to the roof of your RV, using (4) #10 Sheet Metal Screws (part # 7). Be sure to
anchor them into backing/framing.
7. Attach the top (2) 5” Standoff Assemblies (part #4) to your RV, using (8) #10 Sheet Metal Screws (part #7). Be
sure to attach where your RV ladder and the pre-identified backing/framing locations coincide, turning the
standoff mounting plate in the orientation that best aligns with the structural backing in your RV. These
standoffs should meet your ladder uprights between the top two treads.
8. Mark your ladder uprights where the standoffs meet. Using a ¼” drill bit, drill through your ladder uprights and
attach them to the standoffs, using the bolts that were stored during shipment in the cap of the standoff.