Do you have a question about the StrongLite ERGO-PRO and is the answer not in the manual?
Unlock the face rest cam lever, set to a comfortable position, and lock it. Ensure plastic locking disks are engaged.
Raise the chest support cam lever, adjust to a comfortable position, and lower the cam lever to lock.
Unlock the arm support cam lever, adjust to a horizontal position, and flip the cam lever to lock.
Unlock the seat by pushing the button, detach the plate from Velcro, and insert into the seat rail for desired position.
Use upper seat position for feet-on-floor; use lower positions with knee rests for comfort.
Verify metal brackets are hooked to studs and buttons are up to lock brackets.
Push button down, slide forward to unlock, lift up to unhook brackets, and store safely.
Chair height adjusts to eight positions for optimal therapist ergonomics.
Push button on rear leg, move extension, align button with selected hole, and repeat for both legs.
Sit on seat, fold legs onto knee supports to prevent damage. Practice sitting to assist clients.
Adjust chest support angle and height with cam lever unlocked, then lock in place.
Adjust angle, lift for taller clients using knobs, and adjust crescent pad width via Velcro.
Adjust arm rest to a comfortable position with cam lever, ensuring arms are supported.
Replace knee rests if removed and ensure seat is locked in its lowest position.
Squeeze chair lock buttons, lift seat front, and push back of seat to fold.
Lower and store arm, chest, and face rests onto the front beam by unlocking cam levers.
Grasp through knee rest plate or chest plate hand hole to pick up the chair.
Orient chair, lower hand to ground, and tow on wheels for longer distances.
Place chair in case, aligning wheels with bottom slit, and tow or carry via shoulder strap.
Inspect all joints for tightness, check for damaged or missing parts before each use.
Clean vinyl with mild soap and water; clean metal and wood components similarly.
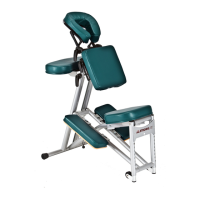
The Stronglite Ergo-Pro™ Massage Chair is a portable and adjustable massage chair designed for massage professionals. It offers a range of features to ensure client comfort and therapist convenience during massage sessions.
The primary function of the Ergo-Pro™ Massage Chair is to provide a stable and comfortable platform for clients to receive massage therapy in a seated position. It supports various body parts, including the face, chest, arms, and knees, allowing therapists to access the client's back and neck effectively. The chair is designed to be highly adjustable to accommodate clients of different sizes and body types, as well as to optimize the therapist's working posture. Its foldable design makes it portable and easy to store and transport.
To open the chair, the bungee cord holding it closed must be released by pulling out and down on the ball located in the center of the rear support plate (Photo 4). After releasing the bungee, grasp the chest plate hand hole with one hand and lift the bottom of the seat from the back with the other hand. The chair may open slowly during its first few uses. Once fully opened, two locking buttons beneath the seat on the center support will click into position (Photo 9), confirming that the knee rests are firmly in place.
The face rest is a crucial component for client comfort. To adjust it, flip the face rest cam lever to the unlocked position (Photo 6), set the face rest to a comfortable angle, and then flip the cam lever back to the locked position. It's important to ensure that the teeth of the plastic locking disks on the face rest are fully engaged. The crescent face rest pad is shipped separately and can be installed by attaching its Velcro™ to the Velcro™ on the base. For taller clients, the face rest can be raised further from the chest support by loosening the face rest knobs on the sides of the chest support, raising the face rest to the desired height, and then tightening the knobs (Photo 14). Care should be taken not to pull the face rest up so high that the rods no longer extend through the tube of the mounts. The crescent pad itself can also be adjusted to fit different face widths by grasping the ends of its two legs, lifting to free them from the Velcro™, and then moving them closer together or wider apart before reattaching. A critical safety warning emphasizes that the face rest should only be used when its rods are properly inserted into and extend through the mounts to prevent instability and potential injury.
The chest support ensures proper client posture and comfort. To adjust it, raise the chest support cam lever to the unlocked position (Photo 7). With the client sitting on the chair but not leaning against the support, adjust the chest support to the appropriate angle and height, then push down on the cam lever to lock it in position.
The arm support provides a place for clients to rest their arms comfortably. To adjust it, flip the arm support cam lever to the unlocked position (Photo 8), adjust the arm support to a horizontal position, and then flip the cam lever to the locked position. It is generally recommended to leave the arm rest in a level position for most clients. The arm rest also features an eyeglass pocket attached to its bottom by Velcro™.
The seat can be adjusted to one of three different positions: a lowest locked position and two positions with less of an angle. To adjust the seat, first unlock it by pushing in the chair seat push button protruding through the bracket under the seat (Photo 9). This allows the front of the seat to be lifted, exposing the seat adjustment plate held against the bottom of the seat by Velcro™. Pull the seat adjustment plate free so it hangs down. The adjustment plate has two sets of notches that mate with a 'T' shaped opening in the seat rail. Choose a desired position, insert the plate into the 'T' opening, and slide it forward to engage the seat rail. The seat can also be used in the locked position. A crucial safety warning advises ensuring the seat adjustment plate is securely and fully seated against the front edge of the 'T' shaped opening to prevent instability and personal injury. If the chair is to be used without knee rests, the seat adjustment plate should be placed in the upper position for a near-level, 'feet-on-the-floor' sitting position. If knee rests are used, the seat should be in one of the two lower positions.
The knee rests are essential for client support. When using the chair with knee rests, verify that both metal brackets on each knee rest are fully hooked to the studs on the knee rail (Photo 10). Ensure the push buttons are sticking up, which locks the brackets in position to prevent them from sliding off. To remove the knee rests, push the button down and slide the knee rest forward to unlock the brackets, then lift the knee rest up to unhook them. There is a specific left and right knee rest (Photo 11). A safety warning emphasizes verifying that both metal brackets are fully seated on the studs with the push buttons sticking up before a client sits on the chair, as incorrectly installed knee rests can fall off or be damaged, potentially causing personal injury.
The chair height can be adjusted to one of eight positions to optimize the therapist's working position. To change the height, push the button in on one rear leg and move the leg extension up or down to the desired position (Photo 12). The chair is shipped with leg extensions fully retracted. Align the button with the selected hole in the rear leg so it protrudes again. This process should be repeated for the other rear leg, ensuring both leg extensions are set at the same height. Photo 13 shows the legs fully extended in the tallest position. A safety warning highlights the importance of ensuring both buttons are protruding through the rear legs and fully engaged, as leg extensions set at different heights or improperly installed can cause instability and personal injury.
Before a client sits, verify that the chair is fully opened and that the locking buttons are protruding from their designated holes beneath the seat on the center rail (Photo 9). The proper way for a client to sit is to first sit on the seat, then fold their legs, and rest them on the knee supports. This prevents damage that could be caused by clients putting their entire weight on a single knee support, as knee supports are not designed for this. Therapists should practice getting on and off the chair themselves to better assist clients, as some may need help. A safety warning advises therapists to always stand nearby to stabilize the chair or assist clients getting on or off, as stumbling or falling could result in personal injury.
To fold the chair, first replace the knee rests if they were removed, ensuring they are on the correct sides and securely locked (Photos 10 & 11). Set the seat to its lowest position and ensure it is locked to the seat rail. Stand to the side of the chair, squeeze the chair lock push buttons (Photo 9) together with one hand, and lift up on the front of the seat with the other hand. After the chair lock is released, continue to pull on the front of the seat while pushing on the back of the seat (Photo 15). Once completely folded, return the bungee to the center of the rear support plate by pulling it out and up on the ball (Photo 4). Before folding, unlock the arm rest cam lever and lower the arm rest to the stored position on the front beam, then lock the cam lever. Similarly, unlock the chest support cam lever, lower the chest support onto the front beam on the side opposite the arm rest, and lock the cam lever. Finally, lower the face rest if it has been raised using the face rest knobs, unlock the face rest cam lever, lower the face rest onto the front beam on the side opposite the chest support, and lock the cam lever.
The chair can be carried by grasping through the hand hole in either knee rest plate (Photo 16), requiring the pad to be lifted out of the way. The chest plate also has a hand hole for carrying (Photo 17). It is important not to use the face rest to pick up the chair. For longer distance travel, the chair is equipped with wheels. Once folded and locked, grasp the hand hole in the chest support plate, orient the chair as indicated in Photo 18, and lower your hand towards the ground until the wheels on the leg extensions make contact. The chair can then be towed like luggage. A safety warning states that damage will occur if the wheels are not on the ground while towing. Stronglite also offers a durable nylon carrying case with a padded shoulder strap. When using the case, place the chair inside with the seat side towards the pocket and the Stronglite logo visible. Ensure the wheels stick through the slit in the bottom of the case for towing or use the shoulder strap for carrying.
The Ergo-Pro™ chair is designed for durability, with exposed nuts being locking types to prevent loosening, and pivot joints having close tolerances to minimize movement and wear. However, fasteners can still become loose, and parts can wear or be damaged. It is the user's responsibility to maintain the chair in good condition. Any loose fasteners should be tightened, and worn, damaged, or missing parts should be replaced or repaired. Replacement parts can be ordered from Stronglite. A critical safety warning states that a chair with loose, damaged, or missing parts can fail, potentially causing personal injury, emphasizing the need to inspect the chair before each use and keep it in good condition.
Before each use, inspect the chair to ensure all joints are as tight as possible without causing binding when the chair is folded up. Check for any damaged or missing parts.
The vinyl components of the chair can be cleaned with mild soap and water using a non-abrasive cloth. The powder-coated aluminum and finished wood components can also be cleaned in the same manner. A safety warning advises against prolonged exposure to temperature extremes, as this will cause damage to the vinyl.
| Table Length | 73 inches |
|---|---|
| Adjustable Headrest | Yes |
| Type | Massage table |
| Features | Adjustable height, face cradle |
| Power Source | Electric |
| Functions | Height Adjustment |