Disposable Cartridge Ear Piercing System
©STUDEX
EAR PIERCING INSTRUCTIONS
8.
Loading the Cartridge
For safety’s sake, wash both hands thoroughly,
and put latex gloves on both hands before opening
the sterile blisters or touching the customer’s ear.
Make sure the instrument is cleaned before
and after each use.
Remove the twin blister from the package and
separate the twin blister by tearing along the
perforation between the two cartridges. For
your convenience, Sterile Prep Pads are
packaged with the studs for cleaning the
customer’s ears.
Peel off the paper backing from one blister,
exposing the piercing cartridge. DO NOT
REMOVE THE CARTRIDGE FROM THE
BLISTER!
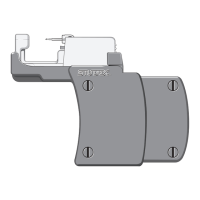
Holding the sides of the plastic blister firmly
with the opening on the bottom, slide the clasp
end of the cartridge down and forward into the
channel in the instrument until it is seated fully
forward (Figure 3A.)
Rotate the back of the cartridge down into the
channel until is firmly seated as shown in
Figure 3B.
Lift off the plastic blister (Fig. 3C.). Do not
discard the plastic blister, as you will need it
later.
You are ready to pierce (Figure 3D.).
1.
2.
3.
4.
5.
6.
7.
Do not touch cartridge at any time!
Always use the blister as a holder when installing,
removing or transporting the cartridge. In this way,
sterility of the piercing studs and clasps is
maintained, and accidental contact with the
customer’s body fluids is avoided.