FOR YOUR SAFETY READ
BEFORE OPERATING
WARNING! If the user of this appliance fails to maintain it
in the condition in which it was shipped from the factory or
if the appliance is not used solely for its intended purpose
or if appliance is not maintained in accordance with the
instructions in this manual, then the risk of a re and/or
the production of carbon monoxide exists which can cause
personal injury, property damage or loss of life.
OPERATING INSTRUCTIONS
WARNING! If you do not follow these instructions exactly, a re or explosion may result
causing property damage, personal injury or loss of life.
WARNING! Before operating water heater, be sure tank is lled with water. See “Safety Warnings”.
A. This appliance does not have a pilot. It is equipped with an ignition device
which automatically lights the burner. Do not try to light the burner by hand.
B. BEFORE LIGHTING smell all around the appliance area for gas. Be sure to
smell next to the oor because some gas is heavier than air and will settle on
the oor.
WHAT TO DO IF YOU SMELL GAS
• Do not try to light any appliance.
• Do not touch any electric switch.
• Do not use any phone in your building.
• Immediately call your gas supplier from a neighbor’s phone. Follow the gas
supplier’s instructions.
• If you cannot reach your gas supplier, call the re department.
C. This is an automatic gas valve, no adjustments are necessary. Do not attempt
to repair the gas valve. This may result in a re or explosion.
D. Do not use this appliance if any part has been under water. Immediately call
an authorised service technician to inspect the appliance and to replace any
part of the control system and any gas control which has been under water.
E. Before operating water heater, check the location of the vent to make sure
it will not be blocked by the opening of any door on the trailer. If it can be
blocked, do not operate the water heater with the door open.
OPERATING INSTRUCTIONS
1. STOP! Read the safety information provided.
2. Turn o all electric power to the appliance.
3. Turn “OFF” gas supply.
4. Wait ve minutes for gas to clear the area. If you smell gas then STOP! Follow instruc-
tions in item B of the safety information. If you don’t smell gas, go to next step.
5. Turn “ON” gas supply.
6. Turn on 12 volt electrical power to the appliance.
7. Turn switch to “ON” position. If the burner does not light, the system will auto-
matically attempt two more tries for ignition before lockout. See Figure 8A.
NOTE: Each ignition cycle will have a 15 second purge before spark cycle if sys-
tem is a three try system.
8. If lockout occurs before main burner lights, turn switch to “OFF”, wait ve sec-
onds and turn switch to “ON” position. This will restart the ignition cycle. The
rst start-up of the heater may require several ignition cycles before all air is
purged from the gas lines.
If the burner will not come on, the following items should be checked before calling
a service person.
1. Switch turned o.
2. Gas supply to heater is empty or turned o.
3. Reset button on ECO is tripped
OPERATING INSTRUCTIONS
FOR UNITS WITH ELECTRIC ELEMENT
Electric water heaters are designed to operate with a minimum amount of service
problems; however, proper operation and care is essential.
By far the most common trouble with electric water heaters results from energizing
the water heater before it is lled with water.
Turn o gas supply to the water heater. To energize the electric heating element,
turn the circuit breaker to “ON.” Reverse the procedure to disconnect electric heat-
ing element.
TO TURN OFF WATER HEATER
1. Turn switch to “OFF” position.
2. Turn o circuit breaker to the appliance.
3. Turn o gas supply.
4. If vehicle is to be stored or heater is going to be turned o while subject to
freezing temperature, drain water heater. (See “Draining and Storage Instruc-
tions.”)
TROUBLESHOOTING GUIDE
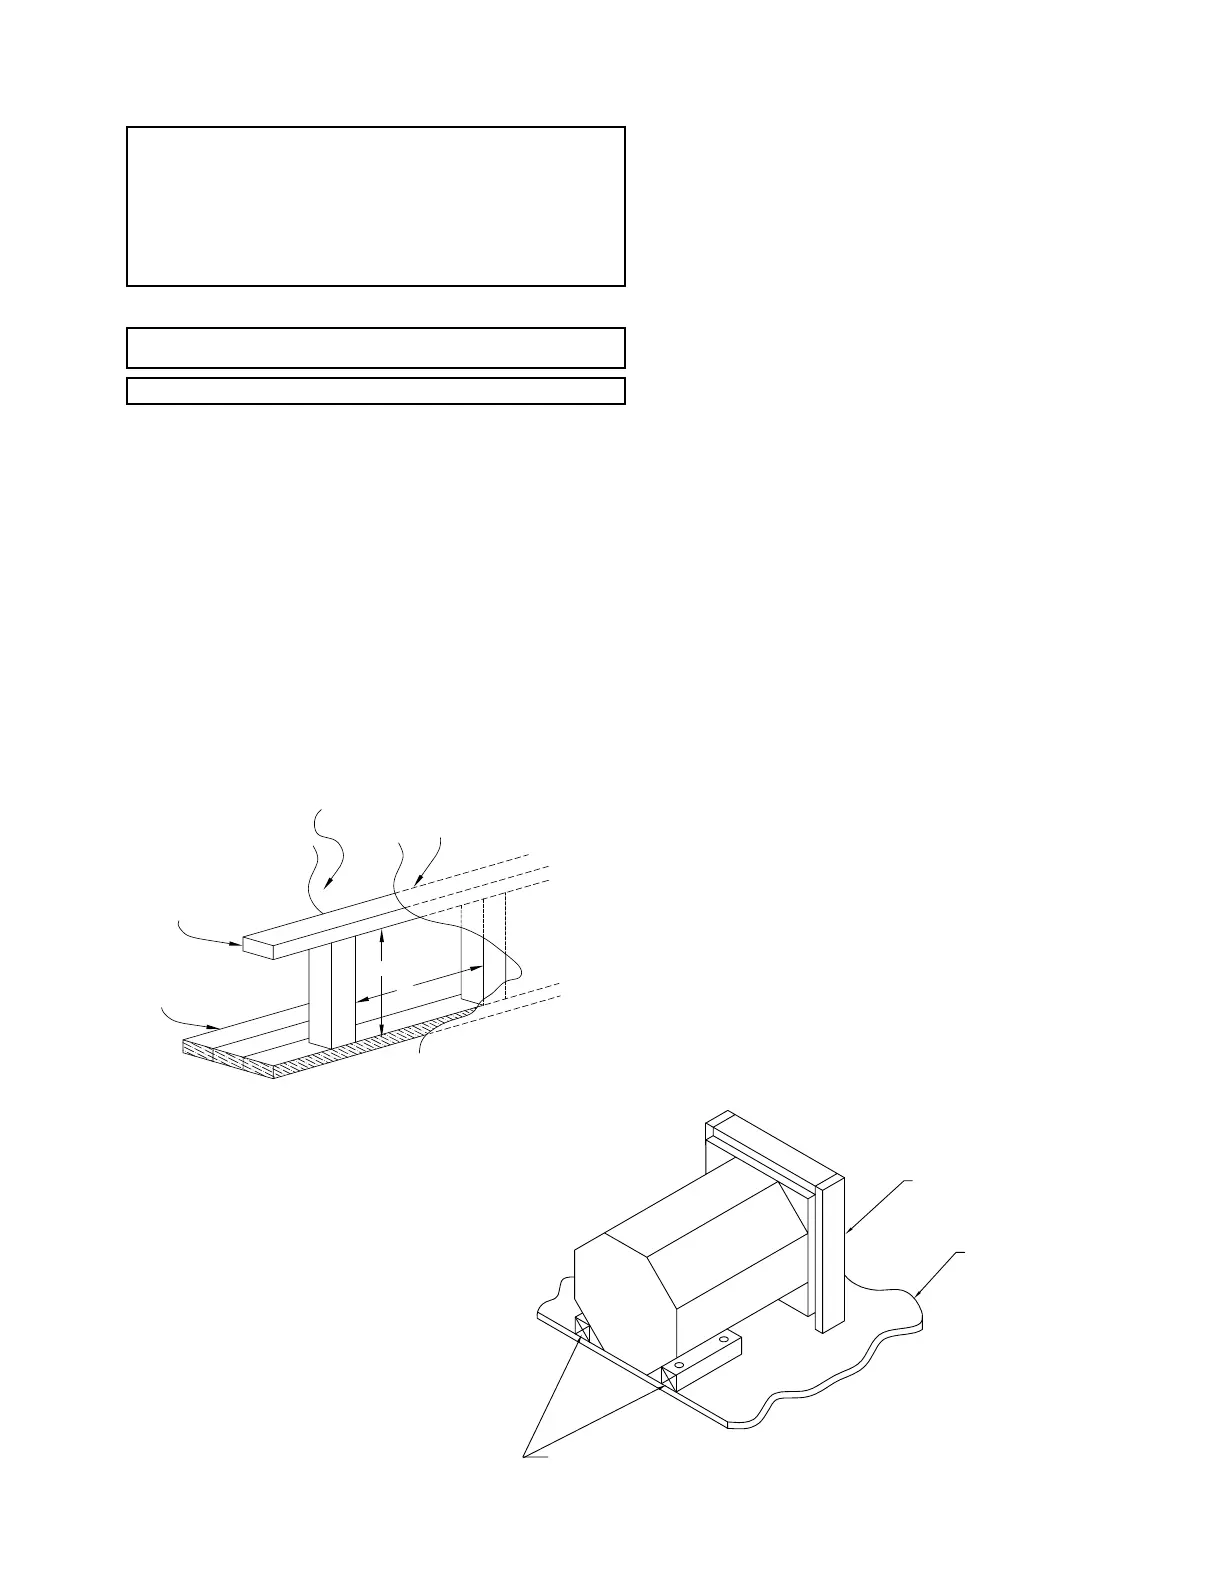
FRAMING
A
B
INNER COACH WALL
OUTER COACH WALL
FLOORING
A=325 MM + 3MM - 0
B=325 MM + 3MM - 0
Figure 1
SECURE CHOCKS, ONE ON EACH SIDE, TIGHTLY AGAINST WATER HEATER JACKET
AND FASTEN TO VEHICLE FLOOR TO PREVENT MOVEMENT. CHOCKS SHOULD BE
APPROXIMATELY 2" X 2" X 6"
FRAMED OPENING
COMPARTMENT
BOTTOM
Figure 1A
5
 Loading...