H
3
TO OPEN DOOR PANEL:
TO TRANSPORT:
Step 1: Pull and hold trigger back, push handle
down (Figure E). Disengage handle from top
hinge (Figure F).
Step 2: Lift door panel up to disengage lower
hinge from adjacent end panel and swing entire
panel open (Figure G).
Note: We have provided you with a convenient
carry strap for transport. Please be sure to always
remove carry strap when playard is in use.
Step 1: Fold playard.
(Refer to Storage section located on Page 4
for directions on how to fold playard.)
Step 2: Attach carry strap to playard.
a. Insert rod of carry strap through holes located in the
top center of the folded playard panels (Figure I).
b. Connect rod to strap by passing the rod through
the hole located on the carry strap (Figure J).
c. Snap rod securely into place by pulling up firmly
on strap until an audible ‘click’ is heard.
FOUR PANEL PLAYARD SETUP:
Important: Do not remove panels
connected to door panel.
Note: Loosen adjustment knobs on panels being
removed by turning counter clockwise.
Step 1: Place hand next to loosened adjustment
knob. Apply downward pressure and flex panel to
disengage top hinge (Figure H). Next, pull up to
disengage bottom hinge. Repeat to remove
other panel.
Step 2: Connect panels by following same
technique in Step 1 above in reverse order.
Step 3: Tighten all adjustments knobs by turning clockwise.
10
F
E
G
Paneles (6 – premontados)
Pomos de acoplamiento
al panel
(5 premontados)
Tirador
(premontado)
A
B
C
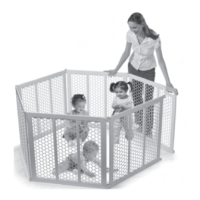
CARACTERÍSTICAS Y COMPONENTES:
INSTALACION DEL PARQUE INFANTIL DE
SEIS PANELES:
Paso 1: Para instalar un área de juego con 6 paneles, despliegue los paneles a fin
de crear una forma hexagonal (Gráfica A). Nota: Los tornillos en el tirador estarán
mirando hacia adentro si se instala adecuadamente.
Paso 2: Conecte el panel de la puerta al último panel colocando la bisagra de la
parte inferior de la puerta en la parte inferior del último panel (Gráfica B).
Paso 3: Empuje el tirador hacia abajo mientras mantiene el accionador hacia atrás.
Insértelo debajo de la abertura de la bisagra (Gráfica C). Suelte la presión sobre el
tirador. Oirá un chasquido producido por el tirador cuando se acople a la bisagra y
creará una cerradura de seguridad.
Paso 4: Apriete los 5 pomos de acoplamiento encima de cada panel haciéndolos
girar en la dirección de las agujas del reloj (Gráfica D).
D
Pomos
Pomos
Pomos
Pomos
Pomos
Panel (6)
J
I
Correa
portadora