EasyManua.ls Logo

SunDING SD-590C - User Manual

SunDING SD-590C
2 pages
Print Icon
To Next Page IconTo Next Page
Loading...
-TRIP UP TRIP DISTANCE COUNT UP
-TRIP DN TRIP DISTANCE COUNT DOWN
-CAL CALORIE
-FAT FATBURN
-COMPARATOR
-Km/Mile SELECTION
-SLEEP MODE
- MAINTENANCE ALERT
- SETTING TYRE CIRCUMFERENCE
-SETTING LAST VALUE OF ODOMETER/ODO
-SETTING TTM
-COMPUTER LOW BATTERY INDICATOR
-SENSOR LOW BATTERY INDICATOR
- AUTO BACK LIGHT
-WIRELESS AUTO WAKE UP
- AUTO ON/OFF
SD- 590C V 1 . 0
FUNCTIONS ILLUSTRATIONS
WHAT IS IN THE PACKAGE
COMPONENT ILLUSTRATIONS
-SPD CURRENT SPEED
-ODO ODOMETER
-DST TRIP DISTANCE
-MXS MAXIMUM SPEED
-AVS AVERAGE SPEED
-TTM TOTAL TRIP TIME
-TM TRIP TIME
-RAT RIDING ALL TIME (SINGLE TRIP TIME)
-CLK CLOCK 12H/24H
-SW STOPWATCH
-Th TEMPERATURE
-MAX Th MAXIMUM TEMPERATURE
-MIN Th MINIMUM TEMPERATURE
-TM UP TRIP TIME COUNT UP
-TM DN TRIP TIME COUNT DOWN
1
2
3
5
6
4
3mm
Computer unit and mount installation
Insert computer unit
in to the mount.
2
Mount the mount
shoe on to the
handlebar.
3
Close
Ope n
C o i n
To attach the speedometer sensor, use the ties to secure it to the front
fork. Make sure the computer and the sensor are on the same side of
the fork and no more than 60cm apart. The sensor should have an
arrow pointing at the magnet. Follow the figure to install the magnet on
a spoke. The gap between the sensor and the magnet should be 3 mm.
Notice
The magnet is designed for spokes
that are less than 2mm thick
Pass bicycle spokes through the
plastic hole on the bottom of the
magnet and tighten to secure
Computer
CR2032 Battery
Magnet
Mounting Shoe
Sensor
Ties
1
2
3
4
5
6
Please note that the slight noise when the computer unit shakes is the built-in ball switch, which is a
normal phenomenon caused by the wireless automatic wake-up function design.
Tighten nut to
scure the unIt.
Installation diagram of
magnet and Sensor
INSTRUCTION
Avoid exposing the device to direct sunlight or high temperature for too
long. Let it cool down in the shade for a while.
3.Black display
4.Display shows incomplete figures.
5.Display readout fades out
1.The speedometer shows 0 km/h while riding.
Improper magnet/sensor alignment, or the distance between
the computer and the sensor is more than 80cm.
2.The speedometer shows wrong values.
Take out the battery and reset it after 10 seconds.
Poor battery contact or dead battery .Check the installation of the battery or change a new battery.
The battery voltage is low, change a new battery.
MALFUNCTIONS AND REASONS
MODE INSTRUCTION
After inserting the battery, the screen enters the total distance/time mode. Press the MODE button to cycle through single
distance/time mode, count up/down mode and fat/calorie mode in turn. In the total distance/time mode, count up/down
mode and fat/calorie mode, it will automatically return to the single distance/time modeafter 8 seconds of no operation.
ODO / TTM MODE DST / TM MODE CAL / FAT MODECOUNTUP / DOW N MODE
1
FRONT BACK
COMPUTER &
MOUNTING
SHOE TRIGGER
BATTERY
COVER
MAINTENANCE ALERT
COMPARATOR
LOW BATTERY INDICATOR
Computer unit interface
MODESET
SPEED
TIME
Question and Answer IconNeed help?

Do you have a question about the SunDING SD-590C and is the answer not in the manual?

Summary

Functions Overview

Current Speed and Distance Tracking

Displays current speed, odometer, trip distance, maximum speed, and average speed.

Time and Trip Functions

Covers trip time, total trip time, riding all time, and trip time/distance count up/down.

Additional Features

Includes clock, stopwatch, temperature, calorie, fat burn, and unit selection.

Alerts and Indicators

Provides maintenance alerts, low battery indicators for computer and sensor, and auto backlight.

Package Contents and Installation

Component Identification

Lists and illustrates all items included in the package for easy identification.

Computer Unit and Mount Setup

Step-by-step guide for attaching the computer unit to its mount.

Magnet and Sensor Installation

Detailed instructions for mounting the magnet on a spoke and the sensor on the fork.

Computer Interface Layout

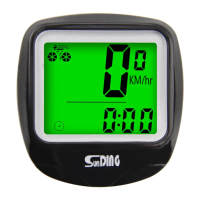
Explains the layout and icons displayed on the computer unit's screen.

Mode Operations

Mode Cycling and Auto Return

Describes how to cycle through different modes like ODO/TTM, DST/TM, and Calorie/Fat.

Mode Descriptions

Details for ODO/TTM, DST/TM, Count Up/Down, and Calorie/Fat modes.

Troubleshooting and Maintenance

Common Malfunctions and Solutions

Addresses issues like incorrect speed, display problems, and provides remedies.

Advanced Settings and Functions

Setting Up Units and Time

Configure temperature units (C/F), time format (12/24H), and tire circumference.

Odometer and Trip Data Setup

Set initial odometer value, total riding time (TTM), and maintenance alerts.

Trip Time;Distance Count Settings

Configure trip time/distance count up and count down functions.

Data Reset Procedures

Instructions for resetting calorie/fat data and clearing all collected data.

Detailed Function Explanations

In-depth descriptions of Speed, ODO, DST, MAX/AVS Speed, Trip Time, Stopwatch, etc.

Temperature and Sleep Mode

Explains temperature display, maximum/minimum temperature, and sleep mode functionality.

Special Features

Details on care reminder, auto backlight, low battery indicators, and auto wake-up.

Overview

This document describes the SD-590C bicycle computer, a device designed to track various cycling metrics. It features a wireless automatic wake-up function, indicated by a slight noise from the built-in ball switch when the unit shakes.

Function Description

The SD-590C offers a comprehensive range of functions to monitor your cycling performance and environmental conditions:

  • Speed Tracking:

    • SPD (Current Speed): Displays your real-time speed, with an accuracy of +/- 0.1 km/h (m/h) and a maximum reading of 99.9 km/h (m/h).
    • MXS (Maximum Speed): Records the highest speed achieved during a trip.
    • AVS (Average Speed): Calculates the average speed for the current trip.
    • COMPARATOR: Indicates whether your current speed is higher (↑) or lower (↓) than your average speed (AVS).
  • Distance Tracking:

    • ODO (Odometer): Shows the total accumulated distance ridden, ranging from 0 to 99999 km (mile). It resets to 0 after reaching the maximum limit.
    • DST (Trip Distance): Displays the distance for a single trip, ranging from 0 to 9999 km (m). It resets to 0 after reaching the maximum limit.
    • TRIP UP (Trip Distance Count Up): Counts up the distance from zero when riding, with a maximum value of 9999.9. Resets to zero after reaching the maximum.
    • TRIP DN (Trip Distance Count Down): Counts down the distance from a set value. It can go negative, stopping at -999.9.
  • Time Tracking:

    • TTM (Total Trip Time): Records the total riding time for one trip, ranging from 0 to 9999 hours.
    • TM (Trip Time): Measures the trip time from zero, counting up to 999 hours. Resets to zero and counts again after reaching the maximum.
    • RAT (Riding All Time): Tracks the total travel time, ranging from 0 to 9999 hours.
    • SW (Stopwatch): A stopwatch function that can be started, stopped, and cleared.
    • TM UP (Trip Time Count Up): Counts up the time from zero when riding, with a maximum value of 99:59:59. Resets to zero after reaching the maximum.
    • TM DN (Trip Time Count Down): Counts down the time from a set value. It can go negative, stopping at -999.9.
  • Environmental & Health Metrics:

    • Th (Temperature): Displays the ambient temperature in Celsius (-20 to 70 degrees) or Fahrenheit (-4 to 158 degrees).
    • MAX Th (Maximum Temperature): Records the maximum ambient temperature during a single trip.
    • MIN Th (Minimum Temperature): Records the minimum ambient temperature during a single trip.
    • CAL (Calorie): Shows the calories burned after the last data reset.
    • FAT (Fatburn): Displays the amount of fat burned after the last data reset.
  • Clock & Settings:

    • CLK (Clock 12H/24H): Displays the current time in either 12-hour or 24-hour format.
    • Km/Mile Selection: Allows selection between kilometers per hour (km/h) and miles per hour (m/h) for speed units.
    • Setting Tyre Circumference: Configures the wheel circumference for accurate speed and distance calculations. A chart is provided for common tire sizes.
    • Setting Last Value of Odometer/ODO: Allows manual adjustment of the odometer reading.
    • Setting TTM: Allows manual adjustment of the total trip time.
    • Maintenance Alert: Provides an alert based on a set riding distance (200, 400, 600, 800).
    • Sleep Mode: Automatically turns off the screen after 300 seconds of no movement, preserving data. The clock remains on display.
    • Auto Backlight: Automatically senses ambient light and activates backlight for 5 seconds when a key is pressed in low light conditions. Can be manually toggled on/off.
    • Wireless Auto Wake Up: The device enters working mode when vibration is detected in sleep mode.
    • Auto On/Off: Automatically turns on or off.

Important Technical Specifications

  • Power Source: The computer unit uses one CR2032 battery.
  • Sensor-Magnet Gap: The gap between the sensor and the magnet should be 3 mm for accurate readings. The magnet is designed for spokes less than 2mm thick.
  • Computer-Sensor Distance: The computer and sensor should be on the same side of the fork and no more than 60cm apart.
  • Temperature Range: Celsius: -20 to 70 degrees; Fahrenheit: -4 to 158 degrees.
  • Distance/Time Ranges:
    • ODO: 0 to 99999 km (mile)
    • DST: 0 to 9999 km (m)
    • TTM: 0 to 9999 hours
    • TM: 0 to 999 hours
    • TRIP UP (Distance): 0 to 9999.9
    • TRIP UP (Time): 0 to 99:59:59
    • TRIP DN (Distance): 0 to -999.9
    • TRIP DN (Time): 0 to -999.9

Usage Features

  • Installation:
    1. Battery Installation: Remove the battery cover from the bottom of the computer, insert one CR2032 battery with the positive (+) pole facing the cover, and close.
    2. Mount Shoe Installation: Secure the mounting shoe onto the handlebar using the provided nut.
    3. Computer Unit Insertion: Insert the computer unit into the mount.
    4. Sensor Installation: Use ties to secure the speedometer sensor to the front fork. Ensure the computer and sensor are on the same side of the fork and within 60cm. The sensor should have an arrow pointing to the magnet.
    5. Magnet Installation: Install the magnet on a spoke, ensuring a 3mm gap between the sensor and the magnet.
  • Setting Mode Navigation: Long press the SET+MODE button for 3 seconds to enter setting mode. Use the MODE button to cycle through options and the SET button to confirm and move to the next digit/setting.
  • Data Reset:
    • CAL/FAT Reset: In fat/calorie mode, press and hold the SET button for 3 seconds to clear fat and calorie data.
    • Clear All Data: In DISPLAY mode, press the SET button for 3 seconds to clear all data except CLK, ODO, RAT, TRIP UP, TRIP DN, and TM UP.
    • Stopwatch Clear: Long press SET for 3 seconds to clear stopwatch data.
  • Display Modes: The device cycles through ODO/TTM mode, DST/TM mode, Countup/Down mode, and CAL/FAT mode. It automatically returns to single distance/time mode after 8 seconds of no operation in total distance/time, count up/down, and fat/calorie modes.

Maintenance Features

  • Troubleshooting:
    • Speedometer shows 0 km/h while riding: Check for improper magnet/sensor alignment or if the distance between the computer and sensor exceeds 80cm.
    • Speedometer shows wrong values: Remove the battery and reset after 10 seconds.
    • Black display: Avoid direct sunlight or high temperatures. Let the device cool in the shade.
    • Display shows incomplete figures: Check for poor battery contact or a dead battery. Reinstall or replace the battery.
    • Display readout fades out: The battery voltage is low; change to a new battery.
  • Low Battery Indicators:
    • Computer Low Battery Indicator: A symbol appears on the screen when the computer battery voltage is low. It disappears after battery replacement.
    • Sensor Low Battery Indicator: A symbol appears on the screen when the sensor battery voltage is low. It disappears after battery replacement.
  • Care Reminder: An icon appears when the riding distance exceeds the set maintenance distance. Press both SET and MODE buttons simultaneously to clear it.

SunDING SD-590C Specifications

General IconGeneral
BrandSunDING
ModelSD-590C
CategoryBicycle Accessories
LanguageEnglish

Related product manuals