Do you have a question about the Sundstrom SR 570 and is the answer not in the manual?
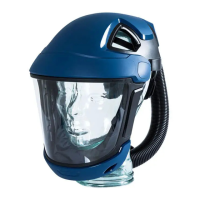
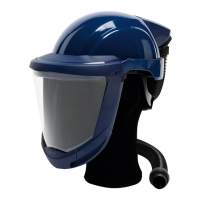
Connect the breathing hose to the face shield, ensuring a click is heard for correct attachment.
Connect the hose to the fan unit or compressed air attachment SR 507, turning clockwise.
Turn the flow meter bag inside out to reveal the flow meter for checking.
Test airflow by placing head-top in flow meter, starting fan, and checking ball position at 175 l/min.
Adjust the depth of the head in the part by positioning the head crown using 5 options on each side.
Adjust the height of the hood by lengthening or shortening top head straps.
Adjust the angle between visor and head harness if the face is too close to the visor.
Adjust the headband angle at the back of the head using upper or lower pin holes.
Adjust head harness width by releasing pins and extending or shortening it, offering two options.
Adjust head harness circumference using the rear knob for a secure fit.
Direct airflow towards the visor or face for personalized comfort.
Start the fan, raise the visor, put on the face shield, and adjust width using the rear knob.
Pull the face seal down under the chin; a click confirms full lowering.
Check face seal fit by running a finger along the contact surface all around the face.
Ensure the breathing hose runs along the back and is not twisted.
Remove peel-off clips and then release and remove the old visor.
Fit the new visor, starting in the center, ensuring it is centered and in the groove.
Secure the visor on the right and left sides, ensuring it is centered in the groove.
Verify that the visor is properly locked around the edge of the face shield.
Remove the visor (see 5.1) and then release and remove the valve cover.
Release and remove the exhalation membrane from its housing.
Install the new membrane correctly, ensuring 'UP' is visible and it seals the valve seat.
Press the valve cover into place and refit the visor.
Release the face seal hooks from the head harness to begin removal.
Push out the face seal pins and remove the old face seal.
Fit the new face seal, aligning markings on the seal and visor to the front.
Press the face seal around the visor, fix pins, and secure hooks to the head harness.
Release the face seal hooks from the head harness to allow access.
Remove the old forehead seal from its position.
Install the new forehead seal by pressing its tabs into the face shield socket.
Place the new seal between head harness side sockets and check mounting.
Release the head harness from the face shield and remove the old sweatband.
Insert the head harness tongue into the new sweatband, noting its orientation.
Fit the sweatband onto head harness spikes, folding it around the bandeau.
Secure the two loose sweatband sockets onto the head harness.
Release the head harness from the face shield via three fixing points.
Secure both side fixing points of the head harness to the face shield.
Secure the front fixing point of the head harness to the face shield.
Use a soft brush or sponge with detergent for severe soiling, rinse, and dry.
Clean the exhalation membrane and valve seat, verifying their condition.
Remove gaskets, clean connections and packing groove before mounting new gasket.
| Brand | Sundstrom |
|---|---|
| Model | SR 570 |
| Category | Respiratory Product |
| Language | English |