8005SC 1 Rev. 09/09/19
6
2
88
88
99
99
99
99
99
99
99
99
99
99
99
99
88
88
88
88
89
99
9
9
88
8
6
6
6
6
6
6
2
1
6
7
7
7
7
7
7
7
7
5
10
4
5
3
3
5
Examine box contents, then proceed
with following instructions.
Step 1: Slide chrome legs (#2) into square holes cut in tray (#1)
until bolt holes are aligned at top of legs.
Step 2: Insert bolt and flat washer into hole on leg and tray.
Fasten nut using lock washer and flat washer, BUT DO NOT
TIGHTEN NUT COMPLETELY AT THIS TIME. Repeat this
procedure on all four corners.
Step 3: Repeat Step 1 with bottom tray (#1).
Step 4: Repeat Step 2 with bottom tray (#1).
Step 5: Insert casters (#3, #4) into the hole of plastic inserts (#5).
NOTE: Insert the two locking casters (#3) at the same end of the
cart.
Step 6: Now go back and tighten all loose nuts and bolts (Torque
to 60 inch-lbs.).
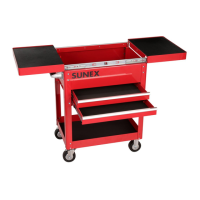
Step 7: For drawer assembly instructions, if this feature is available
with model purchased, go to Step 8 on reverse side.
© Copyright 2019, Sunex Tools
®
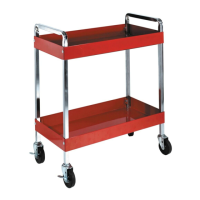
8005SC
SERVICE CART
ASSEMBLY INSTRUCTIONS
• It is the responsibility of the owner to make sure all personnel read this manual prior to using
the device. It is also the responsibility of the device owner to keep this manual intact and in a
convenient location for all to see and read. If the manual or product labels are lost or not legible,
contact Sunex Tools
®
for replacements. If the operator is not fluent in English, the product
and safety instructions shall be read and discussed with the operator in the operator's native
language by the purchaser/owner or his designee, making sure that the operator comprehends
its contents. • Read and follow all instructions in User’s Manual. • Do not load carts beyond
rated capacity (350 Lbs. - 175 lbs. per shelf). • Apply brake on locking casters anytime cart
is in place. • Do not pull cart. Push from handle on end to move. • Units can tip or fall causing
damage or personal injury. • Cart is designed to roll easily on flat surfaces and should not be
used on uneven or inclined surfaces. • Keep children away from unit. • Wear gloves when
lifting by edges. • Failure to heed these warnings may result in personal injury and/or
property damage.
Overall Load Capacity ............................................................ 350 Lbs.
Top Shelf Capacity ................................................................. 175 Lbs.
Bottom Shelf Capacity ........................................................... 175 Lbs.
WARNING
WARNING: This product can expose you to chemicals including
nickel, which is known to the State of California to cause cancer
and birth defects or other reproductive harm.
For more information go to www.P65Warnings.ca.gov.
Bolt kit for 8005SC cart:
6
7
8
9
Replacement Parts Available:
Item # Part # Description Req.
1 8007 Tray/each 2
2 RSSC7 Chrome Leg/each 2
3 RSSCPLW Locking Caster/each 2
4 RSSCPW Non Locking Caster/each 2
5 RSSCPP1 Set of 4 Plastic Inserts 1
RSSCPHK Bolt Kit (incl. 8 each of #6, #7,
#8, and 16 each of #9)
1
8006RB Locking Drawer with Roller
Bearing Slides
RSRBSLIDEC2 Clip-on Roller Bearing Slides/pr.
RS8006HDL Chrome Drawer Handle w/
Hardware
RS8006LK Drawer Lock with Two Keys
RSDECAL01 Black Logo Decal (not shown)