R
SPX-WB1 ASSEMBLY QUICK GUIDE
GUÍA DE ENSAMBLADO RÁPIDO DE SPX-WB1
GUIDE RAPIDE D’ASSEMBLAGE DE L’ENSEMBLE SPX-WB1
If you have any questions or comments, please call the Snow Joe
®
+ Sun Joe
®
customer service department at:
Si tiene preguntas o comentarios, comuníquese con el centro de servicio al cliente de Snow Joe
®
+ Sun Joe
®
llamando al:
Si vous avez des questions ou des commentaires, veuillez appeler le service clientèle Snow Joe
®
+ Sun Joe
®
au :
1-866-SNOWJOE (1-866-766-9563)
FOR USE WITH
SPX3000/SPX3001/SPX4000/SPX4001:
1. If not already done, detach your spray wand from
your trigger gun.
2. Attach the transfer adapter to your trigger gun.
3. Take the wheel + rim brush and align the two tabs
with the transfer adapter.
4. Once aligned, insert the tip of the locking collar on
the wheel + rim brush into the transfer adapter,
twist counter clockwise to lock into place.
5. Adjust the wheel + rim brush if needed. After any
adjustment is made, use the locking collar to lock
the attachment into place and twist to lock.
PARA USO CON SPX3000/SPX3001/SPX4000/
SPX4001:
1. Si aún no lo ha hecho, desconecte la vara rociadora
de la pistola.
2. Conecte el adaptador de transferencia a su pistola.
3. Sujete el cepillo para llantas y neumáticos y alinee
las dos lengüetas con el adaptador de transferencia.
4. Una vez alineadas, inserte la punta del collarín de
trabado del cepillo para llantas y neumáticos en el
adaptador de transferencia, y enrosque en sentido
antihorario para trabarlo en su lugar.
5. Ajuste el cepillo para llantas y neumáticos, de ser
necesario. Luego de haber hecho el ajuste, use el
collarín de trabado para trabar el accesorio en su
lugar, girándolo para trabar.
À UTILISER AVEC LES MODÈLES SPX3000/SPX3001/SPX4000/
SPX4001 :
1. Si vous ne l’avez pas encore fait, détachez la lance d’arrosage
du pistolet.
2. Attachez le raccord de transfert au pistolet.
3. Prenez la brosse pour roues et jantes et alignez les deux ergots
avec le raccord de transfert.
4. Une fois l’alignement réalisé, insérez la pointe de la bague de
blocage sur la brosse pour roues et jantes dans le raccord de
transfert et tournez dans le sens contraire des aiguilles d’une
montre pour verrouiller en place.
5. Au besoin, réglez la brosse pour roues et jantes. Une fois le
réglageeectué,tournezlabaguedeblocagepourverrouiller
l’accessoire en place.
FOR USE WITH SPX1000:
1. Disconnect your spray wand assembly so that only
the middle wand remains attached to your trigger
gun.
2. Take the wheel + rim brush and align the two tabs
with the middle wand
3. Once aligned, push the tip of the locking collar on
the wheel + rim brush into the middle wand and
twist counter clockwise to lock into place.
4. Adjust the wheel + rim brush if needed. After any
adjustment is made, use the locking collar to lock
the attachment into place and twist to lock.
PARA USO CON SPX1000:
1. Desconecte el ensamblado de su vara rociadora
de manera que solo la vara intermedia permanezca
conectada a su pistola.
2. Sujete el cepillo para llantas y neumáticos y alinee las
dos lengüetas con la vara intermedia.
3. Una vez alineadas, empuje la punta del collarín de
trabado del cepillo para llantas y neumáticos dentro
de la vara intermedia, y gire en sentido antihorario
para trabarlo en su lugar.
4. Ajuste el cepillo para llantas y neumáticos, de ser
necesario. Luego de haber hecho el ajuste, use el
collarín de trabado para trabar el accesorio en su
lugar, y gírelo para trabar.
À UTILISER AVEC le SPX1000 :
1. Débranchez l’ensemble lance d’arrosage de manière à ce que
seule la lance intermédiaire reste attachée au pistolet.
2. Prenez la brosse pour roues et jantes et alignez les deux ergots
avec la lance intermédiaire.
3. Une fois l’alignement réalisé, insérez la pointe de la bague
de blocage sur la brosse pour roues et jantes dans la lance
intermédiaire et tournez dans le sens contraire des aiguilles
d’une montre pour verrouiller en place.
4. Au besoin, réglez la brosse pour roues et jantes. Une fois le
réglageeectué, tournez labague deblocagepourverrouiller
l’accessoire en place.
FOR USE WITH
SPX1500/SPX2000/SPX2500/SPX6000C:
1. If not already done, detach your spray wand from
your trigger gun.
2. Take the wheel + rim brush and align the two tabs
with the inside of the trigger gun.
3. Once aligned, insert the tip of the locking collar
on the wheel + rim brush into the trigger gun, twist
counter clockwise to lock into place.
4. Adjust the wheel + rim brush if needed. After any
adjustment is made, use the locking collar to lock
the attachment into place.
PARA USO CON SPX1500/SPX2000/SPX2500/
SPX6000C:
1. Si aún no lo ha hecho, desconecte la vara rociadora
de la pistola.
2. Sujete el cepillo para llantas y neumáticos y alinee las
dos lengüetas con el interior de la pistola.
3. Una vez alineadas, empuje la punta del collarín de
trabado del cepillo para llantas y neumáticos dentro
de la pistola, y gire en sentido antihorario para
trabarlo en su lugar.
4. Ajuste el cepillo para llantas y neumáticos, de ser
necesario. Luego de haber hecho el ajuste, use el
collarín de trabado para trabar el accesorio en su
lugar.
À UTILISER AVEC LES MODÈLES SPX1500/SPX2000/SPX2500/
SPX6000C :
1. Si vous ne l'avez pas encore fait, détachez la lance d'arrosage
du pistolet.
2. Prenez la brosse pour roues et jantes et alignez les deux ergots
avec l'intérieur du pistolet.
3. Une fois l'alignement réalisé, insérez la pointe de la bague de
blocage sur la brosse pour roues et jantes dans le pistolet et
tournez dans le sens contraire des aiguilles d'une montre pour
verrouiller en place.
4. Au besoin, réglez la brosse pour roues et jantes. Une fois le
réglage eectué, utilisez la bague de blocage pour verrouiller
l'accessoire en place.
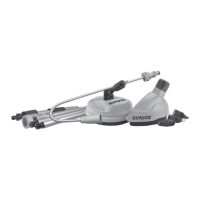
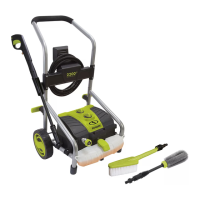
Wheel + rim brush
Cepillo para llantas y neumáticos
Brosse pour roues et jantes
Wheel + rim brush
Cepillo para llantas y neumáticos
Brosse pour roues et jantes
Wheel + rim brush
Cepillo para llantas y neumáticos
Brosse pour roues et jantes
SPX1500/SPX2000/SPX2500/SPX6000C
SPX1000
Trigger gun
Pistola
Pistolet
Trigger gun
Pistola
Pistolet
SPX3000/SPX3001/SPX4000/SPX4001
Trigger gun
Pistola
Pistolet
Transfer adapter
Adaptador de
transferencia
Raccord de transfert
Middle wand
Vara intermedia
Lance intermédiaire
Locking collar
Collarín de trabado
Bague de blocage
Locking collar
Collarín de trabado
Bague de blocage
Locking collar
Collarín de trabado
Bague de blocage
All manuals and user guides at all-guides.com