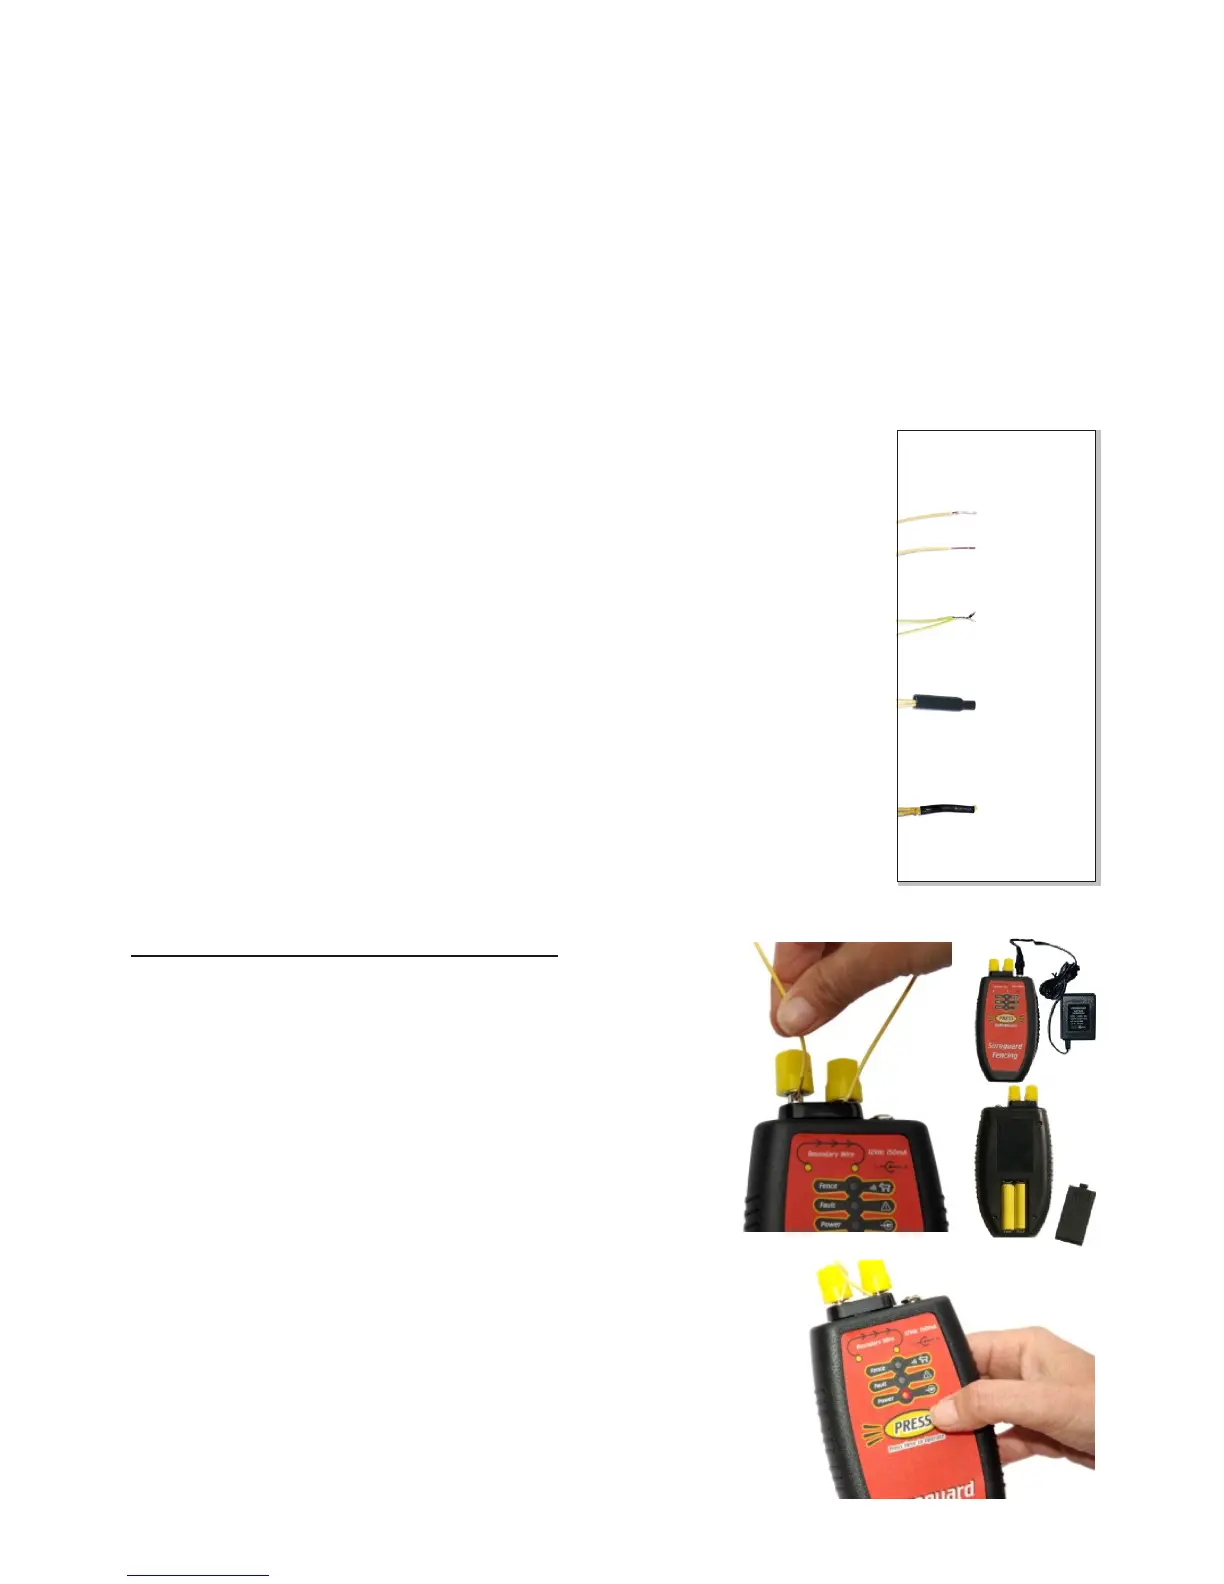
(4) Continue
until cap
exudes
adhesive.
WATERPROOF
WIRE SEAL
(Repair Kit #615)
(2) Twist wires
securely.
(3) Fit cap.
Apply heat
evenly to
shrink the cap.
E.g. use a
lighter or flame.
(1) Strip 15mm
(1/2") of
insulation
from each cable.
Boundary Wire Transmitter
Boundary Wire Connection:
The boundary wire is one continuous piece around the containment area. Run both
ends back to the transmitter. Remove 15mm of insulation and twist the exposed
copper. Unscrew each terminal to expose the hole in the shaft. Place the exposed
copper wire into this hole and screw the terminal finger tight. Repeat for the second
terminal and its wire.
Power Source:
Connect the 12 volt mains power adapter into the socket next to the yellow terminals.
Switch on the power adapter at the wall socket. The “Power” light on the front control
panel will start to glow.
The transmitter also has a battery compartment on the back of the case. You have the
option of installing rechargeable backup batteries. The transmitter will charge these
batteries when connected to mains power. Install two “AA” sized batteries of at least
2000mAH rating for a backup operating time of 2~3 days.
Control Panel:
If a fault occurs the “Fault” light will glow and an alarm will automatically sound.
Fix the fault immediately as the collar may not activate properly. Use the following
guide to identify and fix the problem.
To switch the boundary wire transmitter ON, press & release the push button switch
labelled “Press”. The “Fence” light will glow when the transmission is on. Press &
release the “Press” again to switch the transmitter OFF. The “Fence” light will go off.
Wiring Techniques
l For consistent distance setting, we recommend you place the boundary wire at ground level, or bury it no more than 20cm or raised no
more than 20cm above ground. Try to keep the full wire installation about the same height. The activation distance will vary slightly if
sections are at different heights. You may raise the wire to any height to decrease the activation distance in that area, but this might make
this area less secure. We do not recommend placing the wire at the top of a fence over the entire installation.
l Corner activation distances are slightly greater than straight sections. This is because the radio collar calculates the distance by
measuring the strength of the radio signal. At corners the signal is detected from two directions at once and this additional strength
causes the no-go area to round on the inside corners. If the containment area is small, you may want to reduce this effect. You can
achieve this by gradually raising the wire to the top of the fence at the corner. Start at about 2m to 4m from the corner. Ramp back down
over the same distance after the corner.
l Burying the boundary wire is optional. We recommend no less than 5cm and no greater than 20cm. Do not bury damaged or repaired
sections of wire. Only bury the wire after containment is achieved. This allows for fine position adjustments, if required. Protect or bury
the wire if it presents a trip hazard.
l Protect the wire when crossing a driveway or pathway. On concrete you can often use the expansion
joint to protect the wire by pushing it into this gap. On gravel you should protect the wire inside PVC
conduit. On bitumen you should protect the wire inside soft black polythene pipe (irrigation pipe). The
polythene pipe can be nailed onto the bitumen. On pavers you can often lift the pavers and place the wire
directly under it.
l When wiring a battle axe block (long narrow driveway), with example #1, the wire crosses the driveway
at the house end. If you want to protect the road entry end you must use a customized installation (similar
technique to examples #2 and #3).
l For boundary wire repairs and joints, you must ONLY use Sureguard waterproof seals (Order kit item
#615).
l Signal anomalies: When wiring like example #1, it is important to keep the wire as far away as possible
from large steel objects because the radio signal can distort through and around the object (does not
apply to steel fencing). For example, a boundary wire run behind a shed might result in the collar
activating at the front of the shed. A Trampoline near the wire can might cause the collar to trigger directly
under its frame. Steel frames houses or a steel staircase may also distort the signal. A single wire run
along a house wall can transmit its signal through the steel footings to doorways on the other side of the
house. All of these situations can be fixed by increasing the separation of the wire to the steel object, or
reducing the activation distance in the collar. A doubled boundary wire like example #2 or 3 will always
solve this issue. (Call technical support if you need assistance).
4