STEALTH DIGI-CUT100
4 PRODUCT DESCRIPTION
4.1 The voltage of the output ends is very high. Don’t touch with the output ends, cutting
torch and other conductive parts while setting up an electric circuit.
4.2 For the safety of the equipment and the persons, the customer must correctly make
grounding or protection according to the power supply system:using 4 mm2 lead to
connect the protection grounding of the cutting machine.
4.3 Cutting operating should be carried out in dry and good ventilating area. The
surrounding objects should be not less than 0.5m away from the cutting machine.
4.4 Before cutting , the operator should read the operation instructions carefully and use
the machine correctly.
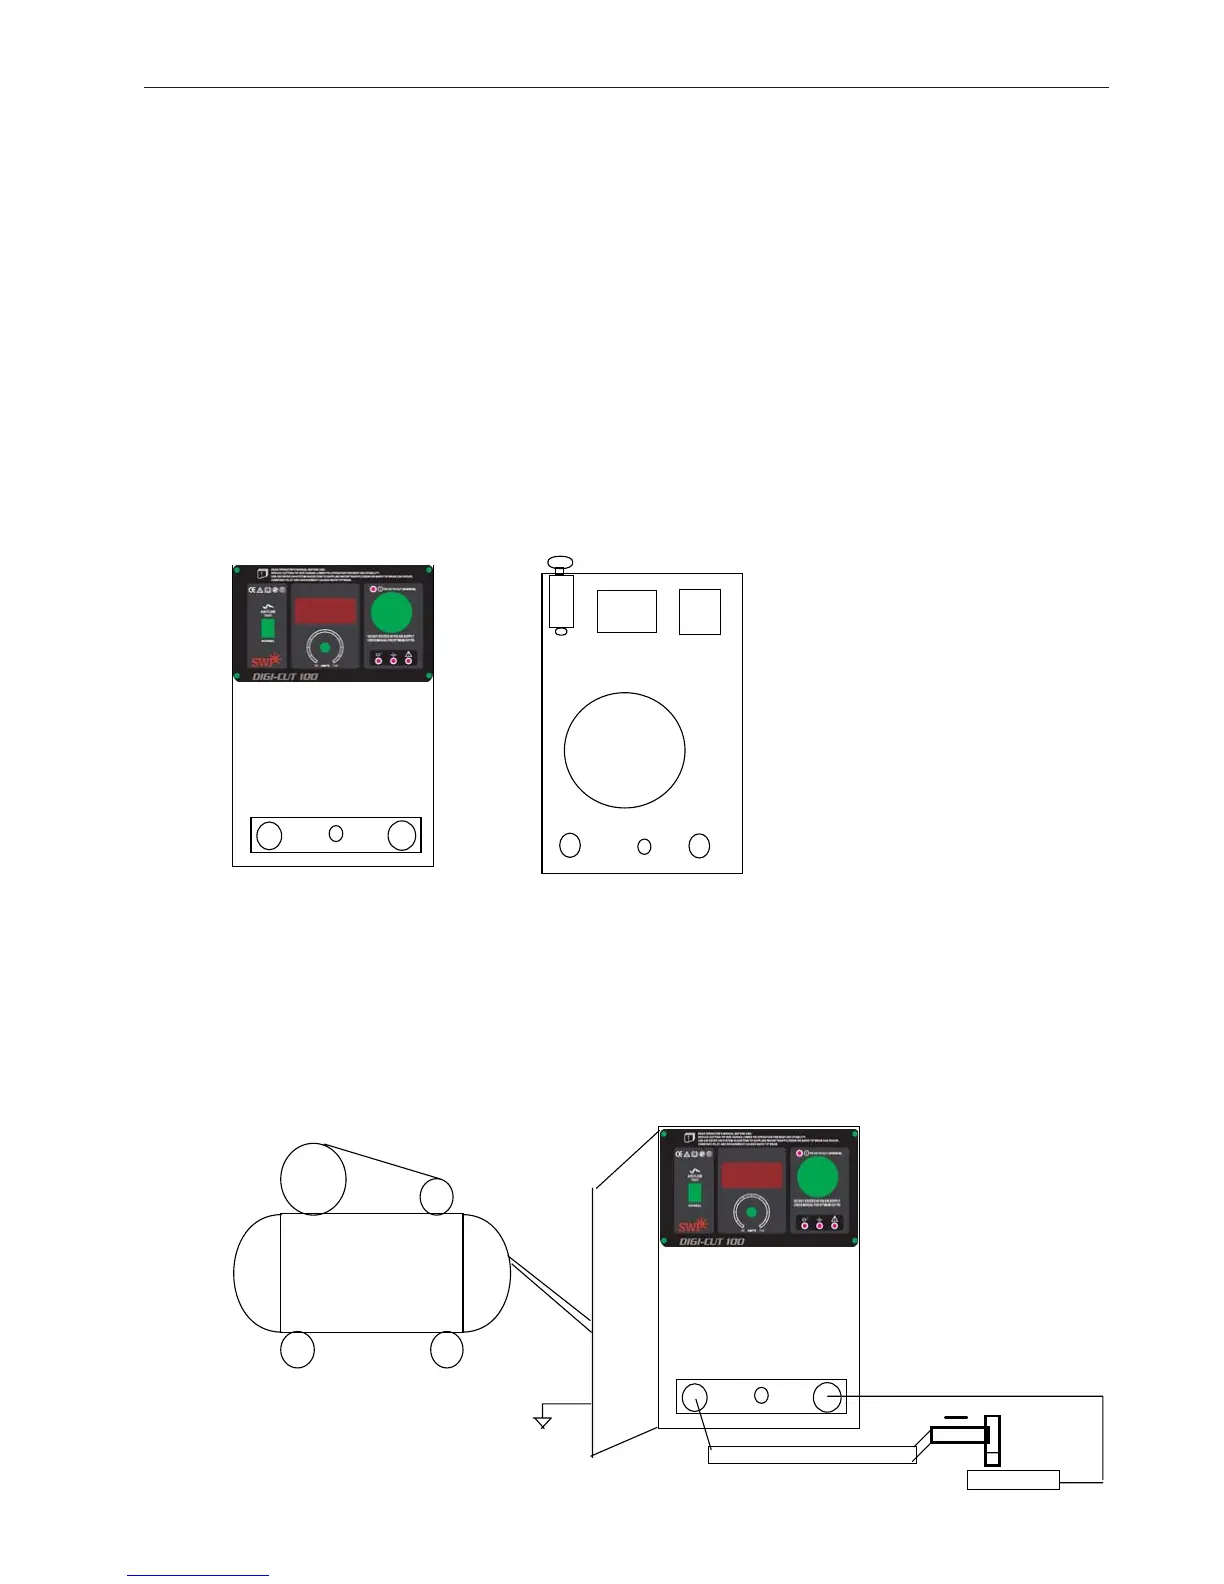
5 PANEL FUNCTION DIAGRAMS
FRONT PANEL
BACK PANEL
torch and other conductive parts while setting up an electric circuit.
2. For the safety of the equipment and the persons, the customer must correctly make
grounding or protection according to the power supply system:using 4 mm
2
lead to
connect the protection grounding of the cutting machine.
3. Cutting operating should be carried out in dry and good ventilating area. The surrounding
objects should be not less than 0.5m away from the cutting machine.
4 . Before cutting , the operator should read the operation instructions carefully and use the
machine correctly.
5. THE SKETCH OF FUNCTION AND CONNECT ING
1.
indication of cutting current 2.power indication 3. warning indication 4. cutting/testing gas switch
5. cutting current regulator 6. cutting torch cable 8. workpiece cable 9. nameplate
10. air pressure-reduced valve 11. pressure air entrance 12. fan
13. indication of air pressure-reduced valve 14. grounding column 15. input cable 16,power switch
()
17.indication of lower air 18. indication of PSI OK TO CUT minimum 19.fuse 20A
BACK PANEL
FRONT PANEL
11
12
9
14
15
16
6
19
8
torch and other conductive parts while setting up an electric circuit.
2. For the safety of the equipment and the persons, the customer must correctly make
grounding or protection according to the power supply system:using 4 mm
2
lead to
connect the protection grounding of the cutting machine.
3. Cutting operating should be carried out in dry and good ventilating area. The surrounding
objects should be not less than 0.5m away from the cutting machine.
4 . Before cutting , the operator should read the operation instructions carefully and use the
machine correctly.
5. THE SKETCH OF FUNCTION AND CONNECT ING
1.
indication of cutting current 2.power indication 3. warning indication 4. cutting/testing gas switch
5. cutting current regulator 6. cutting torch cable 8. workpiece cable 9. nameplate
10. air pressure-reduced valve 11. pressure air entrance 12. fan
13. indication of air pressure-reduced valve 14. grounding column 15. input cable 16,power switch
()
17.indication of lower air 18. indication of PSI OK TO CUT minimum 19.fuse 20A
BACK PANEL
FRONT PANEL
1. Cutting current indicator
2. Power ON/OFF
3. Warning light
4. Cutting/testing gas switch
5. Cutting current indicator
6. Cutting torch cable
8. Workpiece cable
9. Nameplate
10. Air pressure-reducing valve
11. Air IN pressure
12. Fan
13. Air pressure-reducing valve
indicator
14. Grounding column
15. Input cable
16. Power switch
17. Low air pressure indicator
18. PSI OK TO CUT (minimum)
indicator
19. Fuse 20A
 Loading...