76
EN
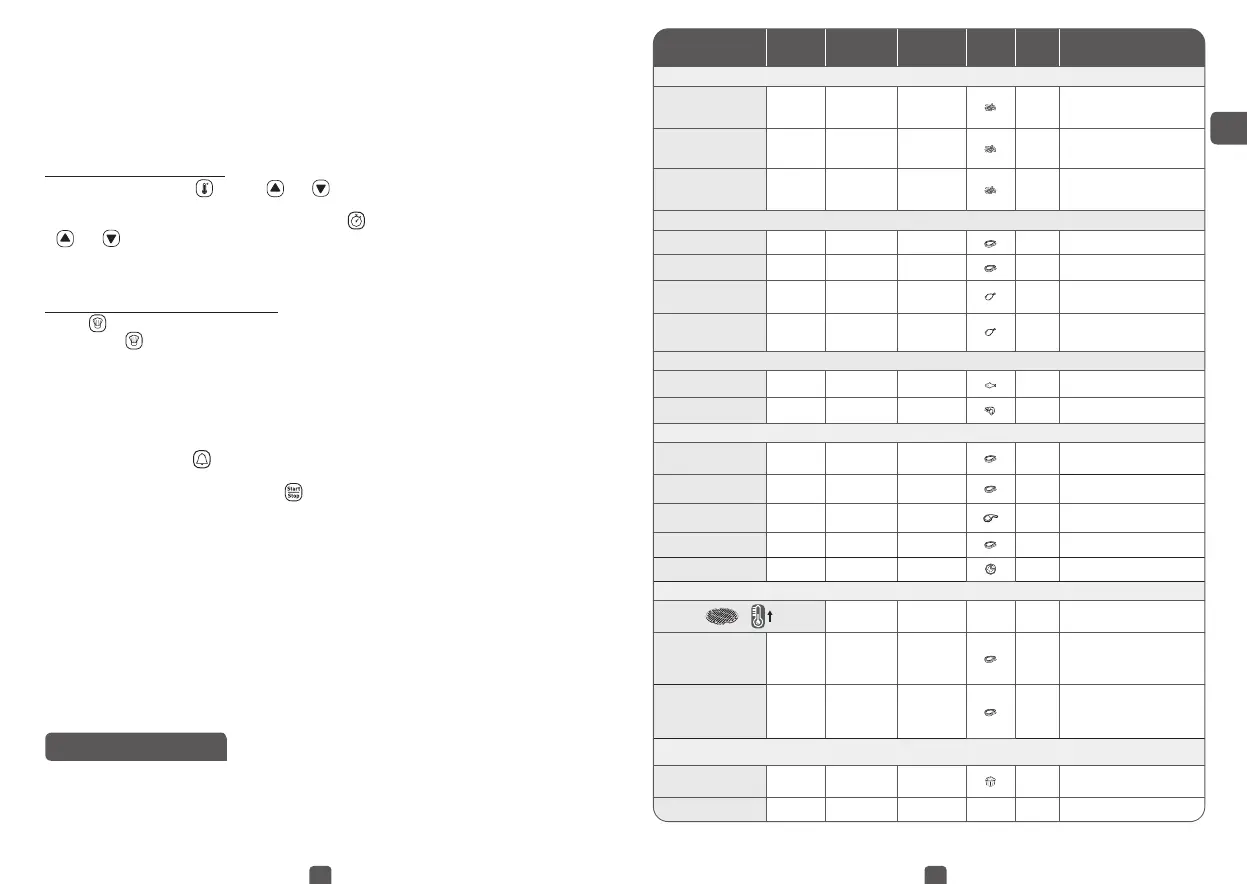
COOKING GUIDE
The table below helps you to select the basic settings for the food you want to prepare.
Note: The cooking times below are only a guide and may vary according to the variety
and batch of potatoes used. For other foods the size, shape and brand may affect results.
Therefore, you may need to adjust the cooking time slightly.
Quantity
Approx Time
(min)
Temperature
(°C /°F)
Cooking
mode
Shake*
Extra
information
Potatoes & fries
Frozen chips (10 mm x
10mm standard thickness)
1000g
1200g
23-25 min
28-30 min
180°C / 350°F
x3
Use the bowl without the grill
plate inside
Homemade French
Fries (8 x 8 mm)
1000g
1200g
23-25 min
28-30 min
180°C / 350°F
x3
Use the bowl without the grill
plate inside
Add 1 tbsp of oil
Frozen
potato wedges
1000g
1200g
17-21 min
21-25 min
200°C / 400°F
x3
Use the bowl without the grill
plate inside
Add 1 tbsp of oil
Meat & Poultry
Frozen steak 5 pcs 15-17 min
180°C / 350°F
Frozen meatballs 600 g 11-13 min
180°C / 350°F
Chicken breast
fillets (boneless)
5 pcs 20-22 min
180°C / 350°F
Chicken (whole)
1600 g 60 min
200°C / 400°F
Use the bowl without
the grill plate inside
Fish
Salmon fillet 4 pcs 14-17 min
140°C / 300°F
Shrimps 12pcs 4 min
170°C / 350°F
Snacks
Frozen chicken nuggets
1500 g 15-17 min
200°C / 400°F
Yes
Use the bowl without
the grill plate inside
Frozen chicken wings
1200 g 15-17 min
200°C / 400°F
Yes
Frozen cheese sticks
500 g 13-15 min
180°C / 350°F
Frozen onion rings
500 g 9-11 min
200°C / 400°F
Yes
Pizza
150-300 g 7-10 min
190°C / 375°F
Grill
= 13 min
200°C / 400°F
Meat 250-300 g
Preheating : 13 min
Cooking : 3 min
200°C / 400°F
You can add oil, aromatic herbs and salt
for better taste.
At mid-cooking, you can return the food.
Chicken 250-300 g
Preheating : 13 min
Cooking : 7 min
200°C / 400°F
You can add oil, aromatic herbs and salt
for better taste.
At mid-cooking, you can return the food.
Baking
Muffins 8 pcs 18-22 min
180°C / 350°F
Use a baking
tin/oven dish**
Chocolate cakes 8 pcs 9-11 min
160°C / 325°F
Note: Never fill the bowl beyond the MAX level mark or exceed the maximum amount
indicated in the table (see into section ‘Cooking Guide’), as this could affect the quality
of the end result.
4. Slide the bowl back into the appliance.
Caution: Do not touch the bowl during use and for some time after use, as it gets very
hot. Only hold the bowl by the handle.
5. To begin cooking, you can select between the automatic cooking mode and the manual
settings.
a. If choosing manual settings:
• Adjust the temperature
with the and buttons on the digital screen. The thermostat
varies from 80-200°C / 180-400°F.
• Then set the desired cooking time by pressing the
button and adjusting the time with the
and buttons. The timer can be set for between 0 and 60 minutes.
• Press the Start button to begin cooking with the selected temperature and time settings.
Cooking starts. The selected temperature and remaining cooking time will alternate on the
screen display.
b. If choosing automatic cooking mode:
• Press
button to display the cooking mode.
• Then press
button on the screen to select the desired cooking mode (these modes are
described in detail in the “Cooking guide” section).
• Confirm the cooking mode by pressing the Start button. This will launch the cooking process.
• Cooking starts. The selected temperature and remaining cooking time will alternate on the
on-screen display.
6. Excess oil from the food is collected in the bottom of the bowl.
7. Some foods require shaking halfway through the cooking time (see section ‘Cooking
Guide’). You can use
to set an alert every 5, 10 or 15 minutes. To shake the food, pull
the bowl out of the appliance by the handle and shake it. Then slide the bowl back into the
appliance and press the Start button
again to restart cooking.
8. When you hear the timer sound, the cooking time set has finished. Pull the bowl out of the
appliance and place it on a heat-resistant surface.
9. Check if the food is ready.
If the food is not ready yet, simply slide the bowl back into the appliance and set the timer
for a few extra minutes.
10. When the food is cooked, take out the bowl. To remove food, use a pair of tongs to lift the
food out of the bowl.
Caution: The bowl should never be turn up side down with the grid.
After hot air frying, the bowl, the grid and the food are very hot. Depending on the type of
food cooked in the appliance, be careful as steam may escape from the bowl.
11.
When a batch of food is ready, the appliance is instantly ready for preparing another batch of food.
Caution:
Never cook French fries with the grid. The grill grid is only to be used to cook meat.
 Loading...