Do you have a question about the Talkaphone ETP-MT and is the answer not in the manual?
Install LED Blue Light on top of tower, feeding wires through. Fasten with tamperproof screws.
Slide LED Panel Light over studs, facing LEDs down. Tighten with hex nuts carefully.
Install hex nut and washer on anchor bolts for airflow and to prevent moisture.
Install tower onto bolts with desired orientation. Secure with hex nuts and washers.
Wire incoming power to LED Blue Light and Panel Light as per voltage specifications.
Connect LED Blue Light auxiliary cables to ETP-400 or VOIP-500 series phones.
Re-attach the access panel over the tower's access opening.
Remove cap plate, pull cables through arm, attach LED Blue Light, and secure arm to tower.
The Talkaphone Tower Parts Kit is designed for the installation of Blue Light Emergency Phone Towers, including models ETP-MT, ETP-MTE, and ETP-MT/R. This kit facilitates the assembly of the tower's essential components, ensuring proper functionality and safety. The installation process involves several key steps, starting with the initial setup of the tower's lighting elements and culminating in the secure mounting and electrical connections.
The primary function of the Tower Parts Kit is to provide the necessary hardware and instructions for assembling the various components of an emergency phone tower. This includes the LED Blue Light, which is mounted on top of the tower to provide a visible signal, and the LED Panel Light, which illuminates the emergency phone area. The kit also includes fasteners and nuts required for securing these components and for mounting the tower itself onto a foundation. The overall goal is to create a fully functional emergency communication point that is easily identifiable and accessible.
The installation process begins with the LED Blue Light, which is designed to be installed on top of the tower. For ETP-MT/R tower series, a cap plate must first be removed to access the mounting area. The LED Blue Light is then fastened using three 10-24 pan head tamperproof screws, which are included in the kit. These screws are designed to deter unauthorized removal or tampering, enhancing the security of the light. After securing the LED Blue Light, the cap plate is replaced, if applicable. It is important to note that power connections for the LED Blue Light are not made at this initial stage.
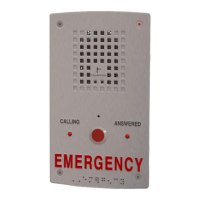
Next, the LED Panel Light is installed. This light slides over existing studs on the tower, with the LEDs facing downwards to illuminate the emergency phone. It is secured using two 6-32 hex nuts, also provided in the kit. Care must be taken not to overtighten these nuts, as excessive force could crack the LED Panel Light. This step ensures that the emergency phone area is well-lit, making it easier for users to locate and operate the phone, especially in low-light conditions.
The tower itself is mounted onto anchor bolts that are pre-installed in the foundation. The kit includes one 3/4"-10 hex nut and one washer for each anchor bolt. These are installed approximately 2.5-3.5 inches above grade, creating a 1/2-inch air gap between the foundation and the tower. This air gap is crucial for promoting airflow and preventing moisture accumulation, which can lead to corrosion and other long-term damage. It is essential to ensure that these nuts are level, maintaining a 0° pitch, to provide a stable and even base for the tower.
Once the tower is positioned, a second set of 3/4"-10 hex nuts and washers are installed on the anchor bolts. The upper nuts are tightened to secure the tower, while the bottom set is used for leveling the tower. This two-stage tightening process allows for precise adjustment of the tower's vertical alignment, ensuring it stands straight and stable.
Electrical connections are a critical aspect of the installation. The incoming power is wired to both the LED Blue Light and the LED Panel Light. The LED Panel Light is versatile, operating on 12VDC up to 120VAC, and is not polarity sensitive, simplifying its wiring. The high voltage LED Blue Light, however, operates specifically on 120VAC, while the low voltage version operates on 12/24VDC or 24VAC only. Installers must refer to the provided wiring diagrams (Figure 2 and Figure 3) to ensure correct connections, matching the power requirements of the specific LED Blue Light model being installed.
For emergency phones, specific wiring instructions apply. When using the ETP-EL Series LED Blue Light with ETP-400 Series Emergency Phones, the orange and black auxiliary control cable pair of the LED Blue Light must be connected to the corresponding orange and black wires of the emergency phone. This connection enables the emergency phone to control the blue light, typically activating it during an emergency call. Installers should consult the emergency phone manual for detailed programming information.
Similarly, when using the ETP-EL Series LED Blue Light with VOIP-500 Series Emergency Phones, the orange and black auxiliary control cable pair of the LED Blue Light connects to positions 3 and 4 (Aux. Output 2) of the 6-pin connector plug of the VOIP-500 Series Phone. This integration ensures seamless operation between the emergency phone and the blue light, enhancing the visibility and functionality of the emergency communication system.
Proper grounding is paramount for the safety and reliable operation of all electrical components. The tower mount must be effectively earth grounded from the grounding stud, located in the electrical box. This grounding should be achieved using 6 AWG or better insulated, stranded copper wire connected to the metallic power service raceway (conduit) or an 8-foot or longer corrosion-resistant ground spike. This step protects against electrical surges and ensures the safety of users and maintenance personnel.
After all electrical connections are made and verified, the access panel over the access opening is re-attached. This panel protects the internal wiring and components from environmental elements and unauthorized access.
For towers requiring an optional arm (OP4 / OP5), the installation process involves additional steps. First, the tower cap plate must be removed. The LED Blue Light and camera cables are then pulled through the hollow arm channel. The LED Blue Light is attached to the arm using three 10-24 tamperproof screws, which are provided in the OP 4 TOWER PTS package. If a camera is being installed, it is attached to the 1.5-inch NPT coupling of the arm. Note that hardware for the camera is not included in this kit. The cables are then pulled into the tower.
Nuts and bolts, provided in the OP 4 TOWER PTS, are used to attach the arm to the tower itself. These bolts are tightened by reaching through the top of the tower. Once the arm is securely fastened, the tower cap plate is replaced. This optional arm installation allows for the integration of additional features like cameras, expanding the functionality of the emergency phone tower.
While the manual primarily focuses on installation, several aspects contribute to the long-term maintenance and durability of the device. The use of tamperproof screws for the LED Blue Light deters vandalism and unauthorized access, reducing the need for frequent repairs due to tampering. The 1/2-inch air gap between the foundation and the tower, created by the specific mounting procedure, is a crucial design feature for preventing moisture-related problems. This gap allows for proper drainage and airflow, minimizing the risk of corrosion and extending the lifespan of the tower's base.
The robust grounding requirements, specifying 6 AWG or better insulated copper wire and an 8-foot or longer corrosion-resistant ground spike, ensure electrical safety and protect the components from lightning strikes and power surges. This robust grounding system reduces the likelihood of electrical failures and the need for costly component replacements.
The clear and detailed wiring instructions, coupled with specific power requirements for different LED lights, help ensure correct installation, which is fundamental to reliable operation and reduced maintenance. Incorrect wiring can lead to component failure, requiring troubleshooting and replacement. By following the guidelines, installers can minimize these issues.
The design of the LED Panel Light, which is secured with hex nuts, allows for relatively easy replacement if it becomes damaged, provided care is taken during removal and installation. The modular nature of the components, such as the LED Blue Light and LED Panel Light, suggests that individual parts can be replaced without having to replace the entire tower, simplifying maintenance and reducing costs.
Overall, the Talkaphone Tower Parts Kit is designed to facilitate a secure, functional, and relatively low-maintenance installation of emergency phone towers, with features that address both immediate operational needs and long-term durability.
| Type | Emergency Phone |
|---|---|
| Model | ETP-MT |
| Mounting | Wall Mount |
| Weight | 5 lbs |
| Material | Stainless Steel |
| Weather Resistance | IP66 |
| Construction | Heavy-duty |
| Operating Temperature | -40°F to 140°F (-40°C to 60°C) |
| Microphone | Noise-canceling |
| Call Initiation | Push Button |
| Compliance | ADA, FCC |