Do you have a question about the Tamiya DT-03 and is the answer not in the manual?
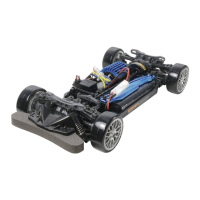
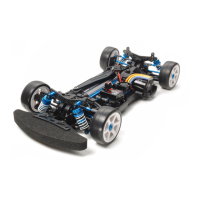
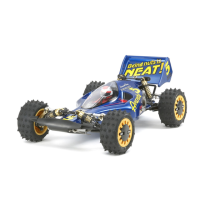
Labels and identifies key parts of the assembled DT-03 chassis.
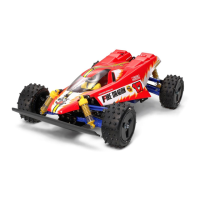
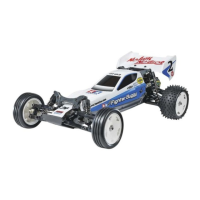
Provides details about the kit being an assembly kit and what is not included.
Information and recommendations for the RC unit and its components.
Details on the specific battery and charger needed for the RC car.
List of essential tools for building the RC car kit.
Important safety guidelines to follow before and during model assembly.
Warnings regarding children, small parts, and safe tool usage during assembly.
Identifies the main components of a 2-channel R/C system.
Details the parts of a stick type R/C transmitter.
Instructions to read the manual thoroughly before starting assembly.
Guidance on applying grease to screws when fitting is tight.
Instructions for charging the Tamiya battery pack with a compatible charger.
Instructions on how to apply sponge tape according to the battery size.
Warnings about solvents affecting plastic and not using thread lock.
Instructions for assembling the main chassis components.
Guidance on how to attach the front stays to the chassis.
Instructions for assembling and attaching the servo saver.
Details on how to install the steering servo correctly.
Procedure for checking and connecting the RC unit components.
Guide to selecting the correct screw for servo horns based on servo type.
Instructions for connecting the steering rods to the chassis and servo.
Procedure for mounting the steering servo onto the chassis.
Steps to assemble the front lower suspension arms.
Instructions for attaching the front lower suspension arms.
Steps for mounting the front upper suspension arms.
Instructions for assembling the front axle components.
Procedure for attaching the assembled front axles.
Instructions for assembling the differential gear unit.
Steps for installing the counter gear into the chassis.
Instructions for assembling the gearbox components.
Steps for installing the motor and its pinion gear.
Instructions for attaching the gearbox cover.
Steps for attaching the rear lower suspension arms.
Instructions for mounting the rear upper suspension arms.
Procedure for attaching the rear axle assemblies.
Instructions for installing the receiver switch.
Instructions for mounting the assembled gearbox unit to the chassis.
A selection of quality tools from Tamiya for model construction.
Instructions for assembling the front shock absorbers.
Instructions for assembling the rear shock absorbers.
Steps for mounting the damper stays to the chassis.
Instructions for installing the front shock absorbers onto the chassis.
Instructions for installing the rear shock absorbers onto the chassis.
Listing of optional upgrade parts available for the RC car.
Details about Tamiya instant cement for rubber tires.
Guide on how to install the RC unit and its components.
Instructions for connecting motor wires and using the receiver dust cover.
Instructions for assembling the tires and wheels.
Steps for mounting the assembled wheels onto the car.
Procedure for installing the running battery pack into the car.
Important safety advice to disconnect the battery when not in use.
Instructions on how to attach the transponder stay to the chassis or body.
Instructions for mounting the rear wing onto the body.
Steps for mounting the car body onto the chassis.
Important safety advice for running the RC car off-road.
Essential safety rules for operating the radio control car.
Step-by-step guide on how to operate the RC car safely.
Instructions for cleaning the car and lubricating moving parts after use.
Guidance on practicing smooth oval driving for better control.
Tips for practicing figure-8 drills and effective cornering techniques.
A guide to diagnose and fix common issues with the RC car.
List of all parts included in the kit, with codes and quantities.
Identification of specific components like motor, antenna pipe, and gears.
Listing of various screws, nuts, washers, and pins.
Details on gears, shafts, axles, and suspension parts.
List of part codes for ordering replacement parts.
Instructions on ordering parts via mail, cash on delivery, or Tamiya card.
Instructions for cutting out the RC car body and wing parts.
Important safety guidelines for cutting and handling body parts.
Instructions for painting the RC car body using Tamiya polycarbonate paints.
Steps for preparing the body and applying paint colors.
Instructions on how to apply stickers to the RC car body.
Details on attaching the transponder holder and wing.
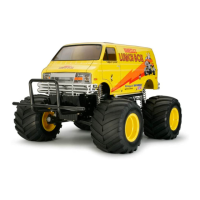
List of parts specifically for the Neo Fighter Buggy body set.
Information on ordering parts and compatibility of tires/wheels.
| Chassis Type | DT-03 |
|---|---|
| Scale | 1/10 |
| Drive | 2WD |
| Motor | 540-type |
| Suspension | 4-wheel independent double wishbone |
| Differential Type | Gear differential |
| Type | Off-road buggy |
| Terrain | Off-road |
| Wheelbase | 287 mm |
| Gear Ratio | 9.28:1 |
| Ground Clearance | 26 mm |
| Weight | Approximately 1.5 kg |
| Shock Absorbers | Friction dampers |