Do you have a question about the Tamiya TT-01 Chassis and is the answer not in the manual?
Specifies the recommended Tamiya radio control system and related components.
Details the required 7.2V racing pack battery and compatible charger.
Provides the dimensional limits for compatible servos.
Explains the transmitter, receiver, ESC, and steering servo functions.
Describes the stick type transmitter and the combined C.P.R. unit.
Instructions for identifying and using parts from Bag A.
Detailed procedure for mounting the spur gear and related components.
Instructions for installing the propeller shaft for the drive system.
Guide to assembling the motor and its associated parts.
Procedure for securely attaching the motor to the chassis.
Detailed steps for assembling the rear differential gear unit.
Instructions for installing the assembled rear differential gear.
Procedure for mounting the rear suspension arms to the chassis.
Guide to assembling the rear axle components.
Detailed instructions for installing the rear bumper.
Procedure for connecting the rear axles to the chassis.
Guide to assembling the front suspension arms.
Detailed steps for assembling the front differential gear unit.
Instructions for installing the assembled front differential gear.
Procedure for mounting the front suspension arms to the chassis.
Detailed instructions for installing the front bumper.
Guide to assembling the front upright components.
Procedure for mounting the front uprights to the chassis.
Detailed steps for assembling the shock absorber units.
Instructions for mounting the assembled dampers onto the chassis.
Guide to assembling the steering linkage components.
Instructions for installing the urethane bumper.
Procedure for mounting the steering arms to the chassis.
Verifies R/C system functionality and sets servo neutral positions.
Guide to mounting the electronic speed controller, receiver, and servo.
Instructions for installing the C.P.R. unit, a combined receiver and ESC.
Advises that the chassis is designed exclusively for on-road use.
Detailed steps for assembling the wheels, including tire mounting.
Instructions for securely mounting the assembled wheels onto the chassis.
Procedure for correctly installing the drive battery into the chassis.
Instructions for fitting the car's body shell onto the chassis.
Guidance on modifying snap pins for secure body attachment.
Step-by-step guide for safely turning the RC car on and off.
Provides tips for practicing driving techniques like cornering and figure-eights.
Lists common issues, their causes, and recommended remedies.
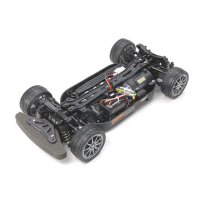
| Chassis Type | TT-01 |
|---|---|
| Drive | 4WD |
| Suspension | 4-wheel independent double wishbone |
| Differential Type | Gear Differential |
| Motor | 540-type |
| Chassis Material | Plastic |
| Scale | 1/10 |
| Wheelbase | 257mm |
| Gear Ratio | 8.35:1 |
| Drive Type | Shaft-driven 4WD |
| Differential | Front and Rear Gear Differential |
| Width | 185mm |
| Required Equipment | 2-channel radio, ESC, servo, 7.2V battery & charger |
| Gear Ratio (with kit-standard pinion and spur gears) | 8.35:1 (varies with pinion gear) |