Do you have a question about the Tarptent Double Rainbow and is the answer not in the manual?
Insert arch pole into yellow sleeve, pointing tip down. Avoid force to prevent damage.
Place pole tips into black end pockets and tighten pockets to secure the arch pole.
Stake out adjacent tent corners as far as possible from the center for even tensioning.
Ensure arch pole is centered before staking out the opposite end corners.
Pull out vestibule doors and stake them to create vestibule space.
Utilize trekking poles or ordered vertical poles to make the tent free-standing.
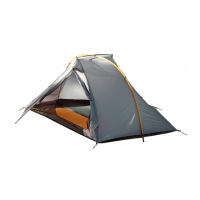
The Tarptent Double Rainbow is a lightweight shelter designed for outdoor use, offering a balance of protection, ventilation, and ease of setup. It is intended for individuals seeking a reliable and adaptable shelter for various weather conditions.
The primary function of the Double Rainbow is to provide shelter from the elements, including rain, wind, and sun. It achieves this through a tent body with a bathtub floor, a top strut pole, and an arch pole that create a stable structure. The design incorporates features for enhanced ventilation, rain protection, and adaptability to different terrains. The shelter can be pitched in a traditional staked-out manner or as a free-standing unit using trekking poles or dedicated support poles.
Setting up the Double Rainbow is designed to be straightforward, typically taking 2-3 minutes once familiar with the process. The initial step involves spreading out the tent body with the black bathtub floor facing the ground. If a ground sheet is used, it should be laid down first. Six stakes are provided and should be ready for placement in the guyline loops – two in front, two in back, and two for the vestibule doors. It's crucial to ensure that the floor corners are clipped above the corresponding fly line tightener to ensure the bathtub floor is correctly tensioned.
The 24-inch (61 cm) top strut pole is then assembled and inserted into grommets at the top of the canopy. The assembled arch pole is inserted into the yellow arch pole sleeve, with the pole tip pointed downwards to facilitate smooth sliding. Users are advised not to force the pole, as this could damage the pole or fabric. Once inserted, the pole tips are placed into the black end pockets, and the pockets are tightened to secure the arch pole.
After the arch pole is secured, the tent corners are staked out by placing stakes through the guyline loops. These stakes should be placed as far as possible from the center of the tent to ensure even tensioning. The process is repeated at the other end of the tent, ensuring the arch pole is centered before staking. For additional space, the vestibule doors can be pulled out and staked. The bathtub end walls can be lifted from the interior using a clip located above the head and foot ends of the shelter, providing more internal volume.
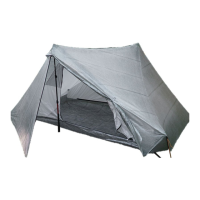
The Double Rainbow can be set up as a free-standing shelter using trekking poles or optional vertical support poles. For this configuration, the poles should be adjusted to a minimum height of 55 inches (140 cm). A closed velcro loop at the end of the arch sleeve is opened and then re-secured snugly around the middle of the trekking pole. The tent corners feature either a pocket for the pole handle or a "finger" to hold the pole tip. The handle is placed in the "pocket," and the pole tip in the "finger." This process is repeated for the other end of the tent. If needed, the vestibule doors can be tensioned with guylines to complete the free-standing setup.
For rain protection and enhanced ventilation, a rain porch can be created. This involves unzipping the vestibule door, revealing a piece of connecting fabric near the top of the zipper. This fabric is unrolled and attached to the other side of the vestibule door. Trekking poles are angled approximately 40 inches (102 cm) off the ground, with their tips placed on each side of the extended vestibule door. Extra guylines are used to stake down the raised vestibule doors, forming an extended entrance that offers both rain protection and ventilation.
To further improve ventilation, the vestibule door can be partially unzipped, and its edge secured with a velcro tab. The exterior arch pole tension strap can be relaxed, and the interior sleeve edge lifted and slid up. An elastic loop is then secured to a higher clip on the sleeve.
Ventilation and fabric warmth are key to minimizing condensation. Users are encouraged to keep doors open when possible, set up in breezy locations, and keep the "beaks" (or at least partially rolled up) open. Camping under trees, where it tends to be warmer, and setting up above river valleys or lake basins can help avoid cool, damp microclimates. Nylon fabric, used in the shelter, can stretch and sag with increased humidity, especially as night falls or when it rains. Line tighteners are provided to re-tension the fabric and maintain shelter tautness.
A critical maintenance step for the Double Rainbow is seam-sealing with silicone before its first use in the field. This process ensures the shelter is waterproof. The recommended procedure involves setting up the shelter in a cool, dry, and well-ventilated area. A sealant is prepared by mixing approximately 3 tablespoons of silicone with about 6 tablespoons of mineral spirits (paint thinner) or Coleman fuel/white gas in a disposable receptacle, stirring until it reaches the consistency of thick olive oil.
Using a small foam brush or rolled-up paper towel, the solution is painted onto the seams from the outside of the shelter. Wiping a paper towel across the seams after application helps push the solution into the fabric. Additionally, it is recommended to paint several thick lines of silicone onto the interior floor of the shelter to create an anti-skid mat, which can prevent sleeping pads or gear from sliding.
Users are reminded to push, rather than pull, the poles through the sleeves to prevent pole section separation, which can occur with excessive force. The tent is made of strong, lightweight, and flammable fabric, and should be treated with care to ensure its longevity.
| Category | Tent |
|---|---|
| Manufacturer | Tarptent |
| Model | Double Rainbow |
| Capacity | 2-person |
| Number of Doors | 2 |
| Number of Poles | 1 |
| Pole Material | Aluminum |
| Material | Silnylon |
| Floor Dimensions | 50 x 88 in (127 x 224 cm) |
| Packed Size | 18 x 4 in (46 x 10 cm) |