Do you have a question about the Tarptent StratoSpire Li and is the answer not in the manual?
Spread canopy floor-side down, prepare stakes, and set trekking poles to 125cm/49in.
Stake one vestibule door side taut, leave cording, insert pole handle-first through vent into grommet.
Pull canopy ridgeline out, insert second pole through other vent, stake opposite door corners taut.
Restake corners for a rectangle shape, ensure flat sides and taut ridgeline.
Pull out Pitchloc strut corners firmly, stake through plastic loop, and tighten fabric with line tighteners.
Unzip doors, adjust floor straps for even tension, and attach apex guylines for ridgeline tension.
Stake guylines separately midway between door stakes for optimal ridgeline tension.
Unclip interior from fly, spread on ground, stake all 4 corners on the black floor side.
Retie apex guylines to door zipper hooks and insert pole tips into elastic loops.
Stake the two trekking poles to tension the interior canopy structure.
Use tension straps to lower effective height and widen floor for two wide sleeping pads.
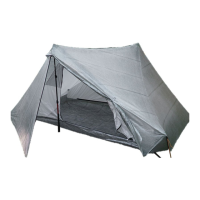
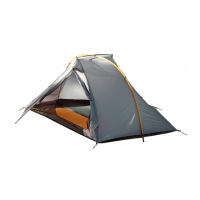
The Tarptent StratoSpire Li is a lightweight, two-person tent designed for various outdoor conditions, from mild weather to snow and wind. It features a unique structure that allows for versatile setup options and enhanced performance.
The StratoSpire Li serves as a shelter for two individuals, offering protection from the elements. Its primary function is to provide a waterproof and wind-resistant enclosure for sleeping and storing gear. The tent's design emphasizes ventilation to minimize condensation and structural integrity to withstand challenging weather, including snow loads. It can be set up as a full tent with an inner compartment or as a standalone fly or inner compartment, offering flexibility for different trips and conditions.
While specific dimensions and weight are not explicitly listed in the provided text, the manual indicates that trekking poles should be set to approximately 125cm/49in for setup, suggesting the tent is designed to be supported by standard trekking poles. The fabric is described as "fully taped and waterproof," indicating high-quality construction for weather resistance. The tent is made of a material that is resistant to stress but not flame or abrasion, implying a lightweight yet durable fabric, likely a silnylon or similar high-performance material, given the "Li" designation often associated with ultralight lithium-ion battery technology or lightweight materials.
The setup process is designed to be quick and intuitive, estimated at about 2 minutes after a few practice runs.
The inner compartment is detachable and attaches to the outer fly structure using loops and clips. Both the outer fly and inner compartment can be used standalone.
The StratoSpire Li is "fully taped and waterproof," meaning it comes pre-sealed and should not require additional seam sealing by the user. Small holes and tears can be easily patched with seam tape. Users are advised to contact Tarptent for assistance if needed.
Effective ventilation and fabric warmth are the primary defenses against condensation. Users are encouraged to keep doors open as much as possible and to set up the tent in breezy locations. Looking for warmer and drier microclimates (under trees, out of valleys and lake basins) can also help.
If stakes loosen in windy or soft soil conditions, or under wind load, the perimeter line tighteners and/or boosting trekking poles from inside can be used to tighten the fabric.
For support or inquiries, Tarptent can be reached at: 12213 Koswyn Ct. Nevada City, CA 95959 USA e-mail: info@tarptent.com ph: 650-587-1548