TX / TXH / TXB 180S - 400L (Rev. 4/23/07)TX / TXH / TXB 180S - 400L (Rev. 4/23/07)
15-415-4
30-35 ft-lbs (41-48 N30-35 ft-lbs (41-48 N⋅⋅m).m).
7.7. PosPositiition thon the true truck wck with a rith a rateated load load on ad on a
15 percent grade (15 feet rise over 100 feet15 percent grade (15 feet rise over 100 feet
distance). distance). Apply the Apply the parking brake parking brake to ensureto ensure
that it will hold the truck with a rated load on athat it will hold the truck with a rated load on a
15 percent grade.15 percent grade.
Parking Brake AdjustmentParking Brake Adjustment (Illustrations 15-4(Illustrations 15-4
thru 15-6)thru 15-6).. Perform the following procedures toPerform the following procedures to
adjustment the parking brake:adjustment the parking brake:
Death or serious injury couldDeath or serious injury could
result from result from a runaway truck. a runaway truck. Park the truck Park the truck onon
1.1. ParPark the trk the truck on a hauck on a hard, lerd, level svel surfurfaceace, blo, blockck
the wheels of the truck in both directions,the wheels of the truck in both directions,
place the parking brake in the released posi-place the parking brake in the released posi-
tion and Lock Out &Tag Out the truck.tion and Lock Out &Tag Out the truck.
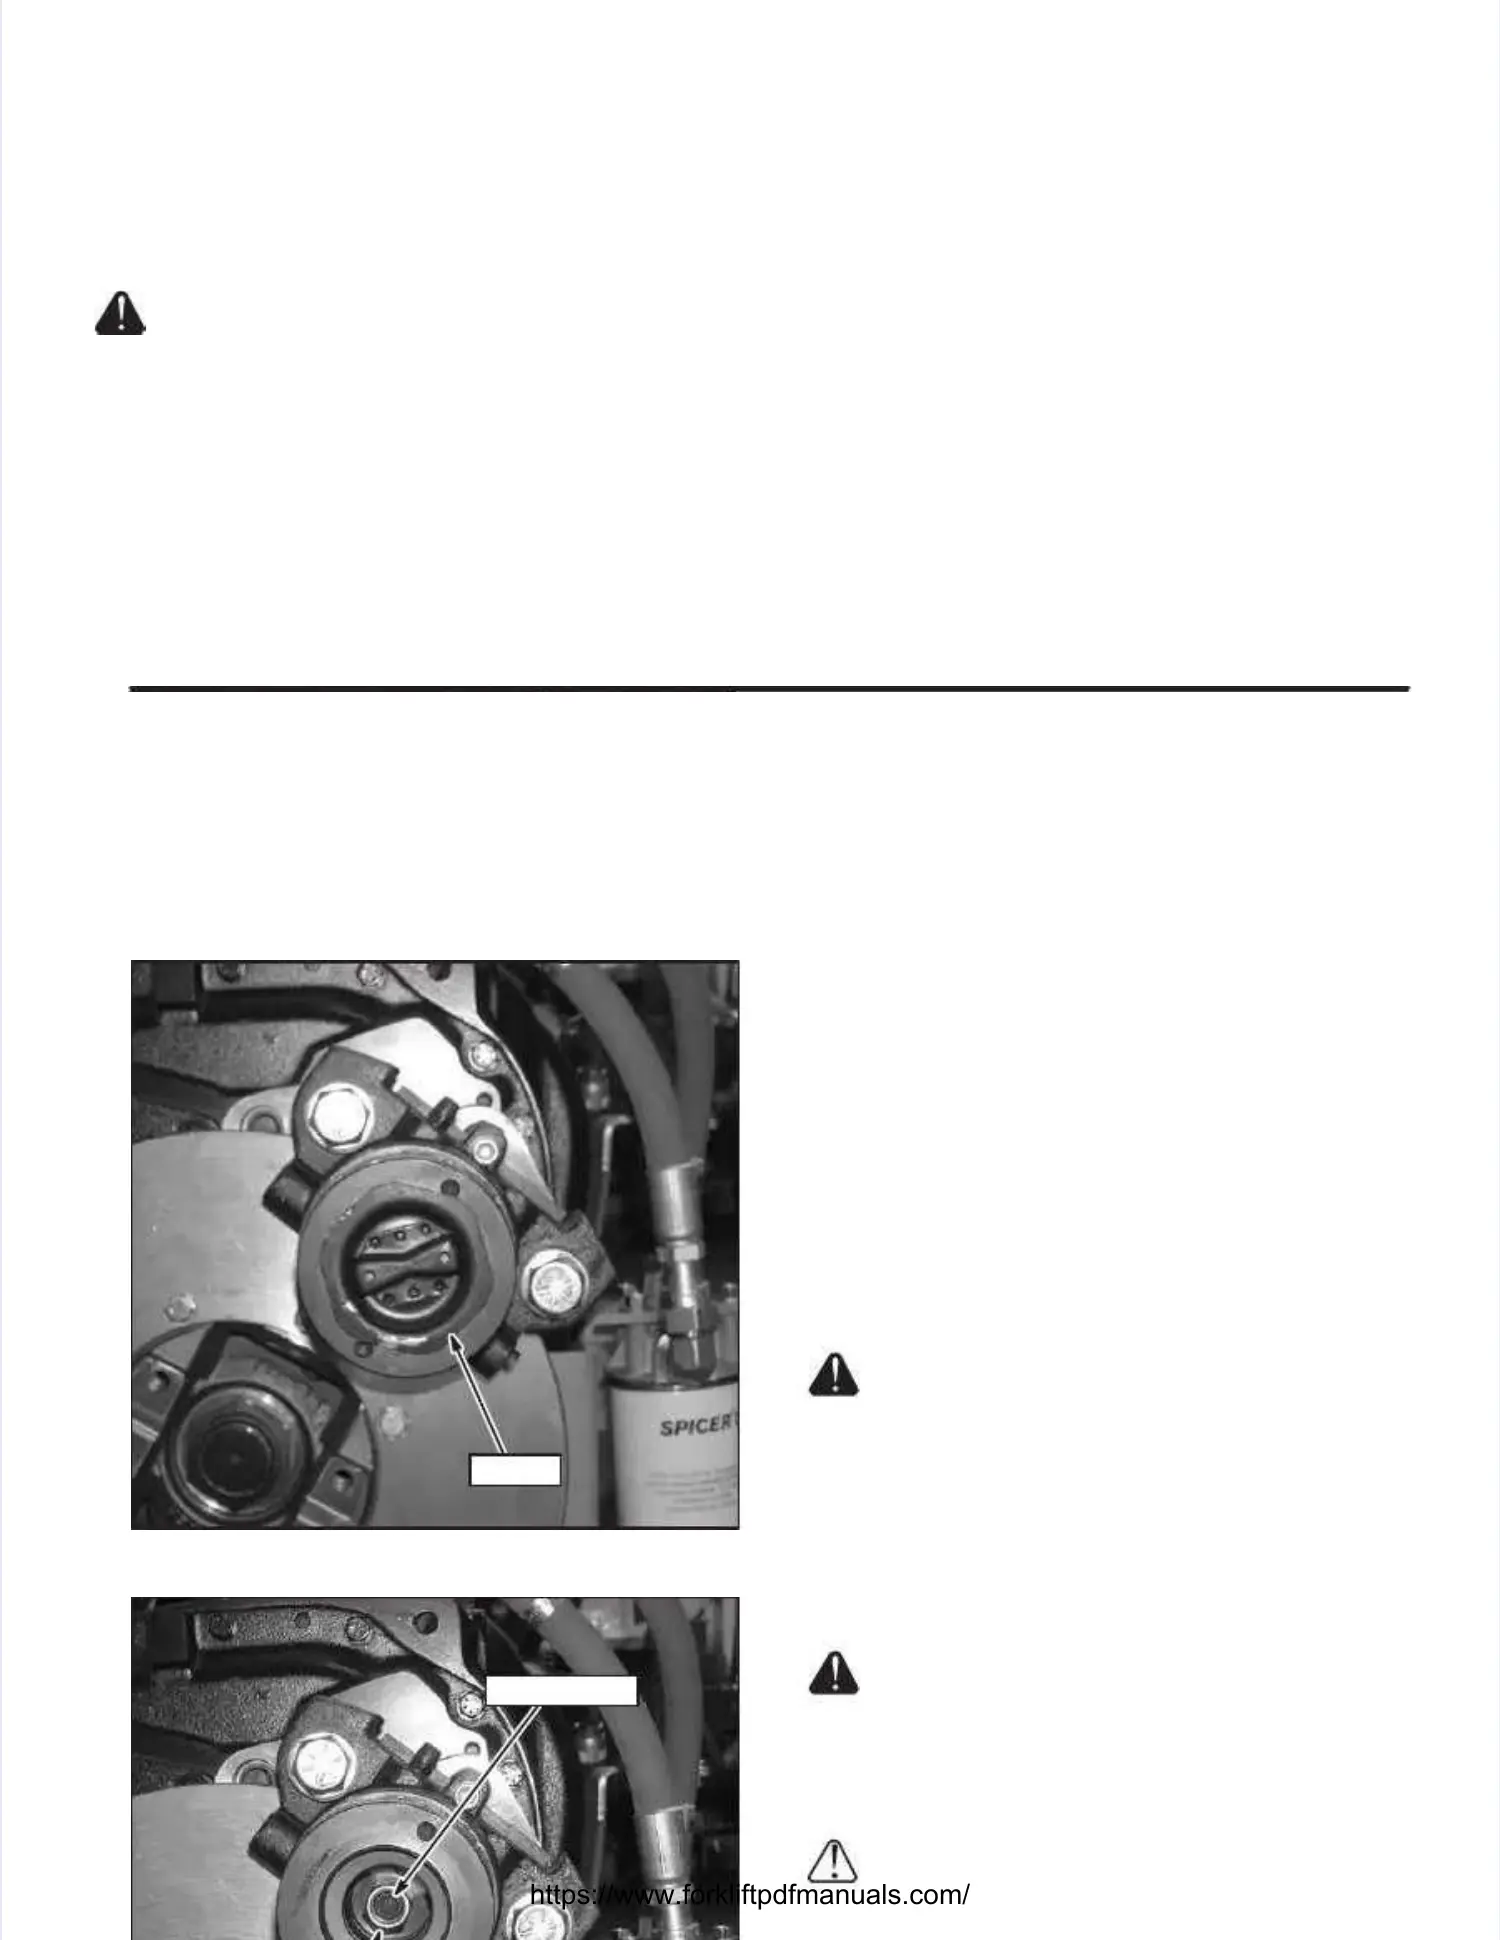
2.2. RemRemove thove the plug (e plug (see Isee Illullustrstratiation 15-on 15-5).5).
3.3. Loosen Loosen the the couplicoupling nng nut (ut (see see IllustIllustration ration 15-6).15-6).
4.4. Set rSet runniunning clng clearearancance bete betweeween the din the disc ansc andd
the lining surface by turning the set screw untilthe lining surface by turning the set screw until
a 0.020 - 0.030 inch (0.51-0.76 mm) thick shima 0.020 - 0.030 inch (0.51-0.76 mm) thick shim
just fits between the just fits between the lining and the lining and the disc surfacedisc surface
when the opposite lining is in contact with thewhen the opposite lining is in contact with the
disc.disc.
5.5. TTorque thorque the coue coupling pling nut tnut to 50-o 50-55 ft55 ft-lbs -lbs (68-75(68-75
NN⋅⋅m), while holding the set screw in position.m), while holding the set screw in position.
6.6. Re-Re-insinstaltall the pll the plug and tug and torqorque to 45ue to 45-50 ft-50 ft-lb-lbss
(61-68 N(61-68 N⋅⋅m).m).
PLUGPLUG
Illustration Illustration 15-5. 15-5. Parking Brake Parking Brake (Plug Installed)(Plug Installed)
SETSCREWSETSCREW
Illustration 15-4). Illustration 15-4). Loosen the Loosen the outer hex outer hex nutnut
(18) and place a 0.010 - 0.015 inch thick shim(18) and place a 0.010 - 0.015 inch thick shim
between the lining and the disc surface.between the lining and the disc surface.
Adjust the socket head Adjust the socket head cap screw (17) ucap screw (17) untilntil
the clearance between the shim is eliminated.the clearance between the shim is eliminated.
8.8. TTighighten tten the outhe outer hex ner hex nuts (uts (18) t18) to como complepletete
the centering operation. the centering operation. TTorque the two orque the two hexhex
nuts (18) against each other to a torque ratingnuts (18) against each other to a torque rating
of 30-35 ft-lbs (41-48 Nof 30-35 ft-lbs (41-48 N⋅⋅m).m).
9.9. Re-Re-adjadjust tust the brahe brake whke when then the runne running cing clealear-r-
ance reaches a total of 0.100 inch (2.5 mm).ance reaches a total of 0.100 inch (2.5 mm).
Wet Disc Brake BleedingWet Disc Brake Bleeding (Illustrations 14-1(Illustrations 14-1andand
14-2)14-2).. Bleeding the wet disc brake systemBleeding the wet disc brake system
requires two servicemen; one to operate the ser-requires two servicemen; one to operate the ser-
vice brake pedal, and another to open and closevice brake pedal, and another to open and close
the bleeder valves the bleeder valves on the drive on the drive axle. axle. Perform thePerform the
following procedures to bleed the service brakes:following procedures to bleed the service brakes:
Death, serious injury orDeath, serious injury or
property damage could result from notproperty damage could result from not
bleeding the bleeding the wet disc brwet disc brakes. akes. The wet diThe wet discsc
brakes must be bled to remove all air from thebrakes must be bled to remove all air from the
system when any brake system hydraulicsystem when any brake system hydraulic
connection hconnection has been as been loosened. loosened. Air canAir can
prevent hydraulic pressure from applying theprevent hydraulic pressure from applying the
brakes correctly and can increase stoppingbrakes correctly and can increase stopping
distance.distance.
Death or serious injury couldDeath or serious injury could
result from result from a runaway truck. a runaway truck. Park the truck Park the truck onon
a hard, level surface, apply parking brake anda hard, level surface, apply parking brake and
block the wheels of the truck in both directionsblock the wheels of the truck in both directions
to prevent movement.to prevent movement.
Do not reuse used hydraulicDo not reuse used hydraulic
fluid. fluid. Used hydraulic Used hydraulic fluid can fluid can be contami-be contami-
nated and can cause incorrect operation.nated and can cause incorrect operation.
 Loading...